Difference between revisions of "Backing up your Database"
Robmatthews (Talk | contribs) |
Jvankooten (Talk | contribs) |
||
| Line 1: | Line 1: | ||
| − | + | == Backing up/Restoring your database == | |
| − | |||
| − | |||
| − | + | Backing up your database can be a valuable resource in case of a hard drive crash or virus on your computer. This will allow you to create a copy of your DLS account database so it can be stored in another location (Remote server/Backup DVD or CD/Thumb drive/Etc.) protecting it for future use. Also with DLS 5 v1.3+ it has the feature of creating scheduled backup copies so you will have recent backup copies which can be run on a daily, weekly or monthly basis. To start we will show you the process of creating a onetime manual backup copy and then show you the process of creating a scheduled back up. | |
| − | |||
| − | |||
| − | |||
| − | |||
| − | |||
| − | |||
| − | |||
| − | + | == Onetime Database Backup: == | |
| + | |||
| + | |||
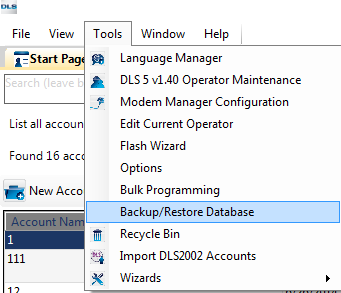
| + | 1. With the DLS software open click on tools and then Backup/Restore Database: | ||
| + | |||
| + | [[File:BackupTools.png]] | ||
| + | |||
| + | |||
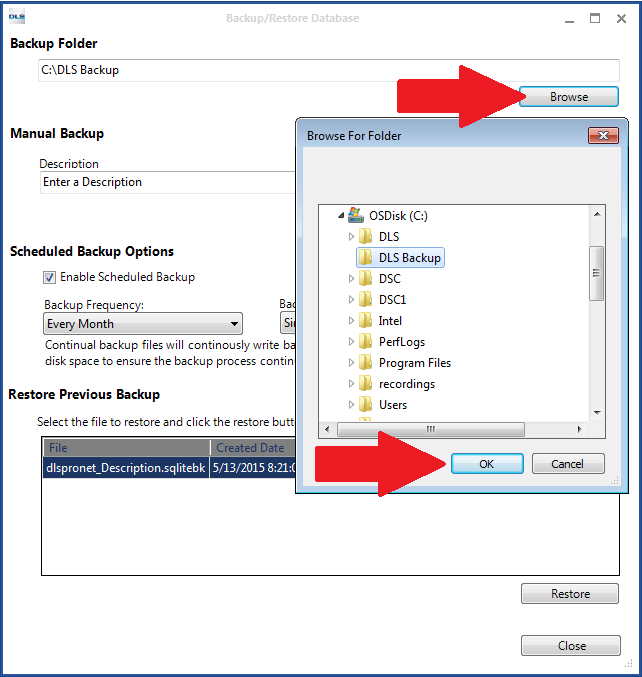
| + | 2. With the new window open (Backup/Restore Database) you would want to click on “Browse” under Backup Folder and find the location where you would like to save the backup copy of your database and click ok: | ||
| + | |||
| + | [[File:BackupFolder.png]] | ||
| + | |||
| + | |||
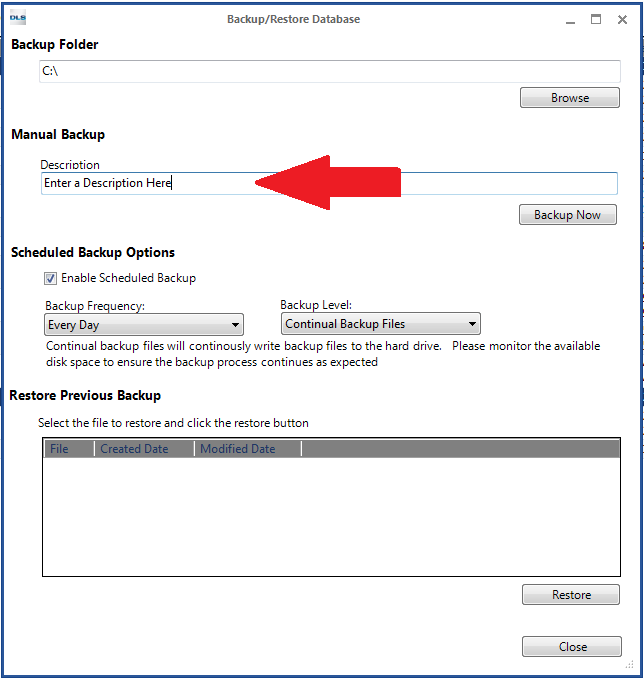
| + | 3. If you wish to add a description of the backup file you may enter that under “Description” below Manual Backup: | ||
| + | |||
| + | [[File:BackupDescription.png]] | ||
| + | |||
| + | |||
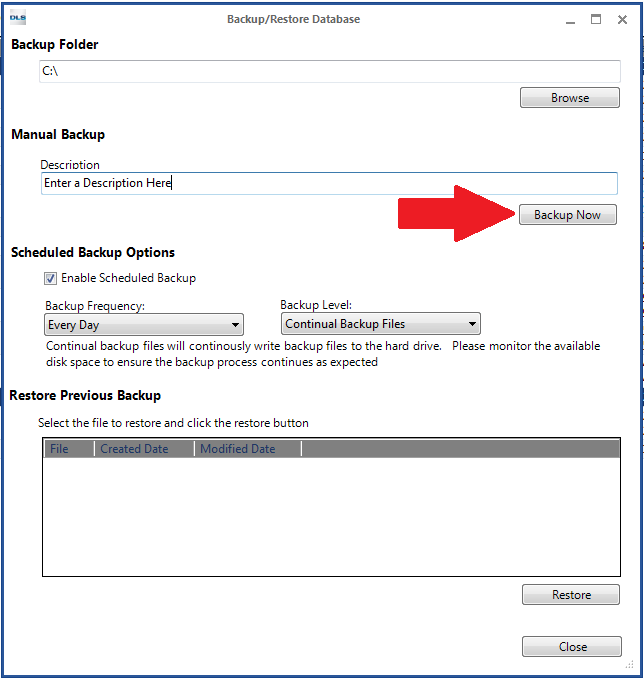
| + | 4. Once ready to create the backup copy of the database click on the “Backup Now” button: | ||
| + | |||
| + | [[File:BackupNow.png]] | ||
| + | |||
| + | |||
| + | |||
| + | [[File:BackupProgress.png]] | ||
| + | |||
| + | Please note: This process can take a while to complete depending on how many accounts you have within DLS. Do not turn off your computer or try to shutdown DLS during this process. | ||
| + | |||
| + | |||
| + | |||
| + | == Scheduled Database Backup: == | ||
| + | |||
| + | |||
| + | 1. With the DLS software open click on tools and then Backup/Restore Database: | ||
| + | |||
| + | [[File:BackupTools.png]] | ||
| + | |||
| + | |||
| + | 2. With the new window open (Backup/Restore Database) you would want to click on “Browse” under Backup Folder and find the location where you would like to save the backup copy of your database and click ok: | ||
| + | |||
| + | [[File:BackupFolder.png]] | ||
| + | |||
| + | |||
| + | 3. Under “Scheduled Backup Options” enable the option for scheduled backups by placing a checkmark beside “Enable Scheduled Backup” and using the drop down menu under “Backup Frequency” choose how often you would like the backup process to run. Following that you are able to pick between either a single backup file or continual backup files under the “Backup Level” drop down menu. If you chose the single file option the one file will be modified with each scheduled backup while a continual backup files option will create a new file for each scheduled backup: | ||
| + | |||
| + | [[File:BackupSchedule.png]] | ||
| + | |||
| + | |||
| + | Please note: If you chose the continual backup files option make sure to monitor the available disk space of the storage media you are saving the backed up database to as it will continue to write new backup files to that drive. | ||
| + | |||
| + | |||
| + | Please Note: The database you backup will only be compatible with the same version DLS 5 software that you are running. Example: If you backup your database in DLS 5 v1.3 it would NOT be compatible with DLS 5 v1.4 | ||
| + | |||
| + | |||
| + | |||
| + | |||
| + | |||
| + | == Restoring a Database == | ||
| + | |||
| + | |||
| + | After you have backed up your database you may come across a time when you would need to restore it either from a hard drive crash or a new computer install. In order to do so you would need to have a copy of the database that you have backed up as well as the same version DLS 5 installation from the database you backed up (Example: If you backed up a DLS 5 v1.3 database you would require DLS 5 v1.3 installed on the computer you are trying to restore on). | ||
| + | |||
| + | 1. With the DLS software open click on tools and then Backup/Restore Database: | ||
| + | |||
| + | [[File:BackupTools.png]] | ||
| + | |||
| + | |||
| + | 2. With the new window open (Backup/Restore Database) you would want to click on “Browse” under Backup Folder and select the location where the backed up copy of the database is stored and click ok” | ||
| + | |||
| + | [[File:BackupFolder.png]] | ||
| + | |||
| + | |||
| + | 3. Once you have selected that destination where the backup database is stored the list under “Restore Previous Backup” should be populated with any backup databases it finds. At this point you would want to select which database you would like to restore from, making sure that it is highlighted and then click the “Restore” button. | ||
| + | |||
| + | [[File:BackupRestore.png]] | ||
| + | |||
| + | |||
| + | 4. When it prompts you if you wish to restore the database you would want to choose yes at that time if all the information is correct. The software will then go through the process of restoring the accounts from that database: | ||
| + | |||
| + | [[File:BackupRestore2.png]] | ||
| + | |||
| + | |||
| + | Please note: This process can take a while to complete depending on how many accounts you have within DLS. Do not turn off your computer or try to shutdown DLS during this process. | ||
Latest revision as of 00:04, 26 May 2015
Contents
Backing up/Restoring your database
Backing up your database can be a valuable resource in case of a hard drive crash or virus on your computer. This will allow you to create a copy of your DLS account database so it can be stored in another location (Remote server/Backup DVD or CD/Thumb drive/Etc.) protecting it for future use. Also with DLS 5 v1.3+ it has the feature of creating scheduled backup copies so you will have recent backup copies which can be run on a daily, weekly or monthly basis. To start we will show you the process of creating a onetime manual backup copy and then show you the process of creating a scheduled back up.
Onetime Database Backup:
1. With the DLS software open click on tools and then Backup/Restore Database:
2. With the new window open (Backup/Restore Database) you would want to click on “Browse” under Backup Folder and find the location where you would like to save the backup copy of your database and click ok:
3. If you wish to add a description of the backup file you may enter that under “Description” below Manual Backup:
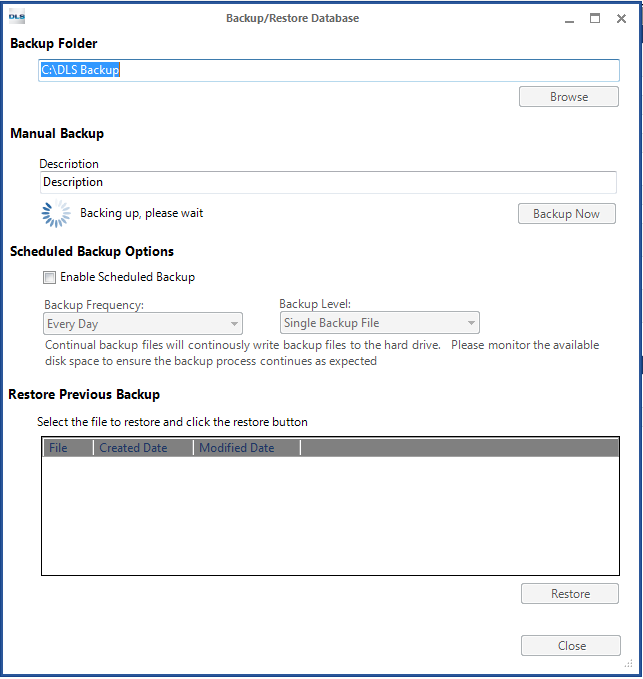
4. Once ready to create the backup copy of the database click on the “Backup Now” button:
Please note: This process can take a while to complete depending on how many accounts you have within DLS. Do not turn off your computer or try to shutdown DLS during this process.
Scheduled Database Backup:
1. With the DLS software open click on tools and then Backup/Restore Database:
2. With the new window open (Backup/Restore Database) you would want to click on “Browse” under Backup Folder and find the location where you would like to save the backup copy of your database and click ok:
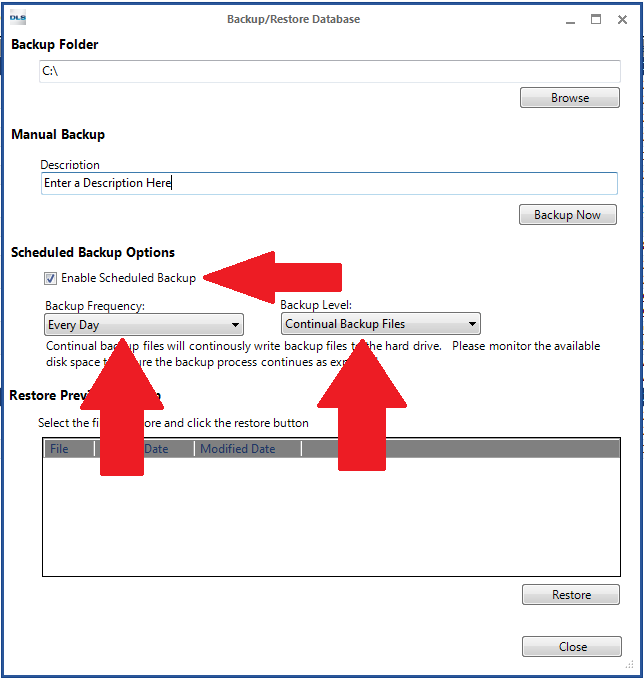
3. Under “Scheduled Backup Options” enable the option for scheduled backups by placing a checkmark beside “Enable Scheduled Backup” and using the drop down menu under “Backup Frequency” choose how often you would like the backup process to run. Following that you are able to pick between either a single backup file or continual backup files under the “Backup Level” drop down menu. If you chose the single file option the one file will be modified with each scheduled backup while a continual backup files option will create a new file for each scheduled backup:
Please note: If you chose the continual backup files option make sure to monitor the available disk space of the storage media you are saving the backed up database to as it will continue to write new backup files to that drive.
Please Note: The database you backup will only be compatible with the same version DLS 5 software that you are running. Example: If you backup your database in DLS 5 v1.3 it would NOT be compatible with DLS 5 v1.4
Restoring a Database
After you have backed up your database you may come across a time when you would need to restore it either from a hard drive crash or a new computer install. In order to do so you would need to have a copy of the database that you have backed up as well as the same version DLS 5 installation from the database you backed up (Example: If you backed up a DLS 5 v1.3 database you would require DLS 5 v1.3 installed on the computer you are trying to restore on).
1. With the DLS software open click on tools and then Backup/Restore Database:
2. With the new window open (Backup/Restore Database) you would want to click on “Browse” under Backup Folder and select the location where the backed up copy of the database is stored and click ok”
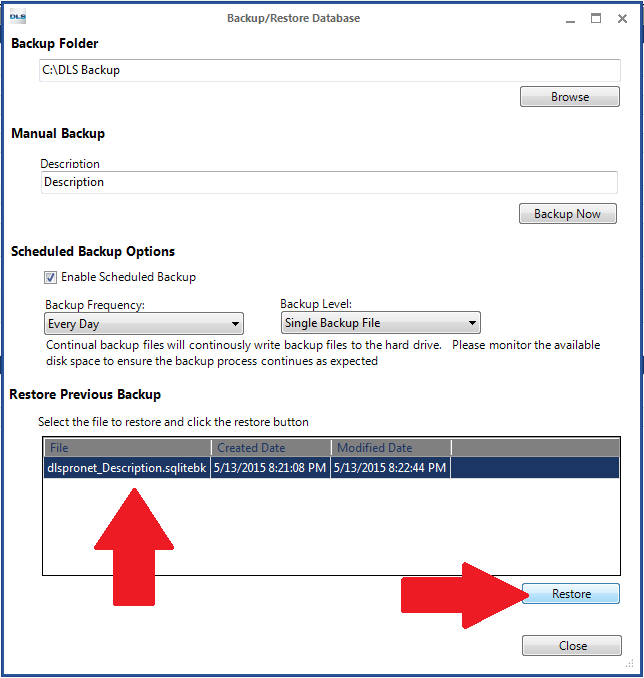
3. Once you have selected that destination where the backup database is stored the list under “Restore Previous Backup” should be populated with any backup databases it finds. At this point you would want to select which database you would like to restore from, making sure that it is highlighted and then click the “Restore” button.
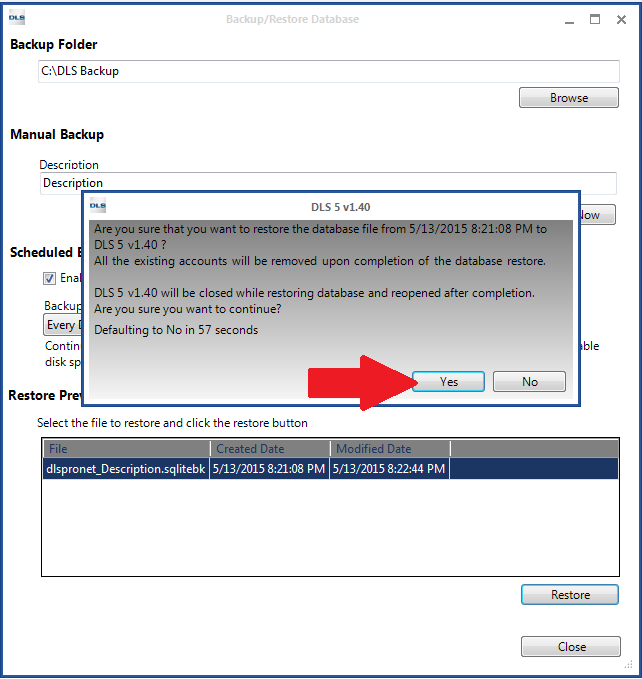
4. When it prompts you if you wish to restore the database you would want to choose yes at that time if all the information is correct. The software will then go through the process of restoring the accounts from that database:
Please note: This process can take a while to complete depending on how many accounts you have within DLS. Do not turn off your computer or try to shutdown DLS during this process.
