Difference between revisions of "Communication Tutorial - Alarm.Com"
Jvankooten (Talk | contribs) (→Computer Network Configuration) |
Jvankooten (Talk | contribs) |
||
| Line 127: | Line 127: | ||
| − | After creating the account or adding the communicator to the account you would then be able to connect to the panel. To do so you would want to open the account and do your regular connection options (Global Upload/Global Download/Communicate Tags/Connect Only) and when the new window opens instead of picking PC-Link for the connection type you would want to drop down the menu and pick | + | After creating the account or adding the communicator to the account you would then be able to connect to the panel. To do so you would want to open the account and do your regular connection options (Global Upload/Global Download/Communicate Tags/Connect Only) and when the new window opens instead of picking PC-Link for the connection type you would want to drop down the menu and pick Alarm.Com. You can then click ok to try to connect to the panel as long as all other relevant information is set (Downloading Access Code / Panel ID Code). For more information on connection options please view the page on Connection Options. |
To view that status of your connection jobs or to see if the software had a trouble condition when trying to connect you can click on view and then communication jobs. This will display the status of the jobs on your system and if any are showing up in red you can view what trouble the software had under the activity log. For more information on the communication job window please visit the Communication Job page. | To view that status of your connection jobs or to see if the software had a trouble condition when trying to connect you can click on view and then communication jobs. This will display the status of the jobs on your system and if any are showing up in red you can view what trouble the software had under the activity log. For more information on the communication job window please visit the Communication Job page. | ||
Revision as of 01:30, 2 September 2015
An SMS connection through Alarm.Com is when you are connecting to a panel through an Alarm.Com communicator that is connected to the panel (Ex. 3G8080AT, CD8080VZ, Etc) using the DLS software. In order to connect to the panel you will require an internet connection, your Alarm.Com Dealer username/password as well as 7-digit customer ID for the account that you would like to connect to. The Alarm.Com username/password must have at least ‘Installer’ level of permission. When you initiate a connection with the panel the software will communicating using the short message service over the GSM or CDMA network so that you are able to remotely program the panel.
Contents
Creating an account for an Alarm.Com Connection
When initially creating an account within DLS you are prompted to select a connection type after choosing the panel type. In this location you would want to select the appropriate Alarm.Com communicator and following that you will be able to enter the required information to connect.
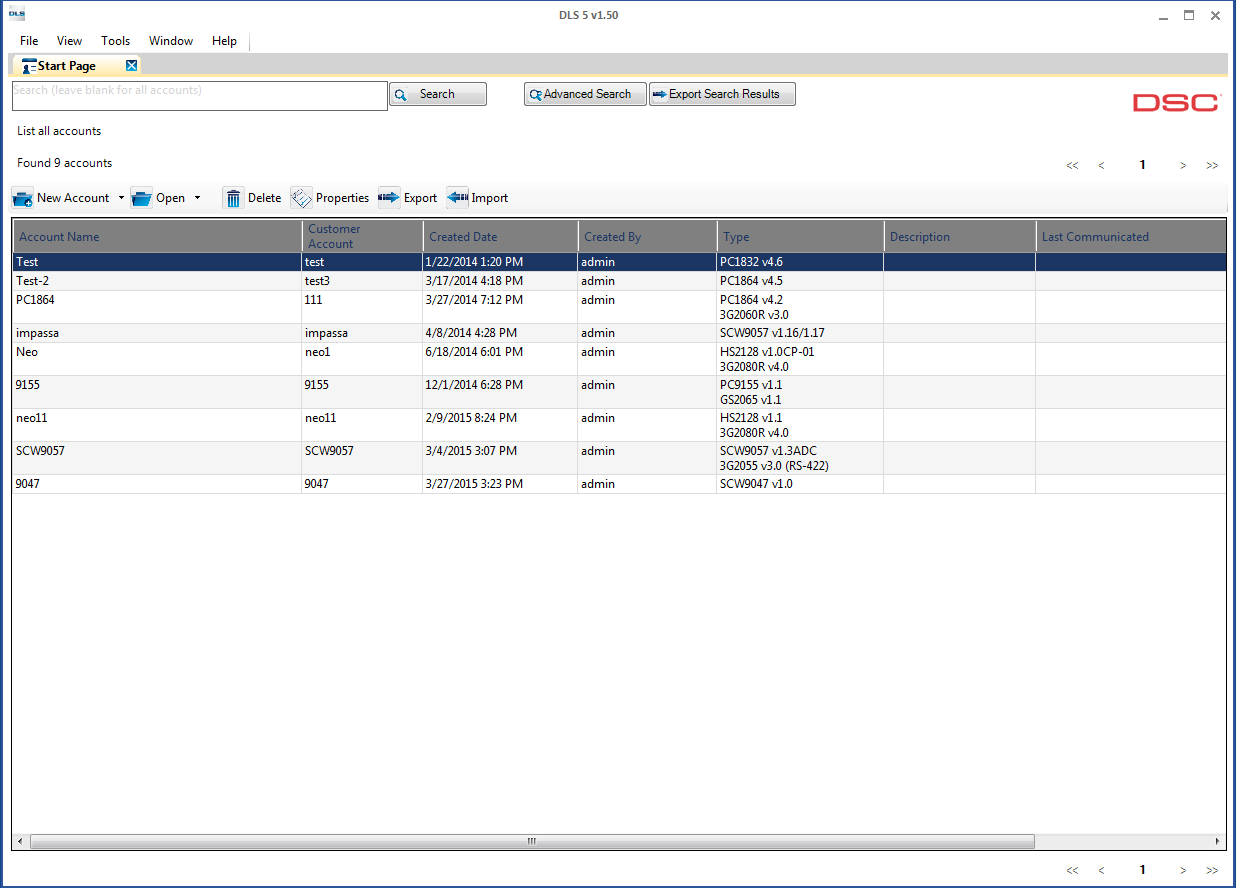
When only using an Alarm.Com connection to connect to the panel you would want to start off by creating the account; to do so we would want the DLS software open and be viewing the main start page.
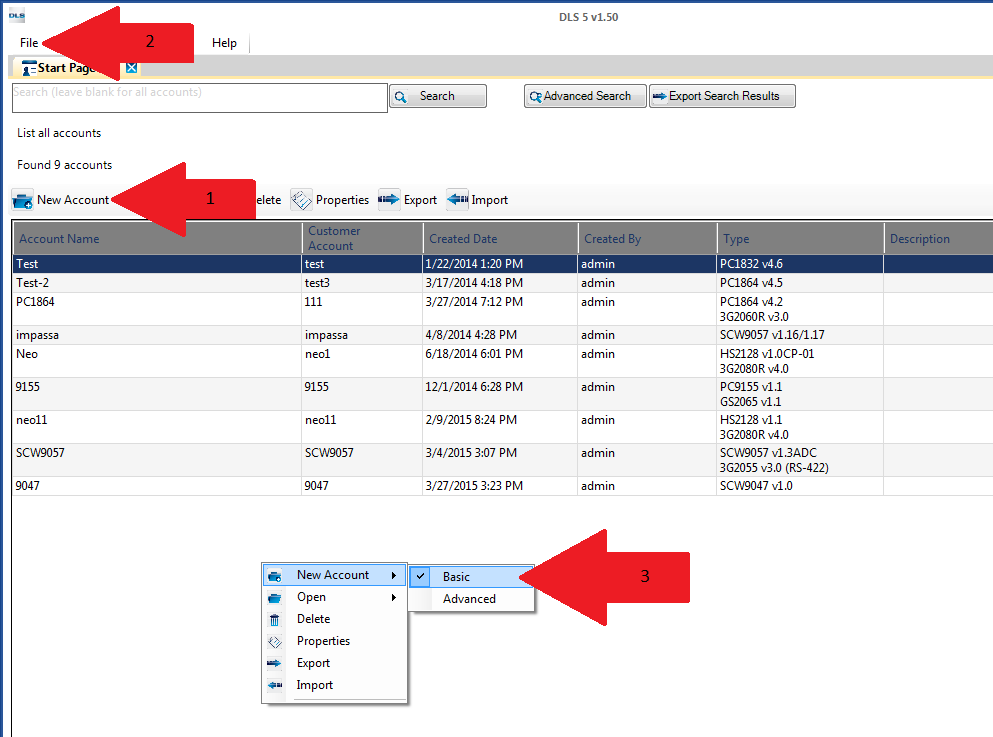
From here we can click on the New Account button (1), go from the File menu and select New Account (2), or right click within the Start Page and select New Account (3). If you do select the last option it is recommended to click basic following that.
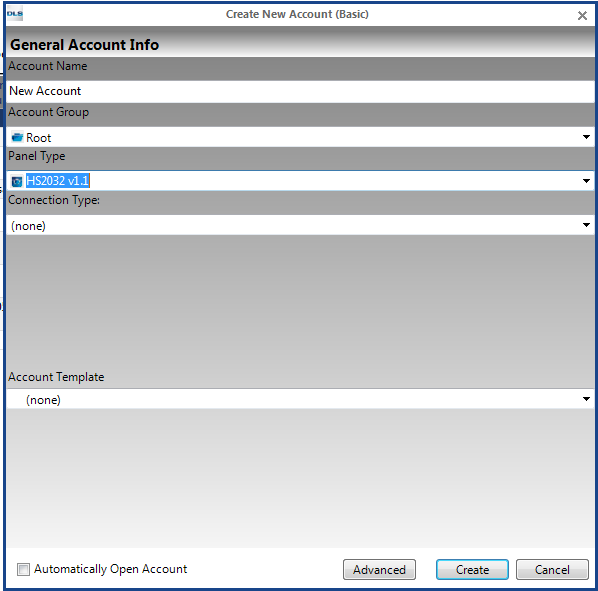
After selecting the desired method to create the account a new window will appear labelled “Create New Account (Basic)”.
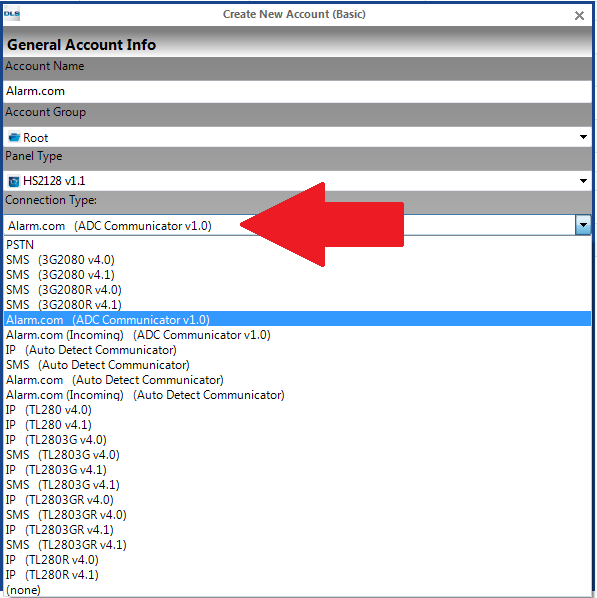
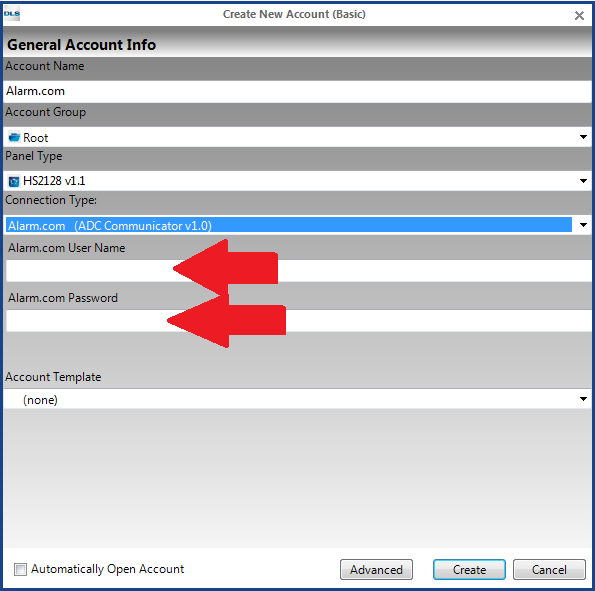
In this new window we can then enter the Account Name, Chose the Account Group, select the panel type and the connection type. Since this account we are creating for an Alarm.Com connection we would want to select the appropriate Alarm.Com communicator that you have connected to the panel.
After selecting the Alarm.Com communicator that you have connected to the panel you are then prompted to enter your Alarm.Com Dealer User Name and Password. This information would be provided to you through Alarm.Com.
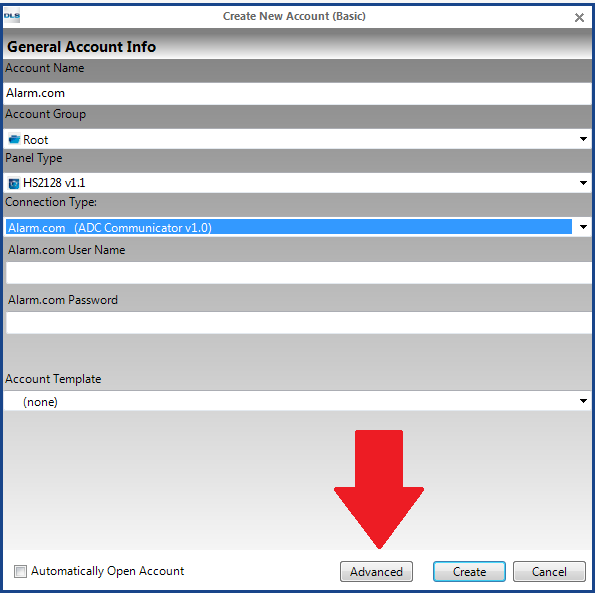
Following entering this information we also need to tell the account the Customer ID number that you wish to connect to. To do this we would want to click on the Advance button bringing up a new window.
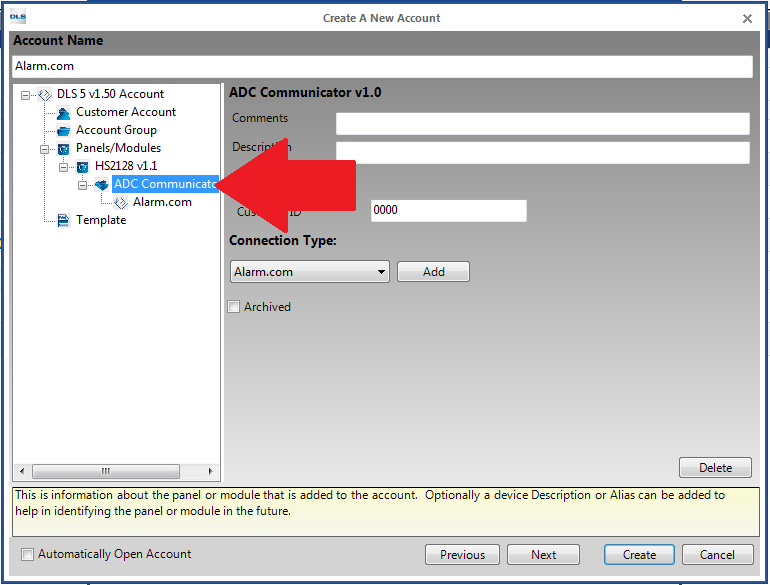
In this new window we would click on the communicator that is nestled under the model of the panel you are creating the account for.
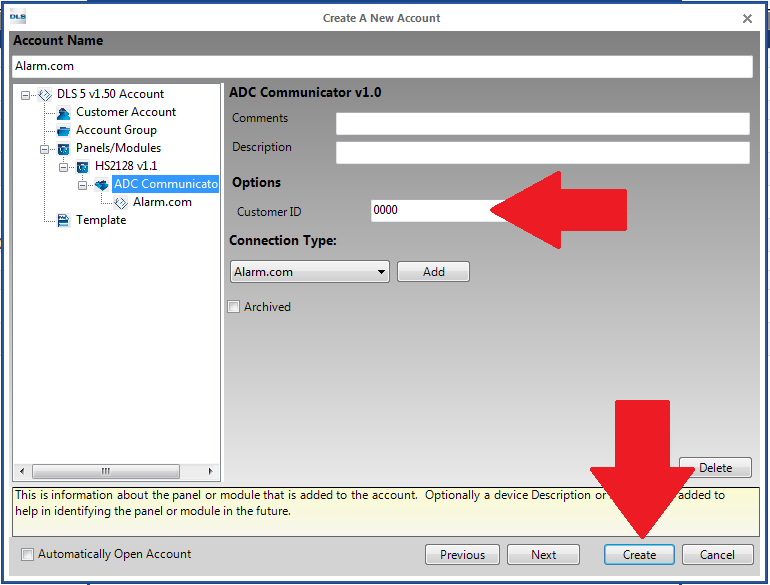
After selecting the communicator we need to enter the customer ID number that is provided to you through Alarm.Com. By default this is all the information in the account that is required for the connection. Once completed you can then click on Create and this account will populate within the main Start Page in DLS. If you do have enabled Automatically Open Account when creating the account it will open right away after clicking Create.
Adding Alarm.Com to an Account Previously Created
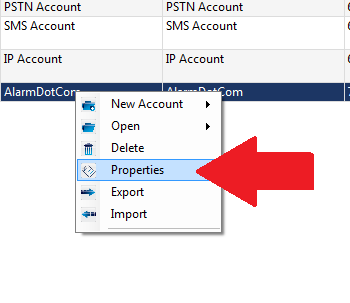
If you have already created an account and then choose later to add an Alarm.Com communicator you can still do so. With the account closed you would right click on the account and click on properties.
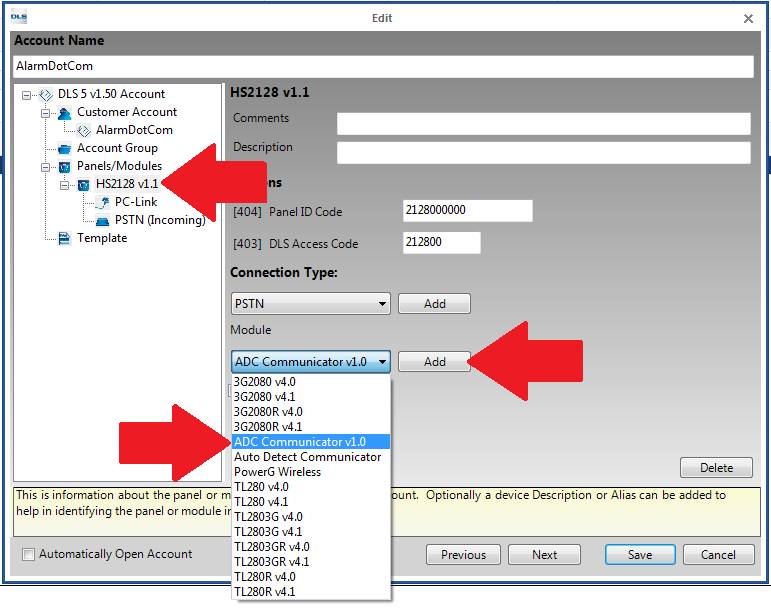
With the account properties open you would want to click on the actual panel that you are using and you will be provided a drop down menu on the right hand side labeled module. You would then drop this menu down and chose the Alarm.Com communicator that is connected to the panel and click the add button to add it to the account.
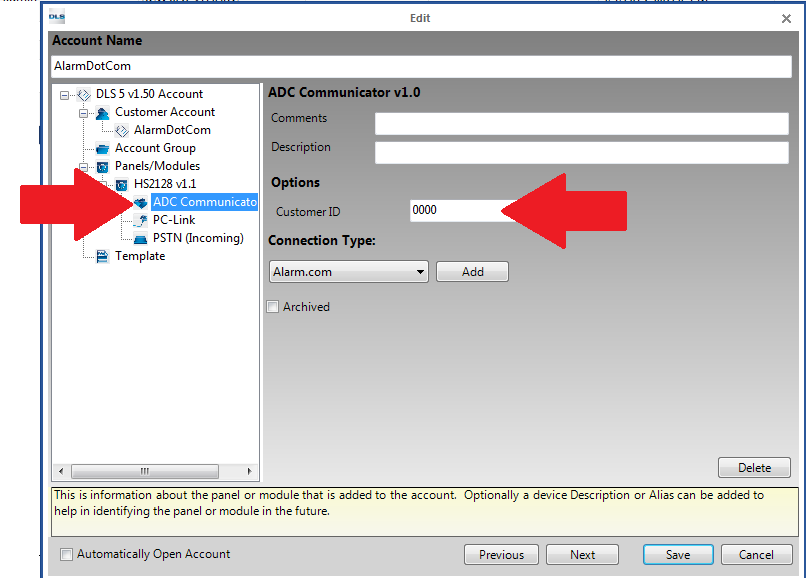
After adding the communicator to the account you would then click the communicator that will be nestled under the panel and enter the Customer ID number that is being used. You would go down to the drop down menu under connection type and chose Alarm.Com and press add.
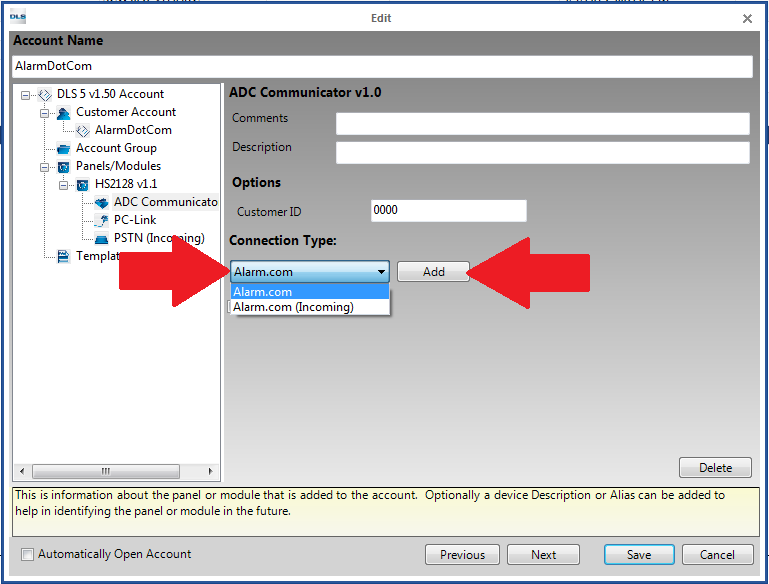
The next step would be to add the Alarm.Com connection type to the account. While on the same screen where you have just entered your Customer ID number you would then drop down the menu under connection type choose Alarm.com and click on the add button.
Once Alarm.Com has been added to the connection type click on the Alarm.Com option on the left hand side of the window which should be nestled under the communicator you added to the account and enter Alarm.Com username and passwords then click save. The account will then open automatically if the option to “Automatically Open Account” is selected or it will auto populate on the start page from where you can then open it.
Alarm.Com Connection Configuration
In order to connect over an Alarm.Com connection there are some particular settings that need to be enabled on both the AirFX Dealer Portal as well as on your computers network.
Computer Network Configuration
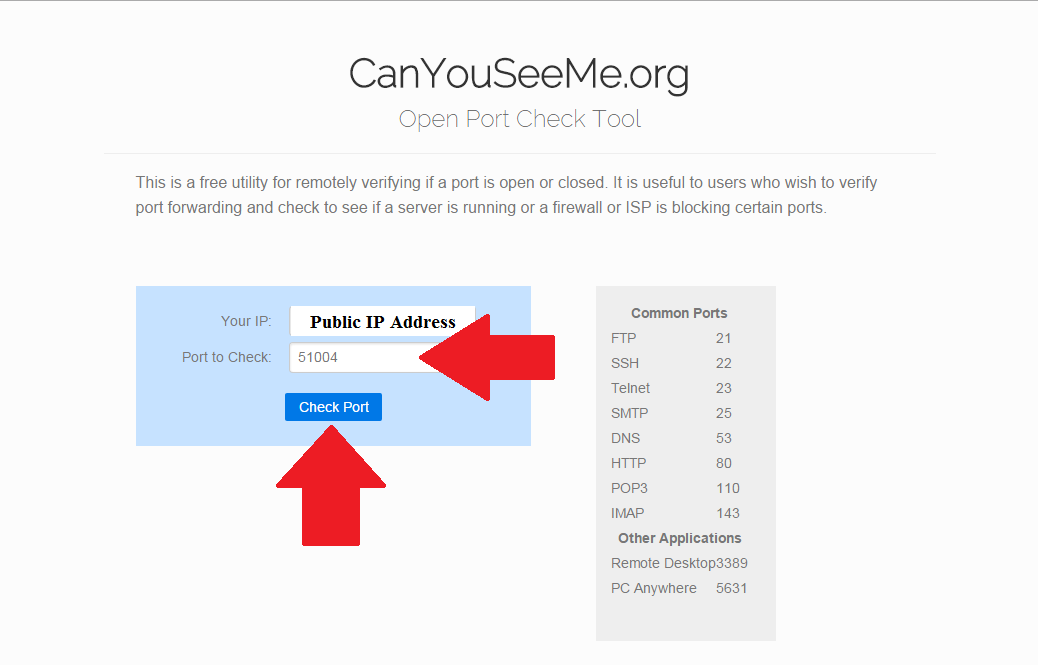
There is also some configuration that needs to be done on the computer network that you are trying to communicate over. The main configuration is that you need to ensure that port 51004 is forwarded to the PC with DLS installed, and not blocked on the network. Some things that could possible block that port would be routers or firewalls being used as well antivirus software.
To confirm that this port is open you can open the website www.canyouseeme.org and in the location that says “Port to Check” you would enter 51004 and click on the Check Port.
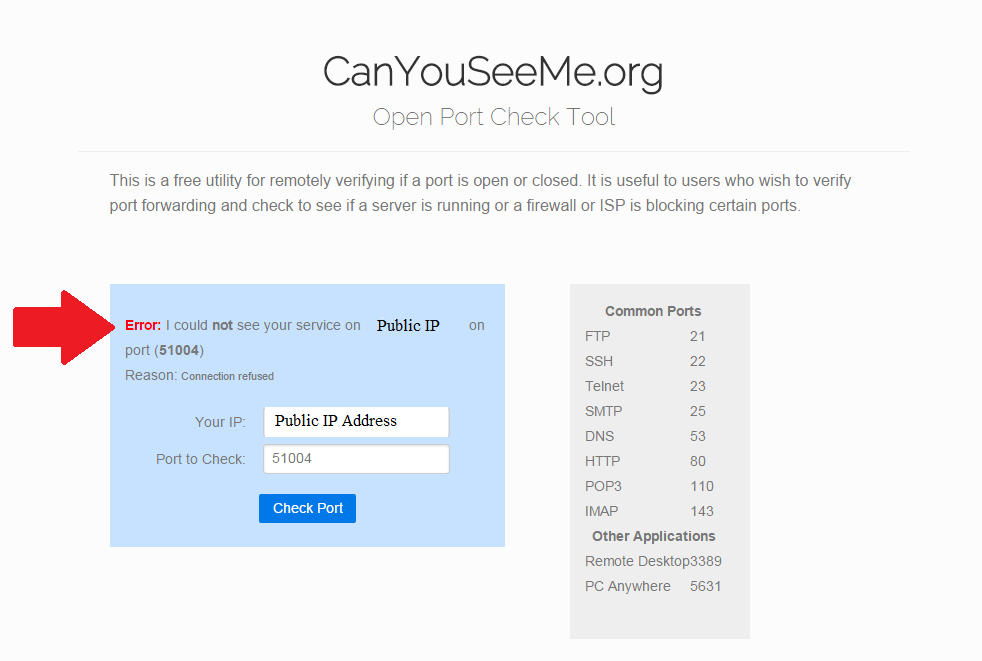
The webpage will then come back with either coming backing saying Success or Error depending on if it was able to communicate on that port. If it was not able to then you would want to look into any routers, firewalls or antivirus blocking that port. It is also suggested to have that port forwarded to the internal IP address of the computer you are trying to connect to if you are behind a router. For more information on how to do this you can refer to the installation manual of your router, contact an IT professional for assistance or visit the webpage www.portforward.com.
Alarm.Com Settings - AirFX
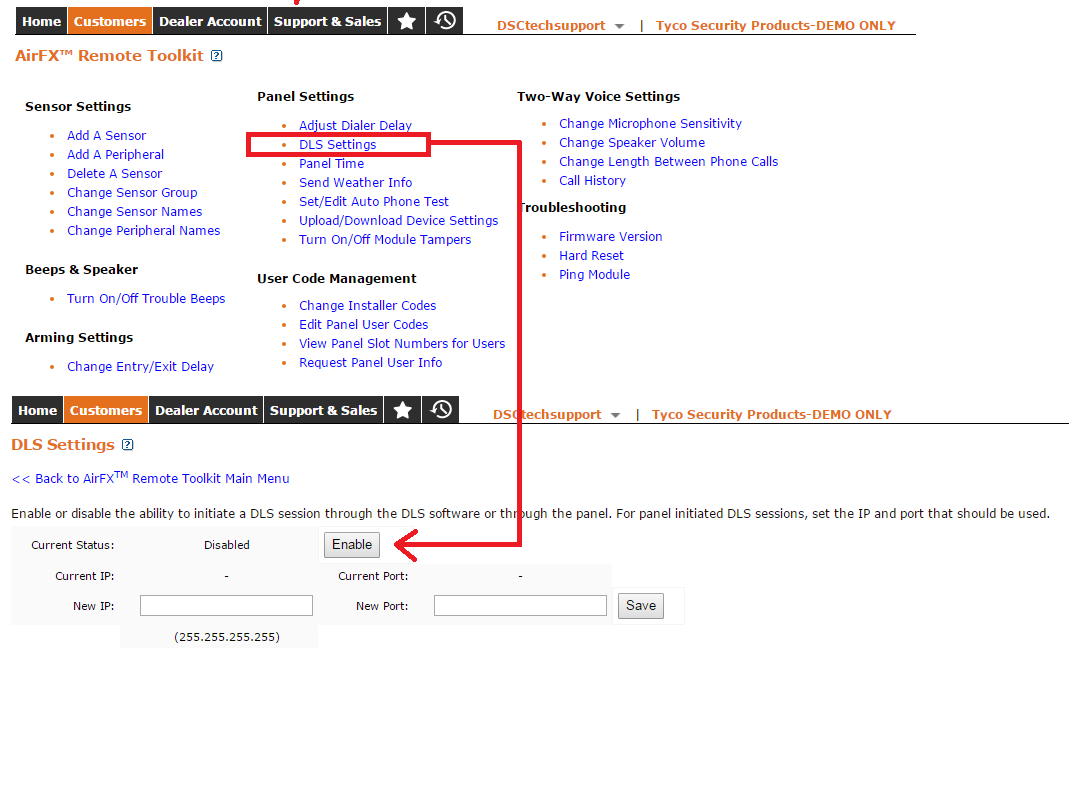
Within the AirFX settings for Alarm.Com you would also need to ensure that you have the option available to connect over the DLS Software. To do so you would want to log in to your Dealer Portal and pull up Customer. Following that under the Panel Settings you would want to click on the DLS Settings link.
This will bring you to a page where you can view the current status of the ability to connect to the panel using DLS. If you see the current state says disabled click on the button marked "Enable" to right and it will change the status to Enabled.
Connecting to a Panel
After creating the account or adding the communicator to the account you would then be able to connect to the panel. To do so you would want to open the account and do your regular connection options (Global Upload/Global Download/Communicate Tags/Connect Only) and when the new window opens instead of picking PC-Link for the connection type you would want to drop down the menu and pick Alarm.Com. You can then click ok to try to connect to the panel as long as all other relevant information is set (Downloading Access Code / Panel ID Code). For more information on connection options please view the page on Connection Options.
To view that status of your connection jobs or to see if the software had a trouble condition when trying to connect you can click on view and then communication jobs. This will display the status of the jobs on your system and if any are showing up in red you can view what trouble the software had under the activity log. For more information on the communication job window please visit the Communication Job page.
