Difference between revisions of "Create a New Account Tutorial"
Jvankooten (Talk | contribs) |
|||
| (12 intermediate revisions by 4 users not shown) | |||
| Line 1: | Line 1: | ||
[[Category:Tutorials]] | [[Category:Tutorials]] | ||
| − | |||
| − | + | ==Basic Account Creation== | |
| − | |||
| + | To create a new account on your Start Page there will be an icon with the heading New Account/File -> New Account or Right click -> New Account/Ctrl + N. | ||
| − | |||
| − | [[Image: | + | [[Image:AC4.png]][[Image:AC7.png]] |
| − | |||
| − | |||
| − | + | Once you click New Account a new window will appear asking for the following information: | |
| + | [[Image:AC3.png|600px|right|thumb|New Account Window]] | ||
| − | |||
| + | 1. Account Name: The name or heading of the account being created. | ||
| + | 2. Account Group: This would be the location the accounts will be saved under. | ||
| + | 3. Panel Type: Select the type of panel the account would be associated to. | ||
| + | 4. Connection Type: Select the type of connection the panel would be using to communicate. | ||
| − | + | 5. Phone Number: The phone number that would be associated to the panel. (This option will vary depending on what method of connection being used; refer to the Account Connection Tutorial for more information.) | |
| − | + | 6. Double Call: This will also prompt well to have Double Call enabled, enable double call if that feature will be used. (This option will vary depending on what method of connection being used; refer to the Account Connection Tutorial for more information.) | |
| + | 7. Account Template: This will allow you to load a template with pre-programmed information | ||
| − | + | 8. Automatically Open Account: This will allow you to open the account once you are done creating your account. | |
| − | + | 9. Advanced/Create/Cancel: This will allow you to create your account, go to the advanced options for your account, or cancel your account. | |
| − | |||
| − | |||
| − | |||
| − | |||
| − | |||
| − | |||
| − | + | ==Advance Account Creation== | |
| + | [[Image:AC5.png|400px|right|thumb|Account Overview]] | ||
| − | |||
| + | If you select Advanced this will give you the option to add various modules and keypad and an overview of your entire account. (The account overview will vary on how many modules and keypads have been added to the panel) | ||
| − | + | Once you press create this will either show an account on your start page, or if you select automatically open it will open your account. | |
| − | + | When you select the type of panel on your account overview this will bring new options on the right side of the window, with options to program the following: | |
| + | [[Image:AC6.png|600px|right|thumb|Advance Account Creation]] | ||
| − | + | 1. PC1832 v4.6: This will indicate the type of panel you are working with; when you select the icon it will give you additional options to add to your panel. | |
| − | + | 2. Comments: Input any additional comments you would like to be attached with this account. | |
| − | '' | + | 3. Descriptions: Any descriptor you would like this panel to be associated with. |
| + | |||
| + | 4. Panel ID Code: This code is used by the downloading computer to verify the correct account is calling back (Call Back feature) or to identify which customer account file should be used (User Initiated DLS and Auto Even Buffer Upload features). The default code is the panel number with two 0's at the end i.e. 183200. | ||
| + | |||
| + | 5. DLS Access Code: Program the 6-digit Downloading Access Code. Upon connection, the system will only connect to the downloading panel if the Downloading Access code matches the Downloading Access Code programmed in the panel. The default code is the panel number with two 0's at the end i.e. 183200. | ||
| + | |||
| + | 6. Connection Type: This will allow you to add another type of connection to the panel. | ||
| + | |||
| + | 7. Module: Any additional module that would be associated with this panel would be added under this section, select the module and add, note the module will now show up under your account overview. | ||
| + | |||
| + | 8. Archived: Allows you to disable any panel or module and keep track of any module or panel attached to this account. This is mainly used if there were previous modules connected to the panel which are no longer connected. | ||
| + | |||
| + | 9. Delete: Allows you to remove the account | ||
| + | |||
| + | 10. This will allow you to create/cancel or go to the next/previous section | ||
| + | |||
| + | |||
| + | Once you have finished inputting all the required information it will either direct you to the start page or the account page depending on if you decide to select automatically open. | ||
Latest revision as of 20:24, 12 May 2015
Basic Account Creation
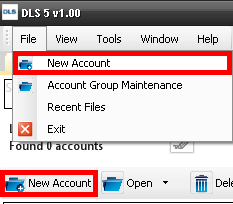
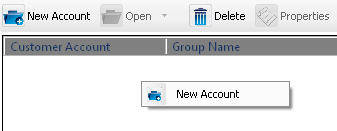
To create a new account on your Start Page there will be an icon with the heading New Account/File -> New Account or Right click -> New Account/Ctrl + N.
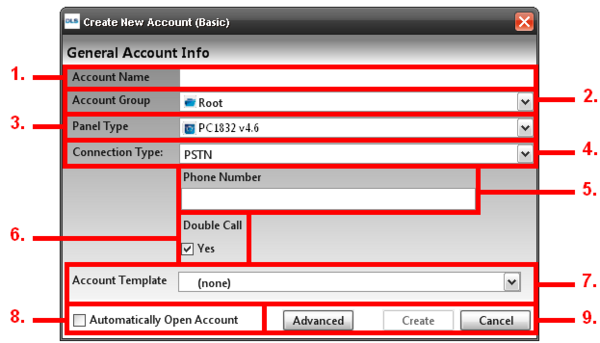
Once you click New Account a new window will appear asking for the following information:
1. Account Name: The name or heading of the account being created.
2. Account Group: This would be the location the accounts will be saved under.
3. Panel Type: Select the type of panel the account would be associated to.
4. Connection Type: Select the type of connection the panel would be using to communicate.
5. Phone Number: The phone number that would be associated to the panel. (This option will vary depending on what method of connection being used; refer to the Account Connection Tutorial for more information.)
6. Double Call: This will also prompt well to have Double Call enabled, enable double call if that feature will be used. (This option will vary depending on what method of connection being used; refer to the Account Connection Tutorial for more information.)
7. Account Template: This will allow you to load a template with pre-programmed information
8. Automatically Open Account: This will allow you to open the account once you are done creating your account.
9. Advanced/Create/Cancel: This will allow you to create your account, go to the advanced options for your account, or cancel your account.
Advance Account Creation
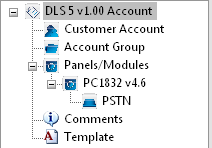
If you select Advanced this will give you the option to add various modules and keypad and an overview of your entire account. (The account overview will vary on how many modules and keypads have been added to the panel)
Once you press create this will either show an account on your start page, or if you select automatically open it will open your account.
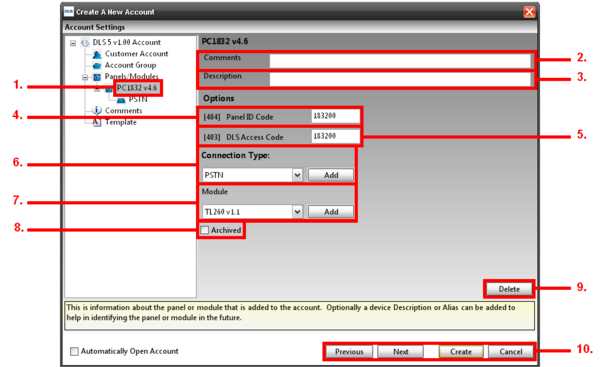
When you select the type of panel on your account overview this will bring new options on the right side of the window, with options to program the following:
1. PC1832 v4.6: This will indicate the type of panel you are working with; when you select the icon it will give you additional options to add to your panel.
2. Comments: Input any additional comments you would like to be attached with this account.
3. Descriptions: Any descriptor you would like this panel to be associated with.
4. Panel ID Code: This code is used by the downloading computer to verify the correct account is calling back (Call Back feature) or to identify which customer account file should be used (User Initiated DLS and Auto Even Buffer Upload features). The default code is the panel number with two 0's at the end i.e. 183200.
5. DLS Access Code: Program the 6-digit Downloading Access Code. Upon connection, the system will only connect to the downloading panel if the Downloading Access code matches the Downloading Access Code programmed in the panel. The default code is the panel number with two 0's at the end i.e. 183200.
6. Connection Type: This will allow you to add another type of connection to the panel.
7. Module: Any additional module that would be associated with this panel would be added under this section, select the module and add, note the module will now show up under your account overview.
8. Archived: Allows you to disable any panel or module and keep track of any module or panel attached to this account. This is mainly used if there were previous modules connected to the panel which are no longer connected.
9. Delete: Allows you to remove the account
10. This will allow you to create/cancel or go to the next/previous section
Once you have finished inputting all the required information it will either direct you to the start page or the account page depending on if you decide to select automatically open.
