Difference between revisions of "Windows Troubleshooting"
| Line 132: | Line 132: | ||
| − | == | + | == How do I install a USB Serial driver == |
| − | |||
| − | + | ===Through Windows XP=== | |
| − | + | [[Using USA - 19HS:]] | |
| + | Go to www.tripplite.com -> Support -> Software/Drivers -> Software -> Drivers -> Keyspan@ Remotes & Adapters -> Download Driver for USA – 19HS (Windows 2000, XP, 2033 Server & Vista) -> Run file -> Connect the keyspan and begin installation | ||
| − | + | [[Using USB - RS232:]] | |
| − | + | Go to www.ftdichip.com -> Drivers -> VCP Drivers -> Download 32 bit/64 bit (depending on which bit using) -> Save file and extract to desired location -> Connect the USB - RS232 to the computer -> “New Hardware†balloon will pop up click it -> Hardware Update Wizard window will prompt up -> Select “No, not this time†-> Select “Install from a list or specific location (Advanced)†-> Browse to the location the Driver Installation files are located -> Select “Next†this will being the driver installation | |
| − | + | ===Through Windows 7=== | |
| − | + | [[Using USA - 19HS]] | |
| − | [[ | + | |
| + | Go to www.tripplite.com -> Support -> Software/Drivers -> Software -> Drivers -> Keyspan@ Remotes & Adapters -> Download Driver for USA – 19HS (Windows 7 and 8) -> Run file -> Connect the keyspan and begin installation | ||
| − | + | [[Using USB - RS232]] | |
| − | + | Once you connect the keyspan Windows 7 will automatically begin the installation | |
| − | |||
| − | |||
| + | == How do I enable Administrative Privileges for DLS 5 == | ||
| + | === Through Windows XP === | ||
| + | i. Is your User account set to Administrator? (Control Panel -> User Accounts -> Group) | ||
| + | ii. If no: Go to Control Panel -> User Accounts -> Select User Account -> Click Properties -> Select Other and scroll to “Administrators†-> Select “OK†| ||
| + | iii. If not able to change User Account type: Right Click DLS IV -> Run as… -> Select “The following user:†-> Select Administrator | ||
| − | === | + | ===Through Windows 7=== |
| − | + | ||
| − | + | i. Is your User account set to Administrator? (Control Panel -> User Accounts and Family Safety -> User Accounts) | |
| + | ii. If no: Go to Control Panel -> User Accounts and Family Safety -> User Accounts -> Change your account type -> Switch to Administrator -> Select “Change Account Type†| ||
| + | iii. If not able to change User Account type: Right Click DLS IV -> Run as administrator/ Right Click DLS IV -> Properties -> Compatibility -> Check “Run this program as an administrator†-> Select “ Apply†| ||
| − | |||
| − | |||
| − | |||
| − | |||
| − | |||
| − | |||
| Line 194: | Line 192: | ||
| − | |||
| − | |||
| − | |||
| − | |||
| − | |||
| − | |||
| − | |||
| − | |||
| − | |||
| − | |||
| − | |||
| − | |||
| − | |||
| − | |||
| − | |||
| − | |||
| − | |||
| − | |||
| − | |||
| − | |||
| − | |||
| − | |||
| − | |||
| − | |||
| − | |||
| − | |||
| − | |||
| − | |||
| − | |||
| − | |||
| − | |||
| − | |||
| − | |||
| − | |||
| − | |||
| − | |||
| − | |||
| − | |||
| − | |||
| − | |||
| − | |||
| − | |||
| − | |||
| − | |||
| − | |||
| − | |||
| − | |||
| − | |||
| − | |||
| − | |||
| − | |||
| − | |||
| − | |||
| − | |||
| − | |||
| − | |||
Revision as of 22:52, 12 December 2012
Contents
DLS 5 access through firewall
Through Windows XP
1. Go to your Control Panel and select "Windows Firewall"
2. Select the "Exceptions" Tab then press "Add Program" and locate DLS 5 and add the program.
Through Windows 7
1. Go to your Control Panel and select "System and Security".
2. Under Windows Firewall window select "Allow a program or feature through Windows Firewall"
3. Make sure "Change Settings" has been applied, this will now make "Allow another program" available. Select the button and locate DLS 5 and add the program.
Adding port 51004
Through Windows XP
1. Go to your Control Panel and select "Windows Firewall"
2. Select the "Exceptions" Tab then press "Add Port".
3. Name it DLS IV Port and add the number "51004" under “Port number†then press "ok".
Through Windows 7
1. Go to your Control Panel, select "System and Security" and go to "Windows Firewall".
2. Under Windows Firewall window select "Advanced Settings", and then select "New Rule"
3. Under "New Rule" select "Ports" under "Specific Local Port" put the number "51004". Allow the connection and checkmark all rules and you can name it DLS Port, do the following for Outbound Rules.
How do I install a USB Serial driver
Through Windows XP
Go to www.tripplite.com -> Support -> Software/Drivers -> Software -> Drivers -> Keyspan@ Remotes & Adapters -> Download Driver for USA – 19HS (Windows 2000, XP, 2033 Server & Vista) -> Run file -> Connect the keyspan and begin installation
Go to www.ftdichip.com -> Drivers -> VCP Drivers -> Download 32 bit/64 bit (depending on which bit using) -> Save file and extract to desired location -> Connect the USB - RS232 to the computer -> “New Hardware†balloon will pop up click it -> Hardware Update Wizard window will prompt up -> Select “No, not this time†-> Select “Install from a list or specific location (Advanced)†-> Browse to the location the Driver Installation files are located -> Select “Next†this will being the driver installation
Through Windows 7
Go to www.tripplite.com -> Support -> Software/Drivers -> Software -> Drivers -> Keyspan@ Remotes & Adapters -> Download Driver for USA – 19HS (Windows 7 and 8) -> Run file -> Connect the keyspan and begin installation
Once you connect the keyspan Windows 7 will automatically begin the installation
How do I enable Administrative Privileges for DLS 5
Through Windows XP
i. Is your User account set to Administrator? (Control Panel -> User Accounts -> Group) ii. If no: Go to Control Panel -> User Accounts -> Select User Account -> Click Properties -> Select Other and scroll to “Administrators†-> Select “OK†iii. If not able to change User Account type: Right Click DLS IV -> Run as… -> Select “The following user:†-> Select Administrator
Through Windows 7
i. Is your User account set to Administrator? (Control Panel -> User Accounts and Family Safety -> User Accounts) ii. If no: Go to Control Panel -> User Accounts and Family Safety -> User Accounts -> Change your account type -> Switch to Administrator -> Select “Change Account Type†iii. If not able to change User Account type: Right Click DLS IV -> Run as administrator/ Right Click DLS IV -> Properties -> Compatibility -> Check “Run this program as an administrator†-> Select “ Applyâ€
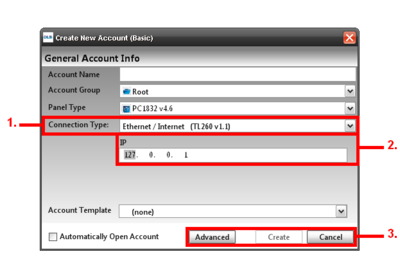
1st Method
1. Connection Type: Under “Connection Typeâ€, make sure “TL 260†is selected, this will prompt up new options to
add the “IP addressâ€.
2. IP: Enter the public IP address of the T Link module that is being used.
3. Advanced: Click on “Advanced†to go to the advanced options for T Link 260.
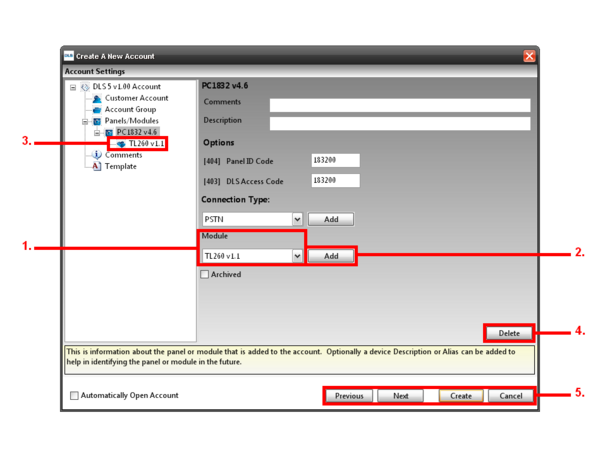
2nd Method
1. Module: Under “Moduleâ€, make sure it is set to “TL260â€.
2. Add: Click “add†to add the module under your panel.
3. TL 260 v1.1: It will now show up under your panel drop down list.
4. Delete: Allows you to remove the TL 260 module from the panel.
5. This will allow you to create/cancel or go to the next/previous section.
Advanced TL260/260R/2603GR/265GS Setup
1. GS/IP Installer Code: The password required to connect to the T Link Console Software, by default the password should be “CAFEâ€.
2. Connection Type: The type of connection the T Link will use to connect; Ethernet/Internet is the only option for the TL 260.
3. Add: Click “add†in order for the “Ethernet/Internet†connection type to be added under the TL 260.
4. Ethernet/Intern: This connection type will be added under the panel drop down list, when selected it will take you to the advance TL 260 programming.
5. Delete: Allows you to remove the Ethernet/internet connection from the panel.
6. This will allow you to create/cancel or go to the next/previous section.
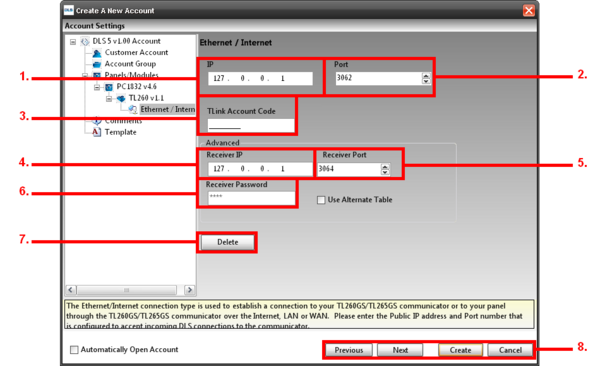
TL260/260R/2603GR/265 IP Setup
1. IP: This would be the IP Address of the T Link in order to communicate.
2. Port: The port that the T Link would be using for communication, the default port should be 3062.
3. T Link Account Code: This would be the account number of the T Link module that the central station would be receiving.
4. Receiver IP: This would be the IP Address of the receiver that the T Link communicates to.
5. Receiver Port: This would be the Port of the receiver that the T Link communicates to, the default port is 3064.
6. Receiver Password: Only used if Central Station requires it.
7. Delete: Allows you to remove the Ethernet/internet connection from the panel.
8. This will allow you to create/cancel or go to the next/previous section.
Connecting to the Panel
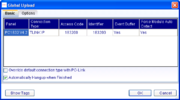
First you must choose the desired communications operation (Global upload, Global Download, Communicate Tags, etc).
Once you have selected the type of communication operation, a screen will appear with 3 tabs prompting you with different options.
Under the "Basic" tab, you can verify the panel you are connecting to, the type of connection you will be making, the access code and the ID code. Depending on which communications operation you select you might also have an option to "auto-detect modules" and whether you would like to upload the event buffer.
There is also a button "Show Tags". This will display for you exactly which sections have been tagged for communications.
Under the "Options" tab you can turn on/off the double call feature. You can also specify the double call timer and the double call duration.
Upload Event Buffer
If you would like to upload the event buffer, without upload or downloading any other sections, you can select "Upload Event Buffer" from the toolbar.
Module Auto-Detect
If you would like to find out what modules are enrolled on the system, without uploading or downloading any programming sections, you can select the "Module Auto-Detect" function from the toolbar.


