Difference between revisions of "Standalone DLS NA"
(Created page with "=Supported Operating Systems = * Windows XP Professional with Service Pack 3 or higher * Windows XP Professional with Service Pack 2, Windows Installer 3.1, and KB926255 Wind...") |
|||
| Line 39: | Line 39: | ||
=DLS Standalone Installation= | =DLS Standalone Installation= | ||
| − | + | *Initiate the installation of the latest available release by downloading the executable file from [http://www.dsc.com/ www.dsc.com] or acquiring it from your dealer. | |
| − | + | * Please select your Country: | |
| − | <center>[[image: | + | <center>[[image:DLSSelectCountry.png|365x286px]]</center> |
| − | + | *The End User License Agreement will be prompted: | |
| − | <center>[[image:|377x293px]]</center> | + | <center>[[image:DLSLicenseAgreement.png|377x293px]]</center> |
| − | + | *If you agree, accept the agreement and the following screen will be prompted. Select the ‘DLS 5 (Standard)’: | |
| − | <center>[[image: | + | <center>[[image:DLSNAStandaloneInstallationType.png|404x317px]]</center> |
| − | + | ||
| − | + | ||
| − | + | ||
| − | + | ||
| − | + | ||
| − | + | ||
| − | + | ||
| + | *DLS Installer will automatically search for .NET 4.0 Framework. If it is not installed, you will be requested by the installer utility to initiate the installation. | ||
| + | *Once the installation has completed, the new shortcuts are added in DSC folder under Start menu: | ||
| + | **Windows 7: | ||
| + | <center>[[image:DLSStandalone_StartMenu_Win7.png|119x164px]]</center> | ||
| + | **Windows 8+: | ||
| + | <center>[[image:DLSStandalone_StartMenu_Win8.png|185x180px]]</center> | ||
| Line 65: | Line 64: | ||
After installation, message box will prompt up indicating default username and password for DLS login: | After installation, message box will prompt up indicating default username and password for DLS login: | ||
| − | <center>[[image:|287x121px]]</center> | + | <center>[[image:DLSWelcomeScreen.png|287x121px]]</center> |
Click ‘OK’, and insert default login name (admin) and password (1234) in the following form: | Click ‘OK’, and insert default login name (admin) and password (1234) in the following form: | ||
| − | <center>[[image:|294x117px]]</center> | + | <center>[[image:DLSLoginForm1.png|294x117px]]</center> |
=Create an Account= | =Create an Account= | ||
| − | * To create a new account in basic mode (quick mode), click ‘New Account’, ’Basic’: | + | *To create a new account in basic mode (quick mode), click ‘New Account’, ’Basic’: |
| − | <center>[[image: | + | <center>[[image:DLSCreateAccount.png|347x53px]]</center> |
| − | * Enter account name without any blank spaces in between and special characters, select ‘Account Group’ and then select ‘Panel Type’ you want to connect to: | + | *Enter account name without any blank spaces in between and special characters, select ‘Account Group’ and then select ‘Panel Type’ you want to connect to: |
| − | <center>[[image:|285x285px]]</center> | + | <center>[[image:DLSSelectPanelTypeAccountCreation.png|285x285px]]</center> |
If you are not sure about your panel type, select ‘Auto Detect Panel’. This feature will automatically detect your panel type. | If you are not sure about your panel type, select ‘Auto Detect Panel’. This feature will automatically detect your panel type. | ||
| − | * Select ‘Connection Type’: | + | *Select ‘Connection Type’: |
| − | <center>[[image: | + | <center>[[image:DLSSelectConnectionTypeAccountCreation.png|293x293px]]</center> |
If you are connecting through GS/IP and not sure about the communicator type, select ‘Auto Detect Communicator’. This feature will automatically detect your communicator type. | If you are connecting through GS/IP and not sure about the communicator type, select ‘Auto Detect Communicator’. This feature will automatically detect your communicator type. | ||
| − | * To create a new account in advanced mode, click ‘New Account’, ’Advanced’: | + | *To create a new account in advanced mode, click ‘New Account’, ’Advanced’: |
| − | <center>[[image:|310x241px]]</center> | + | <center>[[image:DLSCreateNewAccountAdvancedMode.png|310x241px]]</center> |
* After inserting all the required information, click ‘Create’ to successfully create this new account: | * After inserting all the required information, click ‘Create’ to successfully create this new account: | ||
| − | <center>[[image:|490x46px]]</center> | + | <center>[[image:DLSAccountCreatedEntryStartPage.png|490x46px]]</center> |
* To open the account either double click the account entry, right click on account entry and click ‘Open’ or click ‘Open’ from main account grid menu. Legacy panel type accounts can be open in either ‘Standard View’ or ‘Worksheet View’. Hybrid System accounts can only be open in ‘Standard View’: | * To open the account either double click the account entry, right click on account entry and click ‘Open’ or click ‘Open’ from main account grid menu. Legacy panel type accounts can be open in either ‘Standard View’ or ‘Worksheet View’. Hybrid System accounts can only be open in ‘Standard View’: | ||
| − | <center>[[image: | + | <center>[[image:DLSOpenAccountViewModes.png|305x154px]]</center> |
=Account Tool Bar Menu= | =Account Tool Bar Menu= | ||
| − | Save an account[[image: | + | Save an account[[image:DLS_SaveIcon.png]] |
| − | Perform error check[[image: | + | Perform error check[[image:DLSErrorCheckIcon.png]] |
| − | Add a new user or load an existing template on top of this account[[image: | + | Add a new user or load an existing template on top of this account[[image:DLSNewUserExistingTemplateIcon.png]] |
| − | View account revision form[[image: | + | View account revision form[[image:DLSRevisionHistoryIcon.png]] |
| − | Connect and stay online with panel without initially submitting | + | Connect and stay online with panel without initially submitting any data communication[[image:DLSConnectOnlyIcon.png]] |
| − | Global Upload from Panel to DLS[[image: | + | Global Upload from Panel to DLS[[image:DLSGlobalUploadIcon.png]] |
| − | Global Download from DLS to Panel[[image: | + | Global Download from DLS to Panel[[image:DLSGlobalDownloadIcon.png]] |
| − | Communicate tag options only[[image: | + | Communicate tag options only[[image:DLSCommunicateTagOnlyIcon.png]] |
| − | Upload Event Buffer[[image: | + | Upload Event Buffer[[image:DLSEventBufferUploadIcon.png]] |
| − | Detect successfully enrolled modules with the panel[[image: | + | Detect successfully enrolled modules with the panel[[image:DLSModuleDetectIcon.png]] |
| − | Un-tag options to communicate[[image: | + | Un-tag options to communicate[[image:DLSUntagIcon.png]] |
‘Disconnect when complete’ or ‘Disconnect immediately’ the connected session[[image:Picture 15]] | ‘Disconnect when complete’ or ‘Disconnect immediately’ the connected session[[image:Picture 15]] | ||
| − | Print entire account data and content[[image: | + | Print entire account data and content[[image:DLSPrintIcon.png]] |
| − | Preview entire account data and content to be print[[image: | + | Preview entire account data and content to be print[[image:DLSPrintPreviewIcon.png]] |
| − | Generate account system status report[[image: | + | Generate account system status report[[image:DLSSystemStatusIcon.png]] |
=Communication Tags= | =Communication Tags= | ||
| − | Upload option from Panel to DLS[[image: | + | Upload option from Panel to DLS[[image:DLSUploadTagIcon.png]] |
| − | Download option from DLS to Panel[[image: | + | Download option from DLS to Panel[[image:DLSDownloadTagIcon.png]] |
Modem Manager Configuration | Modem Manager Configuration | ||
| Line 143: | Line 142: | ||
* Go to Tools - Modem Manager Configuration to add/modify the modem information | * Go to Tools - Modem Manager Configuration to add/modify the modem information | ||
| − | <center>[[image:|317x305px]] | + | <center>[[image:DLSModemManagerConfigurationForm1.png|317x305px]] |
</center> | </center> | ||
Revision as of 23:31, 15 May 2014
Contents
Supported Operating Systems
- Windows XP Professional with Service Pack 3 or higher
- Windows XP Professional with Service Pack 2, Windows Installer 3.1, and KB926255 Windows Updates installed
- Windows Vista
- Windows 7
- Windows Server 2008 R2
- Windows 8
- Windows 8.1
DLS Prerequisites
The following applications must be installed for DLS Standalone to operate.
These prerequisites are automatically downloaded (if necessary) and installed under normal circumstances.
1) Microsoft .NET Framework 4 Client Profile
2) Microsoft .NET Framework 4 Extended
Any critical updates to these prerequisites should be installed via Windows Update.
Minimum PC Hardware Requirements
To support the prerequisites for DLS/Web SA, following system requirements must be met:
- Processor: 600 megahertz (MHz) Pentium III compatible or faster processor - 1 gigahertz (GHz) or faster is recommended
- ''''RAM: 1GB of System Memory
- Hard Disk: Up to 2GB of available space may be required.
- CD or DVD Drive: Not required
- Display: 1024 x 768 high color, 32-bit (Recommended)
Note: DLS Standalone uses approximately 500MB, additional hard disk space may be required for prerequisites.
DLS Standalone Installation
- Initiate the installation of the latest available release by downloading the executable file from www.dsc.com or acquiring it from your dealer.
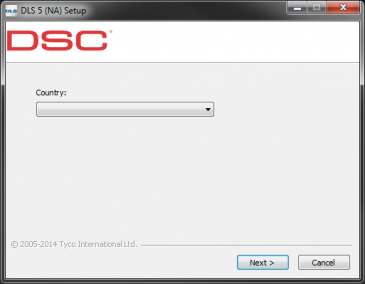
- Please select your Country:
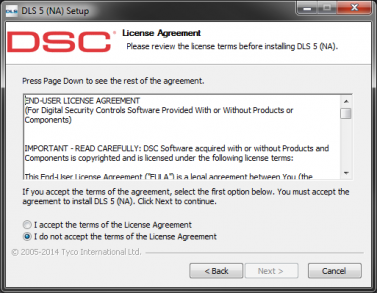
- The End User License Agreement will be prompted:
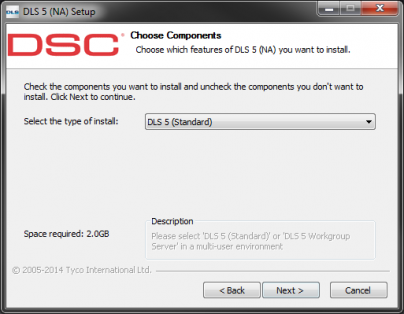
- If you agree, accept the agreement and the following screen will be prompted. Select the ‘DLS 5 (Standard)’:
- DLS Installer will automatically search for .NET 4.0 Framework. If it is not installed, you will be requested by the installer utility to initiate the installation.
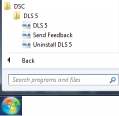
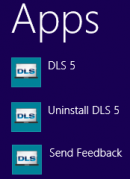
- Once the installation has completed, the new shortcuts are added in DSC folder under Start menu:
- Windows 7:
- Windows 8+:
DLS Login
After installation, message box will prompt up indicating default username and password for DLS login:
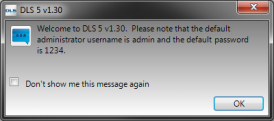
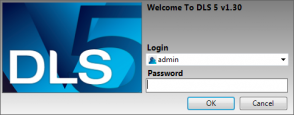
Click ‘OK’, and insert default login name (admin) and password (1234) in the following form:
Create an Account
- To create a new account in basic mode (quick mode), click ‘New Account’, ’Basic’:

- Enter account name without any blank spaces in between and special characters, select ‘Account Group’ and then select ‘Panel Type’ you want to connect to:
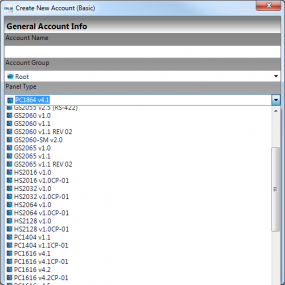
If you are not sure about your panel type, select ‘Auto Detect Panel’. This feature will automatically detect your panel type.
- Select ‘Connection Type’:
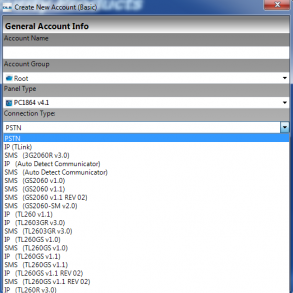
If you are connecting through GS/IP and not sure about the communicator type, select ‘Auto Detect Communicator’. This feature will automatically detect your communicator type.
- To create a new account in advanced mode, click ‘New Account’, ’Advanced’:
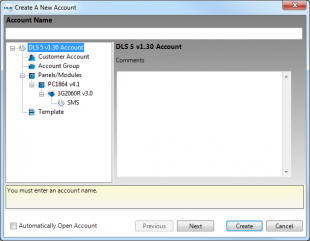
- After inserting all the required information, click ‘Create’ to successfully create this new account:
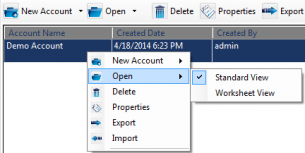
- To open the account either double click the account entry, right click on account entry and click ‘Open’ or click ‘Open’ from main account grid menu. Legacy panel type accounts can be open in either ‘Standard View’ or ‘Worksheet View’. Hybrid System accounts can only be open in ‘Standard View’:
Account Tool Bar Menu
Add a new user or load an existing template on top of this account![]()
Connect and stay online with panel without initially submitting any data communication![]()
Global Upload from Panel to DLS![]()
Global Download from DLS to Panel![]()
Detect successfully enrolled modules with the panel![]()
‘Disconnect when complete’ or ‘Disconnect immediately’ the connected sessionFile:Picture 15
Print entire account data and content![]()
Preview entire account data and content to be print![]()
Generate account system status report![]()
Communication Tags
Upload option from Panel to DLS![]()
Download option from DLS to Panel![]()
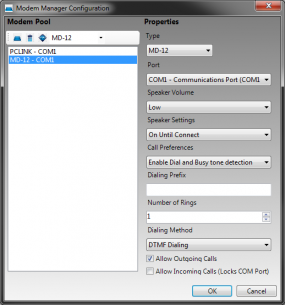
Modem Manager Configuration
- Go to Tools - Modem Manager Configuration to add/modify the modem information
Engine Limitations
- If modems are not connected directly to the server machine via a native RS-232 port then only Keyspan USB-to-Serial converter must be used to optimize the full PSTN functionality