Difference between revisions of "Windows Troubleshooting"
(→Adding Port 51004) |
(→Through Windows 7) |
||
| (10 intermediate revisions by one user not shown) | |||
| Line 22: | Line 22: | ||
3. Make sure "Change Settings" has been applied, this will now make "Allow another program" available. Select the button and locate DLS 5 and add the program. | 3. Make sure "Change Settings" has been applied, this will now make "Allow another program" available. Select the button and locate DLS 5 and add the program. | ||
| − | |||
| + | [[Image:10.png|450px|Firewall Setup]][[Image:12a.png|450px|Firewall Setup]] | ||
== Adding Port 51004 == | == Adding Port 51004 == | ||
| Line 35: | Line 35: | ||
2. Select the "Exceptions" Tab then press "Add Port". | 2. Select the "Exceptions" Tab then press "Add Port". | ||
| − | 3. Name it DLS | + | 3. Name it DLS Port and add the number "51004" under “Port number†then press "ok". |
| Line 49: | Line 49: | ||
2. Under Windows Firewall window select "Advanced Settings", and then select "New Rule" | 2. Under Windows Firewall window select "Advanced Settings", and then select "New Rule" | ||
| − | |||
| − | |||
| − | |||
| − | |||
| − | |||
| − | |||
| − | |||
| − | |||
| − | |||
| − | |||
| − | |||
| − | |||
| − | |||
| − | |||
| − | |||
| − | |||
| − | |||
| − | |||
| − | |||
| − | |||
| − | |||
| − | |||
| − | |||
| − | |||
| − | |||
| − | |||
| − | |||
| − | |||
| − | |||
| − | |||
| − | |||
| − | |||
| − | |||
| − | |||
| + | [[Image:13.png|450px|Port Setup]][[Image:WT7.png|450px|Port Setup]] | ||
3. Under "New Rule" select "Ports" under "Specific Local Port" put the number "51004". | 3. Under "New Rule" select "Ports" under "Specific Local Port" put the number "51004". | ||
| − | |||
| + | [[Image:14.png|450px|Port Setup]][[Image:15.png|450px|Port Setup]] | ||
| + | 4. Allow the connection and checkmark all rules and you can name it DLS Port and click "finish", do the following for Outbound Rules. | ||
| − | + | [[Image:16.png|300px|Port Setup]][[Image:17.png|300px|Port Setup]][[Image:18.png|300px|Port Setup]] | |
| − | + | ||
| − | + | ||
| − | + | ||
| − | + | ||
| − | + | ||
| − | + | ||
| − | + | ||
| − | + | ||
| − | + | ||
| − | + | ||
| − | + | ||
| − | + | ||
| − | + | ||
| − | + | ||
| − | + | ||
| − | + | ||
| − | + | ||
| − | + | ||
| − | + | ||
| − | + | ||
| − | + | ||
| − | + | ||
| − | + | ||
| − | + | ||
| − | + | ||
| − | + | ||
| − | + | ||
| − | + | ||
| − | + | ||
| − | + | ||
| − | + | ||
| − | [[Image: | + | |
== Installing a USB Serial driver == | == Installing a USB Serial driver == | ||
| Line 135: | Line 71: | ||
| − | Using USA - 19HS | + | '''Using USA - 19HS''' |
| − | + | ||
1. Go to: http://www.tripplite.com/en/support/downloads/software-literature-downloads.cfm?tab=4 | 1. Go to: http://www.tripplite.com/en/support/downloads/software-literature-downloads.cfm?tab=4 | ||
| Line 148: | Line 83: | ||
| − | Using USB - RS232 | + | '''Using USB - RS232''' |
| − | + | ||
1. Go to: http://www.ftdichip.com/Drivers/VCP.htm | 1. Go to: http://www.ftdichip.com/Drivers/VCP.htm | ||
| Line 164: | Line 98: | ||
7. Browse to the location the Driver Installation files are located, select “Next†this will being the driver installation | 7. Browse to the location the Driver Installation files are located, select “Next†this will being the driver installation | ||
| − | |||
| − | |||
===Through Windows 7=== | ===Through Windows 7=== | ||
| − | Using USA - 19HS | + | '''Using USA - 19HS''' |
| − | + | ||
1. Go to: http://www.tripplite.com/en/support/downloads/software-literature-downloads.cfm?tab=4 | 1. Go to: http://www.tripplite.com/en/support/downloads/software-literature-downloads.cfm?tab=4 | ||
| Line 182: | Line 113: | ||
| − | Using USB - RS232 | + | '''Using USB - RS232''' |
| − | + | ||
Once you connect the keyspan Windows 7 will automatically begin the installation | Once you connect the keyspan Windows 7 will automatically begin the installation | ||
| Line 192: | Line 122: | ||
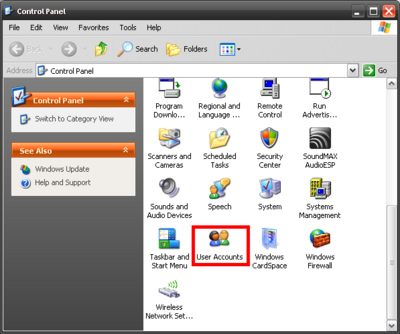
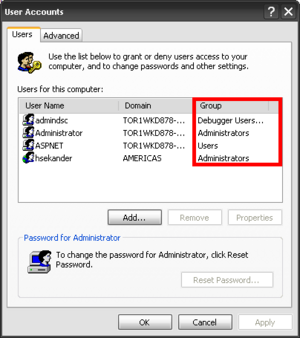
1. Is your User account set to Administrator? (Control Panel -> User Accounts -> Group) | 1. Is your User account set to Administrator? (Control Panel -> User Accounts -> Group) | ||
| − | |||
| − | |||
| − | |||
| − | |||
| − | |||
| − | |||
| − | |||
| − | |||
| − | |||
| − | |||
| − | |||
| − | |||
| − | |||
| − | |||
| − | |||
| − | |||
| − | |||
| − | |||
| − | |||
| − | |||
| − | |||
| − | |||
| − | |||
| − | |||
| − | |||
| − | |||
| − | |||
| − | |||
| − | |||
| − | |||
| − | |||
| + | [[Image:WT18.png|400px|Admin Setup]][[Image:WT19.png|300px|Admin Setup]] | ||
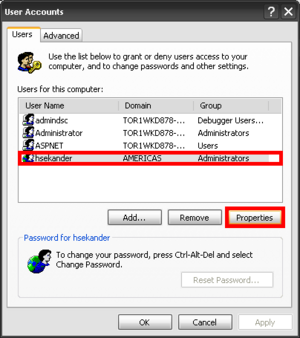
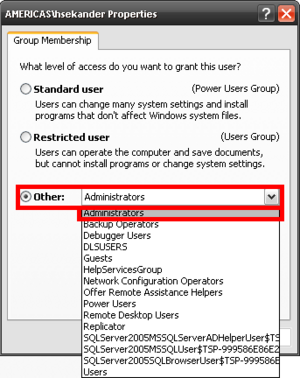
2. If no: Go to Control Panel -> User Accounts -> Select User Account -> Click Properties -> Select Other and scroll to “Administrators†-> Select “OK†| 2. If no: Go to Control Panel -> User Accounts -> Select User Account -> Click Properties -> Select Other and scroll to “Administrators†-> Select “OK†| ||
| − | |||
| − | |||
| − | |||
| − | |||
| − | |||
| − | |||
| − | |||
| − | |||
| − | |||
| − | |||
| − | |||
| − | |||
| − | |||
| − | |||
| − | |||
| − | |||
| − | |||
| − | |||
| − | |||
| − | |||
| − | |||
| − | |||
| − | |||
| − | |||
| − | |||
| − | |||
| − | |||
| − | |||
| − | |||
| − | |||
| − | |||
| − | |||
| − | |||
| − | |||
| + | [[Image:WT20.png|300px|Admin Setup]][[Image:WT21.png|300px|Admin Setup]] | ||
3. If no: Right Click DLS 5 -> Run as… -> Select “The following user:†-> Select Administrator | 3. If no: Right Click DLS 5 -> Run as… -> Select “The following user:†-> Select Administrator | ||
| − | |||
| − | |||
| − | |||
| − | |||
| − | |||
| − | |||
| − | |||
| − | |||
| − | |||
| − | |||
| − | |||
| − | |||
| − | |||
| − | |||
| − | |||
| − | |||
| − | |||
| − | |||
| − | |||
| − | |||
| − | |||
| − | |||
| − | |||
| − | |||
| − | |||
| − | |||
| − | |||
| − | |||
| − | |||
| − | |||
| − | |||
| − | |||
| + | [[Image:WT13.png|150px|Admin Setup]][[Image:WT14.png|300px|Admin Setup]] | ||
| Line 304: | Line 140: | ||
1. Is your User account set to Administrator? Go to: Control Panel, under "User Accounts and Family Safety" select "Add or Remove User Accounts", it will then inidcate if your account is set to "Administrator". | 1. Is your User account set to Administrator? Go to: Control Panel, under "User Accounts and Family Safety" select "Add or Remove User Accounts", it will then inidcate if your account is set to "Administrator". | ||
| − | |||
| − | |||
| − | |||
| − | |||
| − | |||
| − | |||
| − | |||
| − | |||
| − | |||
| − | |||
| − | |||
| − | |||
| − | |||
| − | |||
| − | |||
| − | |||
| − | |||
| − | |||
| − | |||
| − | |||
| − | |||
| − | |||
| − | |||
| − | |||
| − | |||
| − | |||
| − | |||
| − | |||
| + | [[Image:21.png|450px|Admin Setup]][[Image:22.png|450px|Admin Setup]] | ||
| Line 367: | Line 176: | ||
| − | 3. If no: Right Click DLS | + | 3. If no: Right Click DLS -> Run as administrator/ Right Click DLS -> Properties -> Compatibility -> Check “Run this program as an administrator†-> Select “ Apply†|
Latest revision as of 15:31, 17 December 2012
Contents
DLS 5 access through firewall
Through Windows XP
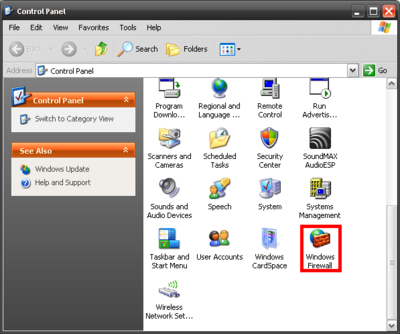
1. Go to your Control Panel and select "Windows Firewall"
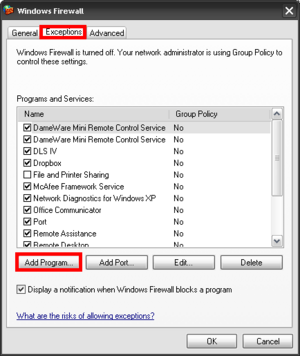
2. Select the "Exceptions" Tab then press "Add Program" and locate DLS 5 and add the program.
Through Windows 7
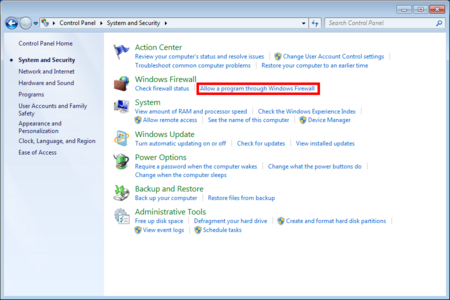
1. Go to your Control Panel and select "System and Security".
2. Under Windows Firewall window select "Allow a program or feature through Windows Firewall"
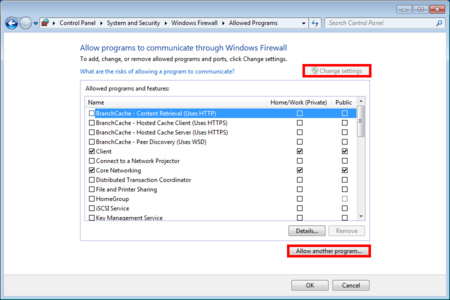
3. Make sure "Change Settings" has been applied, this will now make "Allow another program" available. Select the button and locate DLS 5 and add the program.
Adding Port 51004
Through Windows XP
1. Go to your Control Panel and select "Windows Firewall"
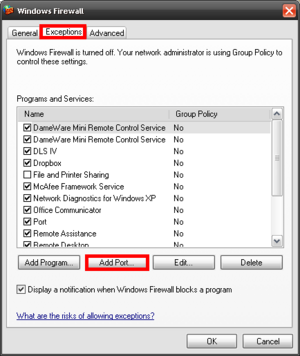
2. Select the "Exceptions" Tab then press "Add Port".
3. Name it DLS Port and add the number "51004" under “Port number†then press "ok".
Through Windows 7
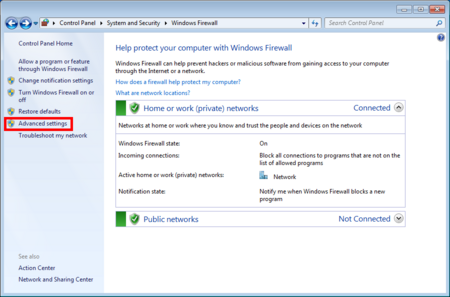
1. Go to your Control Panel, select "System and Security" and go to "Windows Firewall".
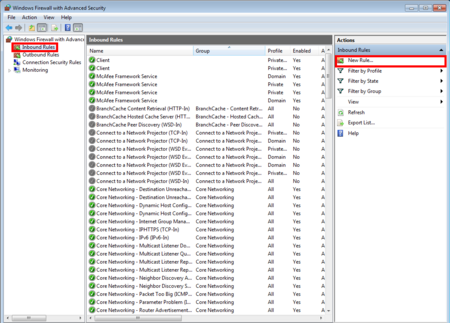
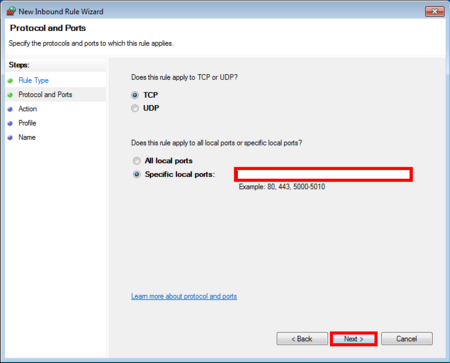
2. Under Windows Firewall window select "Advanced Settings", and then select "New Rule"
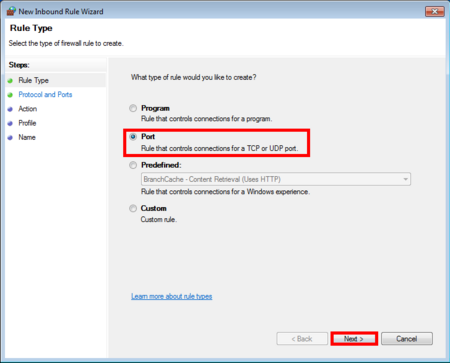
3. Under "New Rule" select "Ports" under "Specific Local Port" put the number "51004".
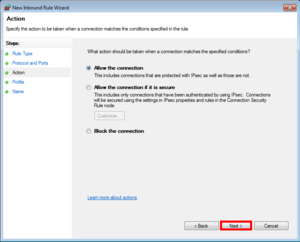
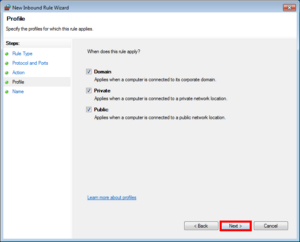
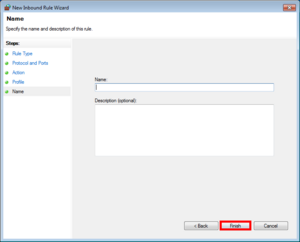
4. Allow the connection and checkmark all rules and you can name it DLS Port and click "finish", do the following for Outbound Rules.
Installing a USB Serial driver
Through Windows XP
Using USA - 19HS
1. Go to: http://www.tripplite.com/en/support/downloads/software-literature-downloads.cfm?tab=4
2. Select "Software", under "Software" select "Drivers".
3. Under "Product Category" select Keyspan@ Remotes & Adapters.
4. Download Driver for USA – 19HS (Windows 2000, XP, 2033 Server & Vista) -> Run file -> Connect the keyspan and begin the installation.
Using USB - RS232
1. Go to: http://www.ftdichip.com/Drivers/VCP.htm
2. Download 32 bit/64 bit (depending on which bit using)
3. Save file and extract to desired location
4. Connect the USB - RS232 to the computer
5. “New Hardware†balloon will pop up click it.
6. Hardware Update Wizard window will prompt up, select “No, not this timeâ€, select “Install from a list or specific location (Advanced)†->
7. Browse to the location the Driver Installation files are located, select “Next†this will being the driver installation
Through Windows 7
Using USA - 19HS
1. Go to: http://www.tripplite.com/en/support/downloads/software-literature-downloads.cfm?tab=4
2. Select "Software", under "Software" select "Drivers".
3. Under "Product Category" select Keyspan@ Remotes & Adapters.
4. Download Driver for USA – 19HS (Windows 2000, XP, 2033 Server & Vista) -> Run file -> Connect the keyspan and begin the installation.
Using USB - RS232
Once you connect the keyspan Windows 7 will automatically begin the installation
How do I enable Administrative Privileges for DLS 5
Through Windows XP
1. Is your User account set to Administrator? (Control Panel -> User Accounts -> Group)
2. If no: Go to Control Panel -> User Accounts -> Select User Account -> Click Properties -> Select Other and scroll to “Administrators†-> Select “OKâ€
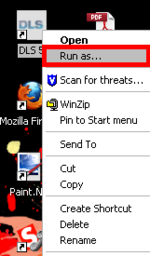
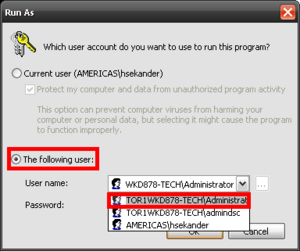
3. If no: Right Click DLS 5 -> Run as… -> Select “The following user:†-> Select Administrator
Through Windows 7
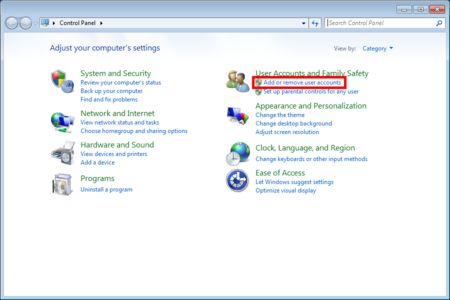
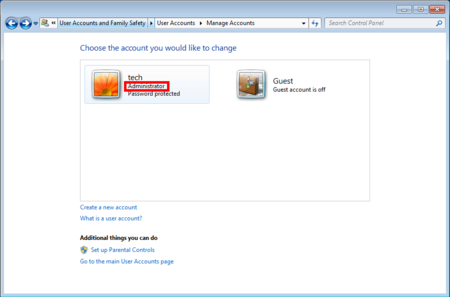
1. Is your User account set to Administrator? Go to: Control Panel, under "User Accounts and Family Safety" select "Add or Remove User Accounts", it will then inidcate if your account is set to "Administrator".
2. If no selectyour User Accounts then press "Change your account type", it will now allow you to switch to Administrator and select “Change Account Type†to confirm the change.
3. If no: Right Click DLS -> Run as administrator/ Right Click DLS -> Properties -> Compatibility -> Check “Run this program as an administrator†-> Select “ Applyâ€
