Difference between revisions of "Account Maintenance"
Andthompson (Talk | contribs) |
Jvankooten (Talk | contribs) |
||
| (56 intermediate revisions by 6 users not shown) | |||
| Line 1: | Line 1: | ||
| − | + | [[category:Working with DLS]] | |
| − | [[ | + | |
| − | + | ||
| − | + | == Open Account == | |
| − | + | In order to open an account, you must either double-click on the account name you wish you open, right-click on the account and select 'open', or click the account name to highlight it and select the 'open' button. Selecting the 'Open' function will create a new tab containing all of the information and programming from the selected account. | |
| − | |||
| − | + | == Print Account == | |
| − | + | To print account information, click the Print button from the toolbar. The Print functionality allows the user to print all account information including contact, device and panel information. In addition, just like in DLS 2002 the Event Buffer can also be printed if selected for printing. | |
| + | After openning the account, in the account toolbar select Print to print the account information, or Print Preview to view what information is printed. (Please note that currently the Print option from Print Preview is disabled) | ||
| + | [[Image:Printer.png|Print]][[Image:PrintPreviewDialog.png|Print Preview]] | ||
| + | [[Image:Printer1.png|right|thumb|300px|Print Menu]] | ||
| − | |||
| + | '''Print Menu options''' | ||
| − | + | By default, all panels assigned to the account opened are checked for printing. To remove a panel from the printing list, uncheck the checkbox next to that panel. | |
| − | + | '''Print Programmed''' (non default) options only. By default this checkbox is checked. When checked only options that are different than the original panel defaults are printed (e.g., user information). | |
| + | |||
| + | '''Print Event Buffer''' To print the complete panel event buffer history, check this box. Like in DLS 2002, DLS prints the complete event buffer and does not provide an option to print only selected areas of the event buffer. | ||
== Delete Account == | == Delete Account == | ||
| + | |||
| + | ''For a tutorial on how to delte an account, see [[Deleting an Account Tutorial]]'' | ||
In order to delete an account you may do one of the following, click on the account to highlight it and press the 'delete' key on your keyboard, right clicking on the account and selecting 'delete', or clicking on the account to highlight it and select the 'delete' button on the toolbar. Doing this will highlight the account in red and mark it for deletion. | In order to delete an account you may do one of the following, click on the account to highlight it and press the 'delete' key on your keyboard, right clicking on the account and selecting 'delete', or clicking on the account to highlight it and select the 'delete' button on the toolbar. Doing this will highlight the account in red and mark it for deletion. | ||
In order to completely remove the account you must go to the '[[Administrator Tools]]' tab. Once you are in the administrator tools, you must select 'remove account' and click the refresh button. This will list all of the account currently marked for deletion. You may then check the box for any accounts you wish to permanently remove and select the 'remove' button. This will permanently delete all of the selected accounts. Instead of the remove button you could also press the 'restore' button in order to stop the selected accounts from being deleted. | In order to completely remove the account you must go to the '[[Administrator Tools]]' tab. Once you are in the administrator tools, you must select 'remove account' and click the refresh button. This will list all of the account currently marked for deletion. You may then check the box for any accounts you wish to permanently remove and select the 'remove' button. This will permanently delete all of the selected accounts. Instead of the remove button you could also press the 'restore' button in order to stop the selected accounts from being deleted. | ||
| + | |||
| + | |||
| + | |||
| + | ==Save== | ||
| + | |||
| + | There are two ways in which to save changes you have made to an account. Once you have made the changes, you can click on the save (looks like a diskette) icon in the toolbar. This will save all changes which have been made. Alternatively, if you close the account tab once changes have been made, you will see a window telling you that changes have been made. This window will ask you whether you wish to save changes or not. | ||
| + | |||
| + | [[Image:Save.png]][[Image:ConfirmSave.png]] | ||
== Properties == | == Properties == | ||
| + | [[Image:Properties2.png|right]] | ||
| + | [[Image:properties.png|right|300px|thumb|The Account Properties Window]] | ||
If you right-click on an account and select properties, or click on the account to highlight it and select the 'properties' button, this will open the account properties window. | If you right-click on an account and select properties, or click on the account to highlight it and select the 'properties' button, this will open the account properties window. | ||
| + | This properties window contains many different things to edit: | ||
| + | |||
| + | - You may edit the customer's account name and contact details, as well as adding additional customers or contacts to the account. | ||
| + | |||
| + | - You may edit the [[Account Group]] that the account is part of. | ||
| + | |||
| + | - You may add, remove, or edit the panels and module types and versions which are part of the account. | ||
| + | |||
| + | - You may edit the communications options for the account ([[Connection methods#PC-Link|PC-Link]] port, phone number and options, etc.) | ||
| + | |||
| + | - There is also a 'comments' section where you can add any additional information you may require. | ||
| + | |||
| + | |||
| + | |||
| + | |||
| + | |||
| + | |||
| + | |||
| + | |||
| + | |||
| + | |||
| + | |||
| + | |||
| + | |||
| + | |||
| + | |||
| + | |||
| + | |||
| + | == Delete a Module == | ||
| + | |||
| + | |||
| + | To delete a module from an account, in the Account Search menu right click on the account where the module is configured and then select Properties. | ||
| + | |||
| + | |||
| + | In the Account setting menu, select the module you wish to remove and click on the delete button. | ||
| + | |||
| + | The account will be reloaded for the module deletion to take place. | ||
| + | |||
| + | [[Image:Properties1.png|Go to Account Properties Window]][[Image:Delete.png|300px|Delete Module]] | ||
== Account Group Maintenance == | == Account Group Maintenance == | ||
| − | |||
| + | ===What is an Account Group?=== | ||
| + | |||
| + | In DLS, Folders have been replaced by Account Groups to better fit a database back-end architecture. Account Groups can be added, deleted, and modified via the Account Group Maintenance window. To open the Account Group Maintenance window, go to "File" --> "Account Group Maintenance". | ||
| + | |||
| + | |||
| + | ===Group Maintenance=== | ||
The toolbar at the top of the Account Group Maintenance window has the following buttons: | The toolbar at the top of the Account Group Maintenance window has the following buttons: | ||
| − | '''New Group''' - Click | + | '''New Group''' - Click the "New Group" button to add a new Account Group, or sub-Account Group. Just as Folders allow several layers of subfolders, Account Groups allow several layers of sub-Account Groups. Simply select the Account Group and click "New Group". The new Account Group will be added as a sub-Account Group. |
| + | |||
| + | '''Rename''' - Select an Account Group and click the "Rename" button to rename the Account Group | ||
| + | |||
| + | '''Remove''' - Click the "Remove" button to delete, or remove, an unwanted Account Group. Note that ALL sub-Account Groups will also be removed. | ||
| + | |||
| + | '''Permissions''' - Permissions may be applied to each Account Group level. Click the "Permissions" button to launch the Permissions Manager for the selected Account Group. Note that when permissions are applied to an Account Group, those permissions are cascaded down to its sub-Account Groups. | ||
| + | |||
| + | '''Refresh''' - Click the "Refresh" button to refresh the list of all Account Groups. | ||
| + | |||
| + | |||
| − | + | ==Recent Account Activity== | |
| − | + | Recent Activity is viewable while an account is open in the Status Window. Click the "Recent Activity" tab to see the recent activity on that account. | |
| − | + | The Recent Activity section from within an account will display account events. It will log programming changes, but it wont specify what programming sections were altered. | |
| + | If an event is logged under "Admin", that means that a change was made to the account but was not communicated. | ||
| − | + | If an event is logged under "Communication Manager", that means that an event was communicated with the panel. It will list the communication in the log, but it wont specify which section was transmitted. | |
| − | + | [[Image:RecentA.png]][[Image:RecentA2.png|450px]] | |
Latest revision as of 00:39, 12 May 2015
Contents
Open Account
In order to open an account, you must either double-click on the account name you wish you open, right-click on the account and select 'open', or click the account name to highlight it and select the 'open' button. Selecting the 'Open' function will create a new tab containing all of the information and programming from the selected account.
Print Account
To print account information, click the Print button from the toolbar. The Print functionality allows the user to print all account information including contact, device and panel information. In addition, just like in DLS 2002 the Event Buffer can also be printed if selected for printing.
After openning the account, in the account toolbar select Print to print the account information, or Print Preview to view what information is printed. (Please note that currently the Print option from Print Preview is disabled)
Print Menu options
By default, all panels assigned to the account opened are checked for printing. To remove a panel from the printing list, uncheck the checkbox next to that panel.
Print Programmed (non default) options only. By default this checkbox is checked. When checked only options that are different than the original panel defaults are printed (e.g., user information).
Print Event Buffer To print the complete panel event buffer history, check this box. Like in DLS 2002, DLS prints the complete event buffer and does not provide an option to print only selected areas of the event buffer.
Delete Account
For a tutorial on how to delte an account, see Deleting an Account Tutorial
In order to delete an account you may do one of the following, click on the account to highlight it and press the 'delete' key on your keyboard, right clicking on the account and selecting 'delete', or clicking on the account to highlight it and select the 'delete' button on the toolbar. Doing this will highlight the account in red and mark it for deletion.
In order to completely remove the account you must go to the 'Administrator Tools' tab. Once you are in the administrator tools, you must select 'remove account' and click the refresh button. This will list all of the account currently marked for deletion. You may then check the box for any accounts you wish to permanently remove and select the 'remove' button. This will permanently delete all of the selected accounts. Instead of the remove button you could also press the 'restore' button in order to stop the selected accounts from being deleted.
Save
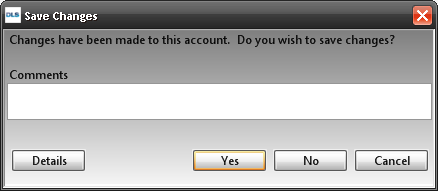
There are two ways in which to save changes you have made to an account. Once you have made the changes, you can click on the save (looks like a diskette) icon in the toolbar. This will save all changes which have been made. Alternatively, if you close the account tab once changes have been made, you will see a window telling you that changes have been made. This window will ask you whether you wish to save changes or not.
Properties
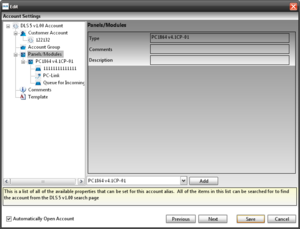
If you right-click on an account and select properties, or click on the account to highlight it and select the 'properties' button, this will open the account properties window.
This properties window contains many different things to edit:
- You may edit the customer's account name and contact details, as well as adding additional customers or contacts to the account.
- You may edit the Account Group that the account is part of.
- You may add, remove, or edit the panels and module types and versions which are part of the account.
- You may edit the communications options for the account (PC-Link port, phone number and options, etc.)
- There is also a 'comments' section where you can add any additional information you may require.
Delete a Module
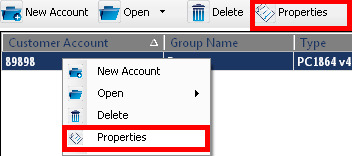
To delete a module from an account, in the Account Search menu right click on the account where the module is configured and then select Properties.
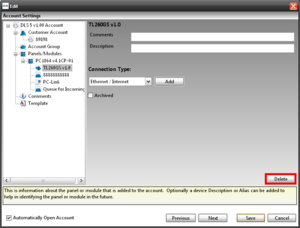
In the Account setting menu, select the module you wish to remove and click on the delete button.
The account will be reloaded for the module deletion to take place.
Account Group Maintenance
What is an Account Group?
In DLS, Folders have been replaced by Account Groups to better fit a database back-end architecture. Account Groups can be added, deleted, and modified via the Account Group Maintenance window. To open the Account Group Maintenance window, go to "File" --> "Account Group Maintenance".
Group Maintenance
The toolbar at the top of the Account Group Maintenance window has the following buttons:
New Group - Click the "New Group" button to add a new Account Group, or sub-Account Group. Just as Folders allow several layers of subfolders, Account Groups allow several layers of sub-Account Groups. Simply select the Account Group and click "New Group". The new Account Group will be added as a sub-Account Group.
Rename - Select an Account Group and click the "Rename" button to rename the Account Group
Remove - Click the "Remove" button to delete, or remove, an unwanted Account Group. Note that ALL sub-Account Groups will also be removed.
Permissions - Permissions may be applied to each Account Group level. Click the "Permissions" button to launch the Permissions Manager for the selected Account Group. Note that when permissions are applied to an Account Group, those permissions are cascaded down to its sub-Account Groups.
Refresh - Click the "Refresh" button to refresh the list of all Account Groups.
Recent Account Activity
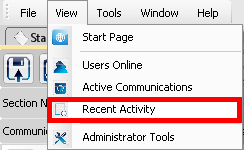
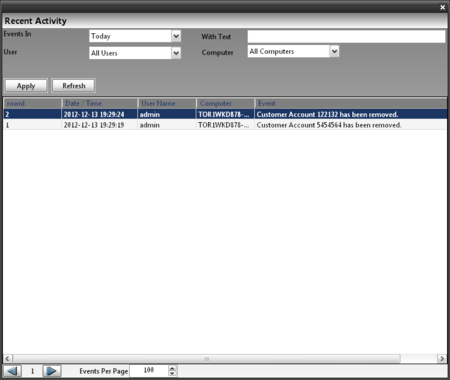
Recent Activity is viewable while an account is open in the Status Window. Click the "Recent Activity" tab to see the recent activity on that account.
The Recent Activity section from within an account will display account events. It will log programming changes, but it wont specify what programming sections were altered. If an event is logged under "Admin", that means that a change was made to the account but was not communicated.
If an event is logged under "Communication Manager", that means that an event was communicated with the panel. It will list the communication in the log, but it wont specify which section was transmitted.
