Difference between revisions of "Create a New Account (Advanced)"
(→Customer Account) |
|||
| (16 intermediate revisions by 4 users not shown) | |||
| Line 1: | Line 1: | ||
| + | [[category:Working with DLS]] | ||
When you are creating a new account, you have several advanced options that you can use | When you are creating a new account, you have several advanced options that you can use | ||
To access the Advanced options, you can either hit the "Advanced" button in the create new account screen, or you can right-click on the account that has already been created and select properties. | To access the Advanced options, you can either hit the "Advanced" button in the create new account screen, or you can right-click on the account that has already been created and select properties. | ||
| − | |||
| + | [[Image:Properties1.png]] | ||
| Line 11: | Line 12: | ||
When you go to the advanced settings, a 2-pane window will appear. | When you go to the advanced settings, a 2-pane window will appear. | ||
| − | + | [[Image:Properties.png]] | |
| − | The first menu on the left will be "DLS | + | |
| + | The first menu on the left will be "DLS Account". This menu branches off into: | ||
===Customer Account=== | ===Customer Account=== | ||
Here you can enter all the customer contact information. If you have multiple panels added to the account, and you wish to have separate contact information for each one, you can add more contact cards by selecting "add" from the bottom of the screen. | Here you can enter all the customer contact information. If you have multiple panels added to the account, and you wish to have separate contact information for each one, you can add more contact cards by selecting "add" from the bottom of the screen. | ||
| + | |||
| + | [[Image:Advproperties.png]] | ||
===Account Group=== | ===Account Group=== | ||
This is where you can specify which group the account will belong too | This is where you can specify which group the account will belong too | ||
| + | |||
| + | ''*if you would like to know how to create groups, refer to the [[Account Groups Tutorial]]'' | ||
===Panels/Modules=== | ===Panels/Modules=== | ||
| − | DLS | + | DLS now gives you the ability to add multiple panels to a single account. |
| + | (*note: Although the panels will be under one account, the user codes will not be shared between them) | ||
| + | |||
| + | To add another panel to an account, right-click the account you want to use and then go to properties. When the window appears, select "Panels/modules". | ||
| + | At the bottom of the screen, select the panel you would like to add then click "add". The panel will appear under this menu. Selecting the panel, you can then add a connection type and various modules. You can also add comments and a description for the account and select whether or not you are going to be using programming templates. | ||
| + | |||
| + | |||
| + | |||
| + | [[Image:Modproperties.png]] | ||
===Comments=== | ===Comments=== | ||
| + | You can add comments to an account. This is especially useful if there are multiple users using the account. | ||
Latest revision as of 23:09, 17 December 2012
When you are creating a new account, you have several advanced options that you can use
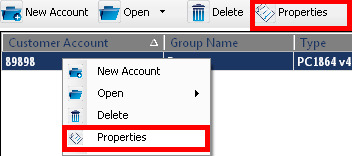
To access the Advanced options, you can either hit the "Advanced" button in the create new account screen, or you can right-click on the account that has already been created and select properties.
Advanced Settings
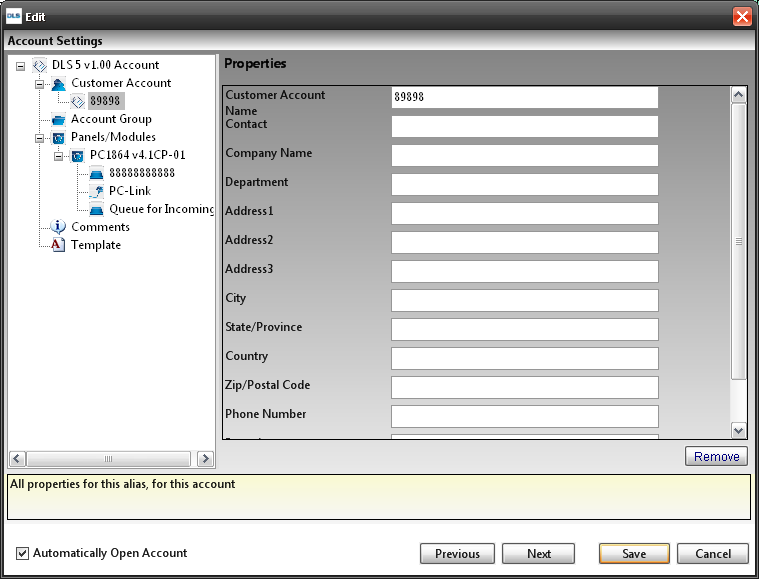
When you go to the advanced settings, a 2-pane window will appear.
The first menu on the left will be "DLS Account". This menu branches off into:
Customer Account
Here you can enter all the customer contact information. If you have multiple panels added to the account, and you wish to have separate contact information for each one, you can add more contact cards by selecting "add" from the bottom of the screen.
Account Group
This is where you can specify which group the account will belong too
*if you would like to know how to create groups, refer to the Account Groups Tutorial
Panels/Modules
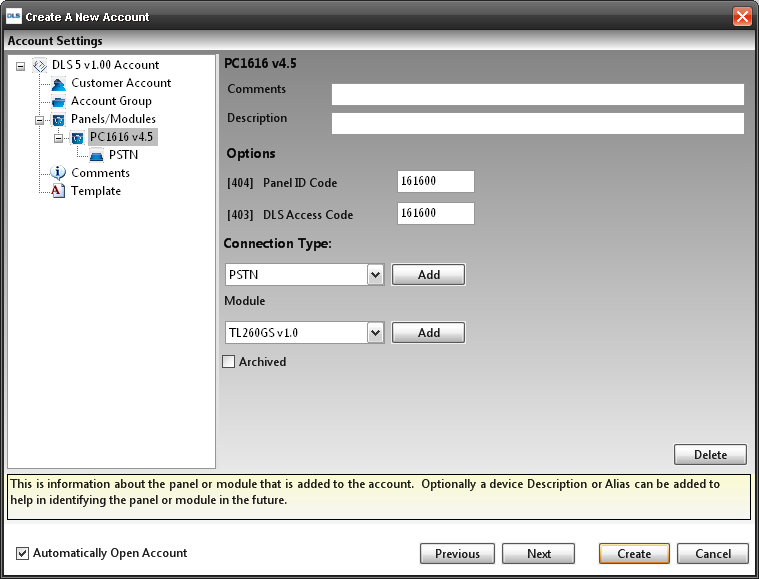
DLS now gives you the ability to add multiple panels to a single account. (*note: Although the panels will be under one account, the user codes will not be shared between them)
To add another panel to an account, right-click the account you want to use and then go to properties. When the window appears, select "Panels/modules". At the bottom of the screen, select the panel you would like to add then click "add". The panel will appear under this menu. Selecting the panel, you can then add a connection type and various modules. You can also add comments and a description for the account and select whether or not you are going to be using programming templates.
Comments
You can add comments to an account. This is especially useful if there are multiple users using the account.


