Communications Tutorial: Difference between revisions
| Line 6: | Line 6: | ||
In order to connect to a panel, you must first decide which type of connection you wish to use. The following options are available. | In order to connect to a panel, you must first decide which type of connection you wish to use. The following options are available. | ||
PSTN | |||
PSTN stands for Public Switched Telephone Network. In plain terms, phone line. | PSTN stands for Public Switched Telephone Network. In plain terms, phone line. | ||
Revision as of 23:04, 5 December 2012
Connection Types
In order to connect to a panel, you must first decide which type of connection you wish to use. The following options are available.
PSTN PSTN stands for Public Switched Telephone Network. In plain terms, phone line.
By selecting this option you will be using the configured modem to dial into the panel. There are 2 modems available to use on the DLS IV platform:
MD-12 - available from DSC
Multi-Tech 56k - widely available around the globe. Model #MT5634ZBA-V-V92-NAM (or similar).
Basic PSTN Setup

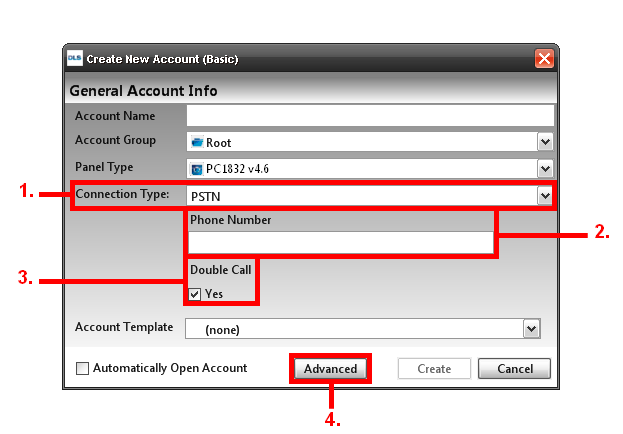
1. Connection Type: The method the panel would be connecting Under “Connection Typeâ€, make sure it is set to “PSTNâ€.
2. Phone Number: This will prompt up new options to add the “Phone Numberâ€, enter your phone number, if it requires a “1†or a “9†to dial out from that location, enter that with the following phone number.
3. Double Call: This will also prompt well to have “Double Call†enabled, enable double call if that feature will be used.
4. Advanced: Click on “Advanced†to go to the advanced options for PSTN.
IP (T-Link)
By selecting IP, you will be connecting to the account using a network connection through the TL-250 module. You need to provide the IP address of the T-Link you will be connecting to. This can be done when you are creating your account or by going into the account properties.
You will also need to make sure all the appropriate ports for the communication are open.
*If you are unsure how to open the ports, contact your network administrator
SMS (GS2060/GS2065 or TL260GS/TL265GS)
This connection type is NEW to DLS IV.
An SMS message is sent to the wireless GSM module to trigger a return connection to the waiting DLS IV client. To use this connection, the SIM number is used as the unique Identifier. Ensure the full SIM number is entered.
One key advantage of using the SMS connection type is that there is NO PORT FORWARD required on the installation. Instead, there is a single port forward required on the DLS IV PC's network to allow the incoming connection from communicator module.
There is a noticeable amount of time required to connect via SMS connection type. This is due to the delays introduced at each juncture of the connection process. Please be patient, connection times of 2-5 mins are normal.
For more information, see these articles:
Ethernet/Internet (TL260GS/TL265GS)
This connection type is NEW to DLS IV, and is DLS IV's fastest connection. Global upload and download times are reduced to seconds with this connection type.
An "Ethernet/Internet" connection is a direct connection to the installed TL260GS/TL265GS communicator. This will require a port is available on the install-site end to accept the direct connection.
To use this connection type, you will need:
- The TL260GS/TL265GS must already be configured with an IP and have a connection to the internet
- TL260GS/TL265GS Installer Code
- Panel's DLS Access Code (if panel sections are included in the communication job)
- EXTERNAL IP & Port of the TL260GS/TL265GS that is configured to allow incoming connections to the module
This connection type does NOT backup to the GPRS (wireless) channel if the Ethernet connection fails.
Connecting to the Panel
First you must choose the desired communications operation (Global upload, Global Download, Communicate Tags, etc).
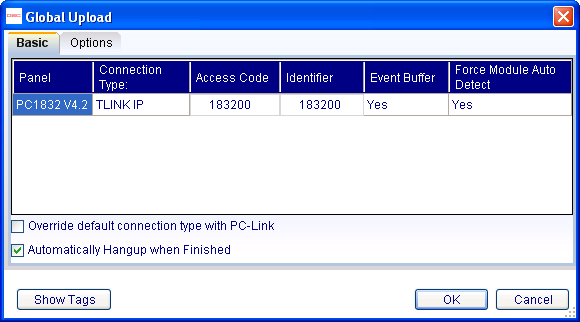
Once you have selected the type of communication operation, a screen will appear with 3 tabs prompting you with different options.

Under the "Basic" tab, you can verify the panel you are connecting to, the type of connection you will be making, the access code and the ID code. Depending on which communications operation you select you might also have an option to "auto-detect modules" and whether you would like to upload the event buffer.
There is also a button "Show Tags". This will display for you exactly which sections have been tagged for communications.
Under the "Options" tab you can turn on/off the double call feature. You can also specify the double call timer and the double call duration.
Upload Event Buffer
If you would like to upload the event buffer, without upload or downloading any other sections, you can select "Upload Event Buffer" from the toolbar.
Module Auto-Detect
If you would like to find out what modules are enrolled on the system, without uploading or downloading any programming sections, you can select the "Module Auto-Detect" function from the toolbar.
