|
|
| Line 24: |
Line 24: |
|
| |
|
| ==PC Firewall setup:== | | ==PC Firewall setup:== |
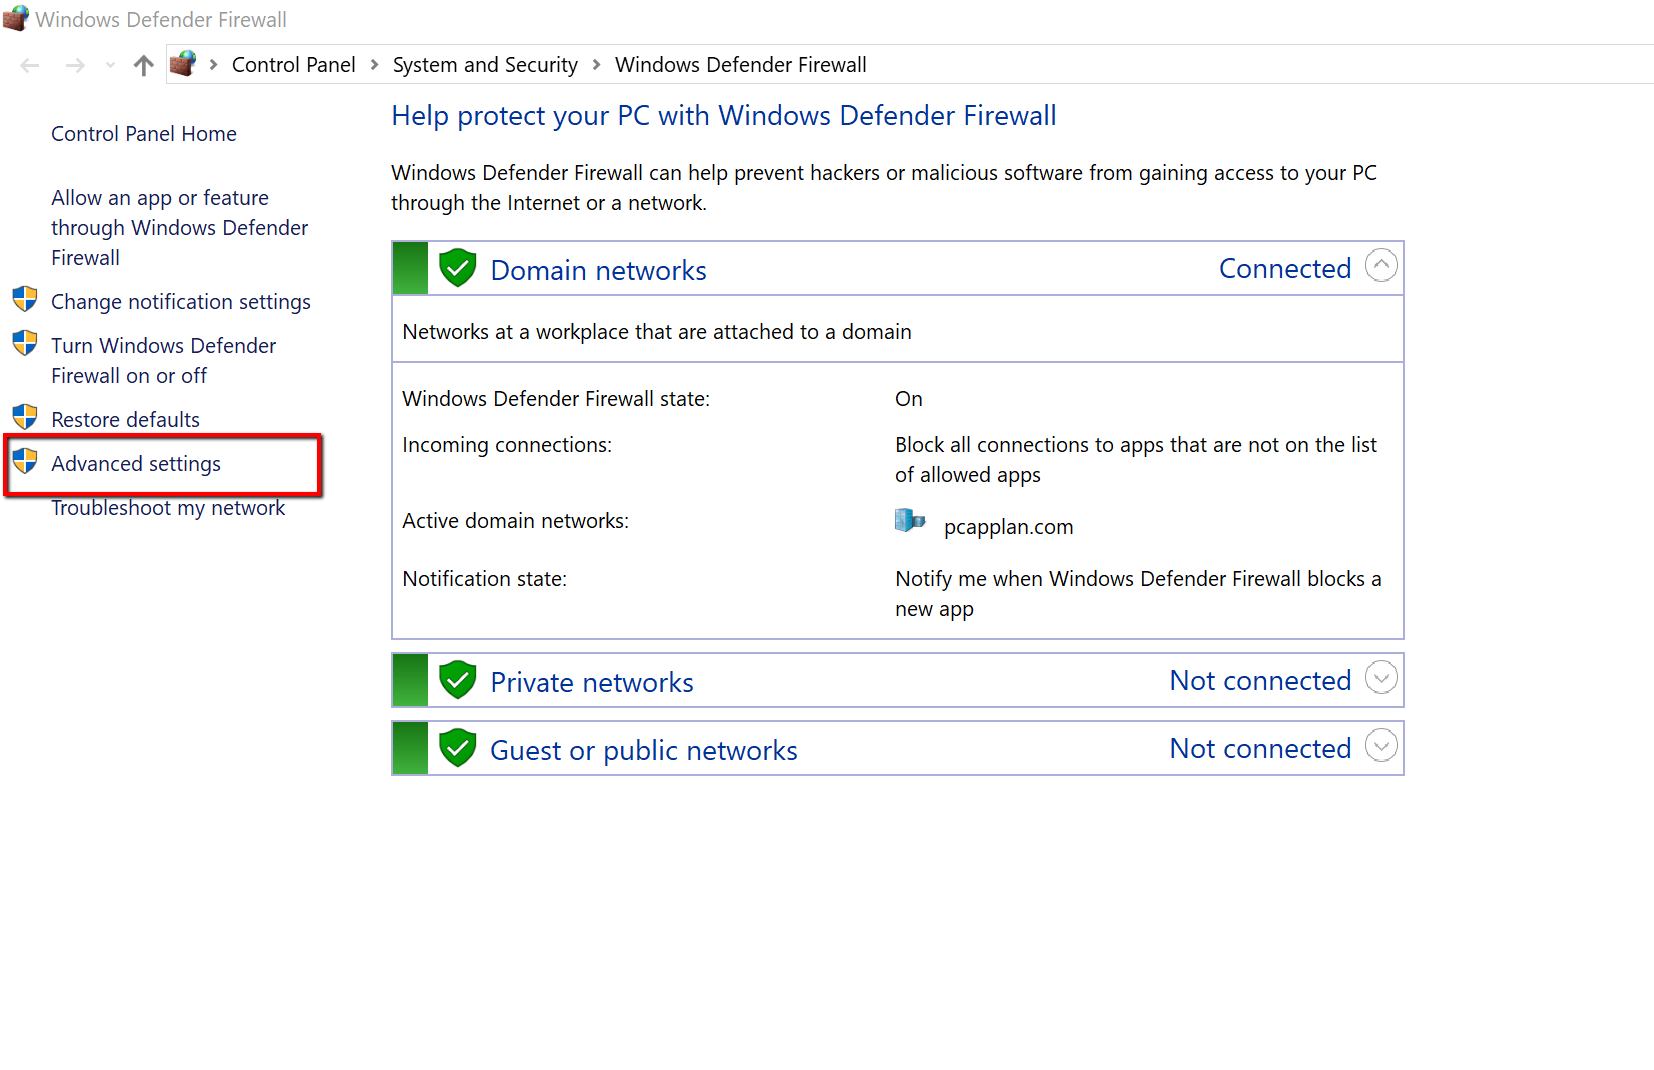
| [[File:ff1.png|600px|thumb|Windows Firewall Setup]] | | [[File:ff1.png|600px|left|thumb|Control Panel\System and Security\Windows Defender Firewall: Click “Advanced Settings”]] |
| Note: This setup will only be required the first time Firewall Friendly is used on the Server or Workstation. | | Note: This setup will only be required the first time Firewall Friendly is used on the Server or Workstation. |
|
| |
|
| Control Panel\System and Security\Windows Defender Firewall: Click “Advanced Settings”
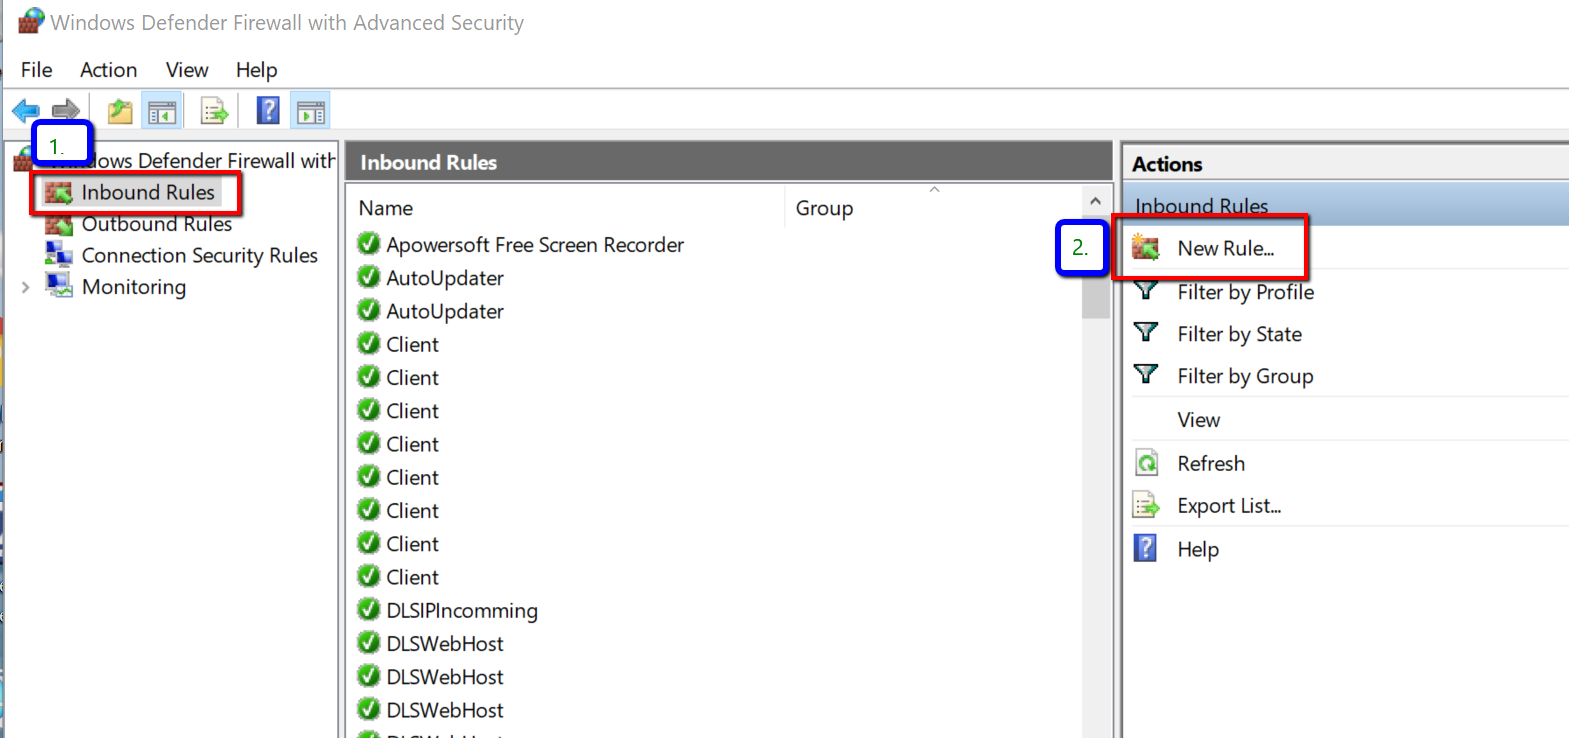
| | [[File:ff2.png|600px|left|thumb|Inbound Rules > New Rules]] |
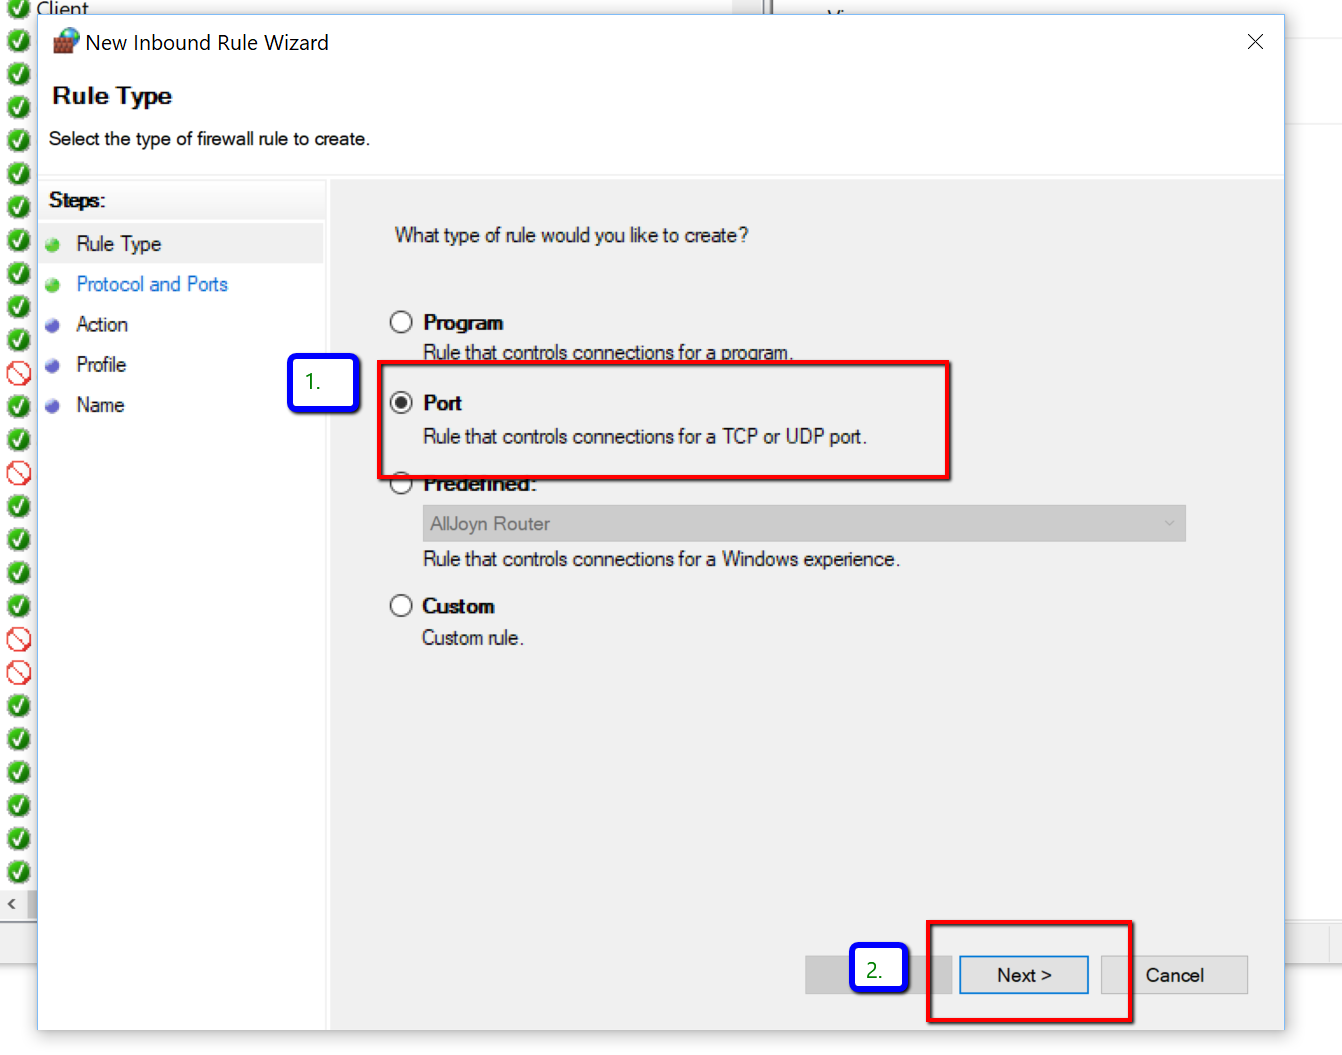
| | | [[File:ff3.png|600px|left|thumb|Select Port and Click Next]] |
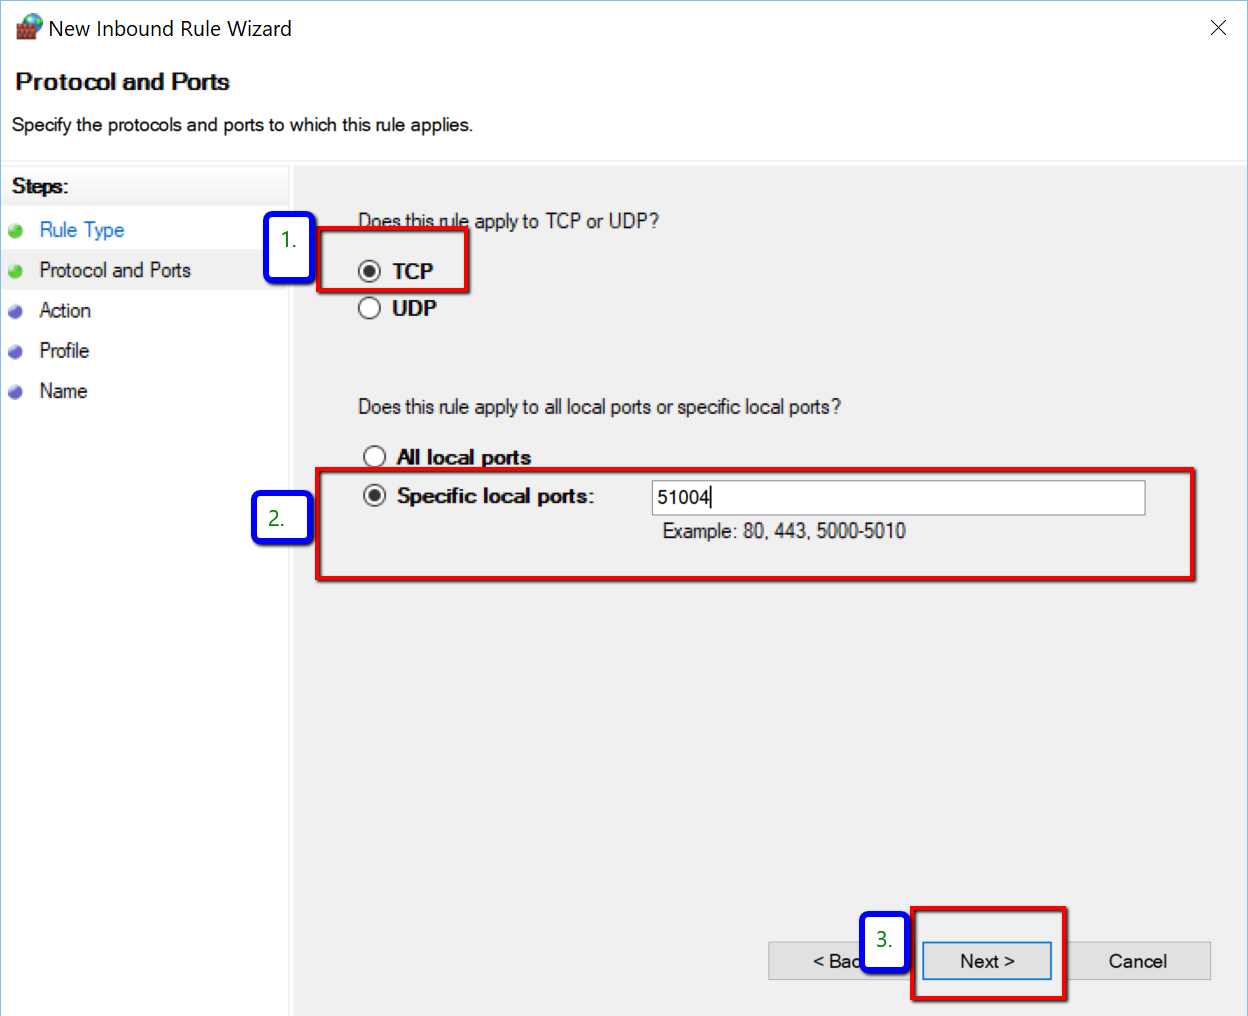
| | | [[File:ff4.png|600px|left|thumb|Make sure TCP is selected and Program “Specific Local ports” as 51004 and Click Next]] |
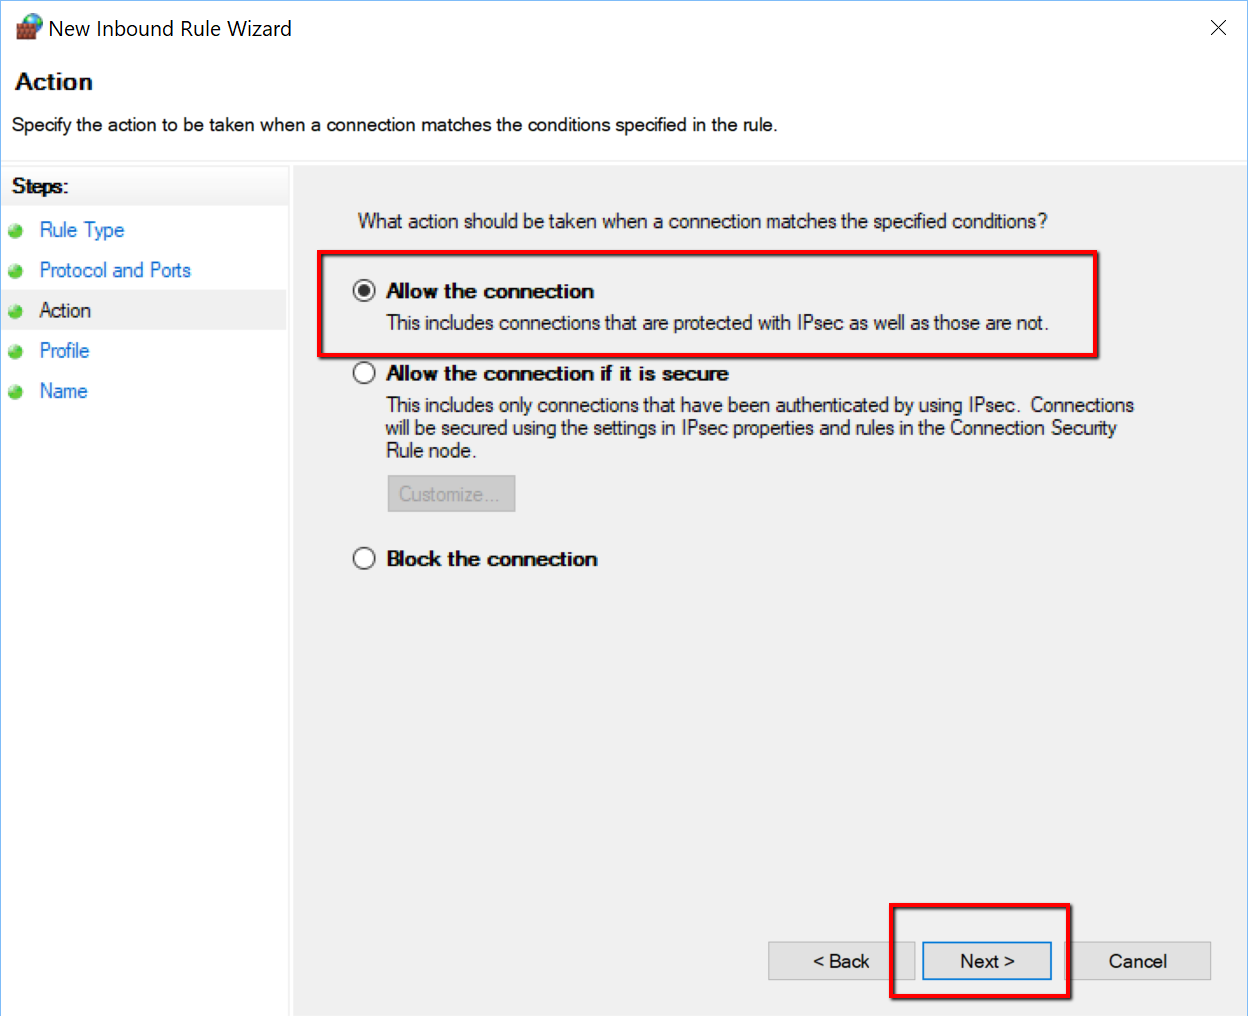
| | | [[File:ff5.png|600px|left|thumb|Make sure Allow the connection is selected and click Next]] |
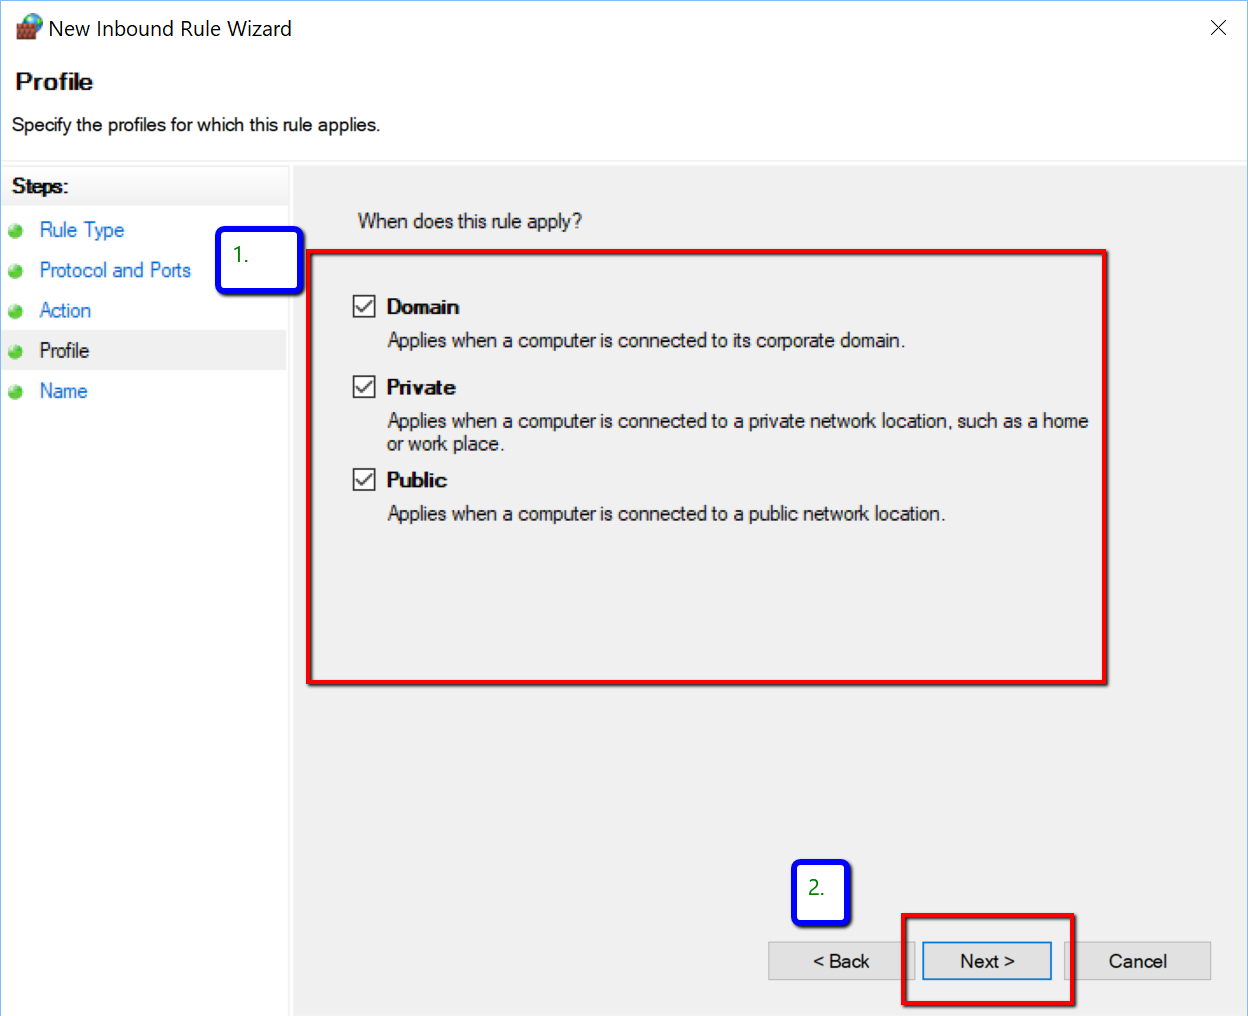
| | | [[File:ff6.png|600px|left|thumb|Make sure all the check boxes are selected and Click Next]] |
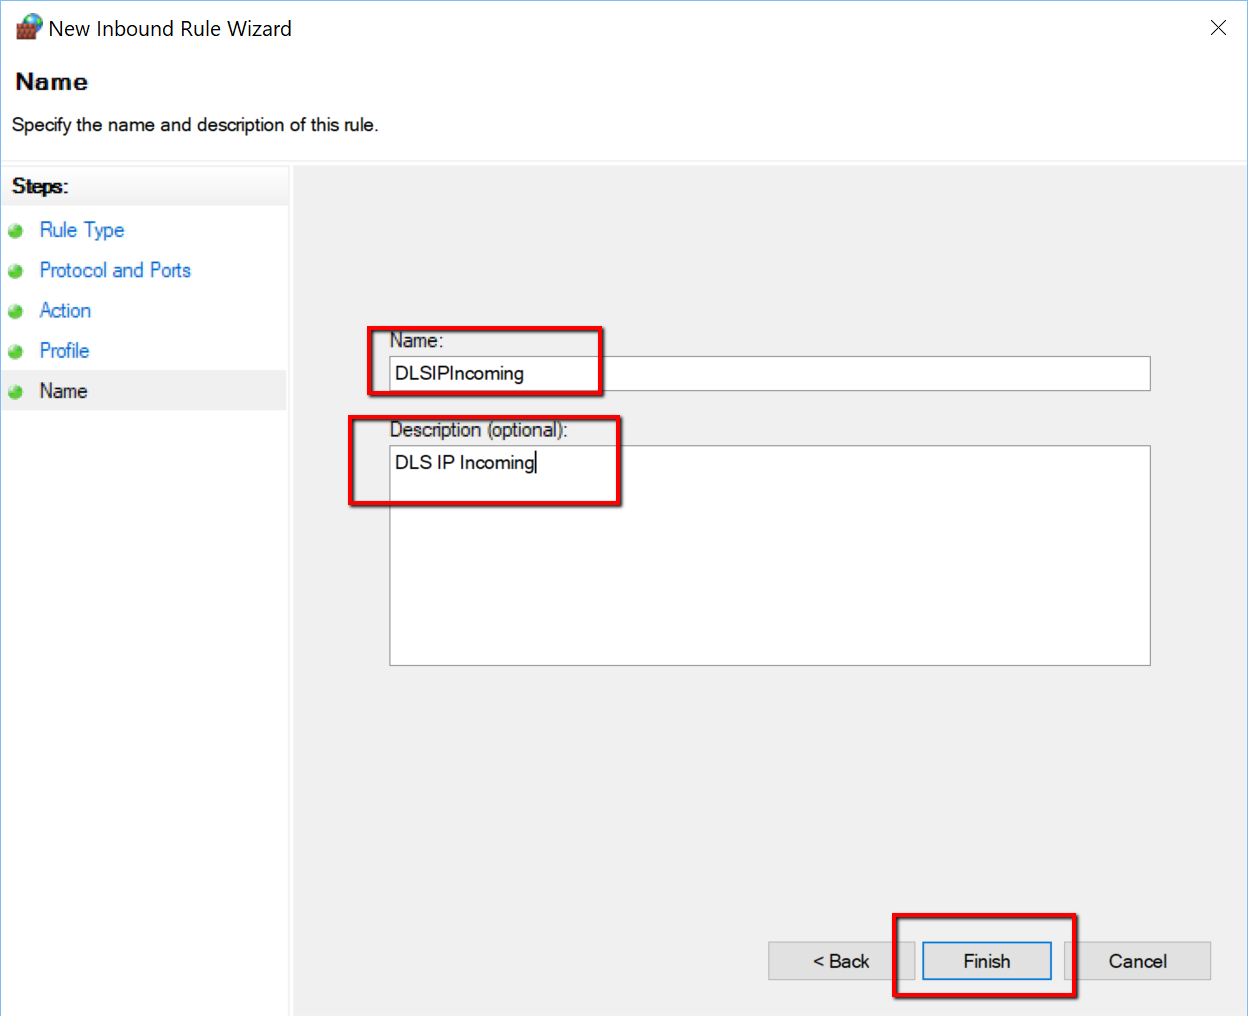
| | | [[File:ff7.png|600px|left|thumb|Give the new Inbound Rule a name and click Finish]] |
| | |
| | |
| | |
| | |
| | |
| | |
| | |
| | |
| | |
| | |
| | |
| | |
| [[File:ff2.png|600px|right|thumb|Windows Firewall Setup]] | |
| Note: This setup will only be required the first time Firewall Friendly is used on the Server or Workstation.
| |
| | |
| Control Panel\System and Security\Windows Defender Firewall: Click “Advanced Settings”
| |
| ===Basic PSTN Setup===
| |
| [[Image.png|400px|right|thumb|Ba PSTN Setup]] | |
| | |
| 1. Connection Type: The method the panel would be connecting Under Connection Type, make sure it is set to PSTN.
| |
| | |
| 2. Phone Number: This will prompt up new options to add the Phone Number, enter your phone number, if it requires a 1 or a 9 to dial out from that location, enter that with the following phone number.
| |
| | |
| 3. Double Call: This will also prompt up to have Double Call enabled, it will allow you to hangup and be able call if that feature will be used.
| |
| | |
| 4. Advanced: Click on Advanced to go to the advanced options for PSTN.
| |
| | |
| ===Advanced PSTN Setup===
| |
| [[ImaSTNa.png|600px|right|thumb|Advanced PSTN Setup]]
| |
|
| |
| | |
| 1. PSTN: Under the DLS Account heading on the left side, select PSTN this will bring up the PSTN advanced options.
| |
| | |
| 2. Phone Number: The phone number entered in the previous section would show up here.
| |
| | |
| 3. Double Call Enable: If Double Call was enabled on the previous section it would show up here.
| |
| | |
| 4. Double Call Timer: Allows the maximum amount of time in minutes between calls when connecting to a pa
| |
| 5. Double Call Duration: Allows the maximum amount of time in minutes before double call hangs up.
| |
| | |
| 6. Delete: Allows you to remove the PSTN connection from the panel
| |
| | |
| 7. This will allow you to create/cancel or go to the next/previous section
| |
| | |
| == IP (T-Link) ==
| |
| | |
| By selecting IP, you will be connecting to the account using a network connection through the TL-250 module. You need to provide the IP address of the T-Link you will be connecting to. This can be done when you are creating your account or by going into the account properties.
| |
| | |
| You will also need to make sure all the appropriate ports for the communication are open.
| |
| | |
| ''*If you are unsure how to open the ports, contact your network administrator''
| |
| | |
| | |
| ===Basic IP (T-Link) Setup===
| |
| [[Image:IP_00px|right|thumb|Basic IP (T-Link) Setup]]
| |
| | |
| | |
| 1. Connection Type: Under Connection Type, make sure T Link is selected, this will prompt up new options to add the IP address and the Encryption Key.
| |
| | |
| 2. IP: Enter the public IP address of the T Link module that is being used.
| |
| | |
| 3. Encryption Key: Add an encryption key if the monitoring station requires reporting codes to be encrypted.
| |
| | |
| 4. Advanced: Click on Advanced to go to the advanced options for T Link 250.
| |
| | |
| | |
| | |
| | |
| | |
| | |
| | |
| | |
| | |
| | |
| | |
| | |
| ===Advanced IP (T-Link) Setup===
| |
| [[Image:IP_TLinka.png|600px|right|thumb|Advance IP (T-Link) Setup]] | |
| | |
| | |
| 1. 127.0.0.1: The account heading on the left side select the IP Address, this will bring up the TL 250 advanced options.
| |
| | |
| 2. T Link IP: The IP Address entered in the previous section would show up here.
| |
| | |
| 3. T Link Port: The port that the T Link would be using for communication, default port is 3062.
| |
| | |
| 4. Encryption Key: The encryption key was entered in the previous section.
| |
| | |
| 5. Receiver IP: The IP Address of the Central Station.
| |
| | |
| 6. Port: The port the Central Station would be using for communication, default port is 3061.
| |
| | |
| 7. Receiver Password: The password used by Central Station to connect to the T Link, default password is CAFE.
| |
| | |
| 8. T Link ID: ID number associated to the T Link module.
| |
| | |
| 9. Console Password: Password required to connect to the T Link Console, default the password is CAFE.
| |
| | |
| 10. Console Port: The port for the T Link Console software to connect to the T Link.
| |
| | |
| 11. Delete: Allows you to remove the T Link connection from the panel.
| |
| | |
| 12. This will allow you to create/cancel or go to the next/previous section.
| |
| | |
| == SMS (GS2060/GS2065 or TL260GS/TL265GS) ==
| |
| | |
| An SMS message is sent to the wireless GSM module to trigger a return connection to the waiting DLS 5 . To use this connection, the SIM number is used as the unique Identifier. Ensure the full SIM number is entered.
| |
| | |
| One key advantage of using the SMS connection type is that there is NO PORT FORWARD required on the installation. Instead, there is a single port forward required on the DLS 5 PC's network allow the incoming c
| |
| There is a of time required to connect via SMS connection type. This is due to the delays introduced at each juncture of the connection process. Please be patient, connection times of 2-5 mins are normal.
| |
| | |
| | |
| For more information, see these articles:
| |
| | |
| [[Port Forwarding]]
| |
| | |
| [[SIM Numbers]]
| |
| | |
| ===Basic SMS (GS2060/GS2065 or TL260GS/TL265GS)Setup===
| |
| [[Image:GS2060.png|400px|right|thumb|Basic SMS Setup]]
| |
| | |
| | |
| 1. Connection Type: Under Connection Type, make sure GS2060 is selected this will prompt up new options
| |
| | |
| 2. Connect 24 User Name: Add the Connect 24 User Name you used to register with Connect 24
| |
| | |
| 3. Connect 24 Password: Add the Connect 24 Password. you used to register with Connect 24
| |
| | |
| 4. Advanced: Click on Advanced to go to the advanced options for the GS2060.
| |
| | |
| ===Advanced SMS (GS2060/GS2065 or TL260GS/TL265GS)Setup===
| |
| [[Image:GS2060a.png|600px|right|thumb|Advance SMS Setup]]
| |
| | |
| | |
| 1. GS2060 v 1.0: Under the DLS 5 Account heading on the left side, select GS2060 v 1.0 this will bring up the GS 2060 advanced options.
| |
| | |
| 2. SIM Number: This would be the subscriber identity module (SIM) number that is found on the SIM card for the GS2060 to communicate.
| |
| | |
| 3. GS/IP Installers Code: The password required to connect to the GS2060 Console, by default the password should be CAFE.
| |
| | |
| 4. Connection Type: The type of connection the GS2060 will use to connect; SMS is the only options for the GS2060
| |
| | |
| 5. Add: This will bring the SMS options.
| |
| | |
| 6. Allows you to remove the SMS connection from the panel
| |
| | |
| 7. This will allow you to create/cancel or go to the next/previous section.
| |
| | |
| | |
| | |
| | |
| | |
| | |
| | |
| | |
| | |
| | |
| | |
| | |
| ===SMS Setup(GS2060/GS2065 or TL260GS/TL265GS)===
| |
| [[Image:GS2060b.png|600px|right|thumb|SMS Setup]] | |
| | |
| | |
| 1. SMS: Under the DLS 5 Account heading on the left side, select SMS this will bring up the GS SMS options.
| |
| | |
| 2. Connect 24 User Name: Add the Connect 24 User Name you used to register with Connect 24.
| |
| | |
| 3. Connect 24 Password: Add the Connect 24 Password. you used to register with Connect 24.
| |
| | |
| 4. Callback Timeout: The amount of time allowed for the GSM to do a call back.
| |
| | |
| 5. DLS Port: The port that the GS2060 would be using for communication, the default port should be 51004.
| |
| | |
| 6. Delete: Allows you to remove the SMS connection from the panel.
| |
| | |
| 7. This will allow you to create/cancel or go to the next/previous section.
| |
| | |
| == Ethernet/Internet (TL260GS/TL265GS) ==
| |
| | |
| | |
| This connection type is NEW to DLS, and is DLS's '''fastest''' connection. Global upload and download times are reduced to seconds with this connection type.
| |
| | |
| An "Ethernet/Internet" connection is installed TL260GS/TL265GS communicator. will require a port is available on the install-site end to accept the direct connection.
| |
| | |
| To use this connection type, you will need:
| |
| * The TL260GS/TL265GS must already be configured with an IP and have a connection to the internet
| |
| * TL260GS/TL
| |
| | |
| | |
| ===Basic TL260/260R/2603GR/265 Setup===
| |
| | |
| There are two ways to add a TL 260 to your panel:
| |
| | |
| | |
| ====1st Method====
| |
| [[Image:TL_260.png|400px|right|thumb|Basic TL 260 1st Method Setup]]
| |
| | |
| | |
| 1. Connection Type: Under Connection Type, make sure TL 260 is selected, this will ions to
| |
| add the IP address.
| |
| | |
| 2. IP: Enter the public IP address of the T Link module that is being used.
| |
| | |
| | |
| | |
| | |
| | |
| | |
| | |
| | |
| | |
| | |
| | |
| | |
| | |
| | |
| | |
| | |
| | |
| | |
| | |
| ====2nd Method====
| |
| [[Image:TL_260a.png|600px|right|thumb|Basic TL 260 2nd Method Setup]] | |
| | |
| | |
| 1. Module: Under Module, make sure it is set to TL260.
| |
| | |
| 2. Add: Click add to add
| |
| | |
| 3. TL 260 v1.1: It will now show up under your panel drop down list.
| |
| | |
| 4. Delete: Allows you to remove the TL 260 module from the panel.
| |
| | |
| 5. This will allow you to create/cancel or go to the next/previous section.
| |
| | |
| | |
| | |
| | |
| | |
| 1. GS/IP Installer Code: The password required to connect to the T Link Console Software, by default the password should be CAFE.
| |
| | |
| 2. Connection Type: The type of connection the T Link will use to connect; Ethernet/Internet is the only option for the TL 260.
| |
| | |
| 3. Add: Click add in order for the Ethernet/Internet connection type to be added under the TL 260.
| |
| | |
| 4. Ethernet/Intern: This connection type will be added under the panel drop down list, when selected it will take you to the advance TL 260 programming.
| |
| | |
| 5. Delete: Allows you to remove the Ethernet/internet connection from the panel.
| |
| | |
| 6. This will allow you to create/cancel or go to the next/previous section.
| |
| | |
| | |
| | |
| | |
| | |
| | |
| | |
| | |
| | |
| | |
| | |
| | |
| | |
| | |
| ===TL260/260R/2603GR/265 IP Setup===
| |
| [[Image:TL_260c.png|600px|right|thumb|TL 260 IP Setup]] | |
| | |
| 1. IP: This would be the IP Address of the T Link in order to communicate.
| |
| | |
| 2. Port: The port that the T Link would be using for communication, the default port should be 3062.
| |
| | |
| 3. T Link Account Code: This would be thf the T Link module that the central station would be receiving.
| |
| | |
| 4. Receiver IP: This would be the IP Address of the receiver that the T Link communicates to.
| |
| | |
| 5. Receiver Port: This would be the Port of the receiver that the T Link communicates to, the default port is 3064.
| |
| | |
| 6.
| |
| | |
| | |
| | |
| ==Connecting to the Panel==
| |
| | |
| First you must choose the desired communications operation ([[Global upload]], [[Global Download]], [[Communicate Tags]], etc).
| |
| | |
| Once you have selected the type of communication operation, a screen will appear with 3 tabs prompting you with different options.
| |
| | |
| Under the "Basic" tab, you can verify the panel you are connecting to, the type of connection
| |
| | |
| There is also a button "Show Tags". This will display for you exactly which sections have been tagged for communications.
| |
| | |
| | |
| Under the "Options" tab you can turn on/off the double call feature. You can also specify the double call timer and the double call duration.
| |
| | |
| | |
| | |
| ===Upload Event Buffer===
| |
| | |
| If you would like to upload the event buffer, without upload or downloading any other sections, you can select "Upload Event Buffer" from the toolbar.
| |
| | |
| | |
| ===Module Auto-Detect===
| |
| | |
| If you would like to find out what modules are enrolled on the system, without uploading or downloading any programming , you can select the "Module Auto-Detect" function from the toolbar.
| |
| | |
| [[Image:ModuleAutoDetect.png]]
| |
