Difference between revisions of "Create a New Account Tutorial"
| Line 37: | Line 37: | ||
''Account Group'' – The group that this account will belong too. You can create new groups using the [[Account Group Maintenance]] feature. | ''Account Group'' – The group that this account will belong too. You can create new groups using the [[Account Group Maintenance]] feature. | ||
| − | ''Panel Type'' – Type and version of panel you will be connecting to | + | ''Panel Type'' – Type and version of panel you will be connecting to. If you would wish to configure only the communicator without connection to the panel, select the communicator you are configuring |
| − | ''Connection Type'' – | + | ''Connection Type'' – Select the communication type used to communicate: |
| + | |||
| + | - '''PSTN''' – Enter phone number (allowed characters – 0-9,*,#,W) | ||
''Phone Number'' – Phone number the panel is connected to | ''Phone Number'' – Phone number the panel is connected to | ||
''Double Call'' – Whether you will be connecting using the double call feature | ''Double Call'' – Whether you will be connecting using the double call feature | ||
| + | |||
| + | |||
| + | - '''SMS''' – Choose this option to enable DLS sessions over GSM/GPRS or to use SMS to initiate DLS sessions over Ethernet. Ensure that the module type used for the account is referenced in the brackets in the Connection Type field. | ||
| + | |||
| + | Enter your user name and password that will be used to connect to the panel via Connect24. | ||
| + | |||
| + | [[Image:ConnectingtoC24.jpg]] | ||
| + | |||
''Account Template'' – Select this option if you will be programming the panel using a template | ''Account Template'' – Select this option if you will be programming the panel using a template | ||
''Automatically open account'' – Select this option if you wish to open the account automatically after you finish creating it | ''Automatically open account'' – Select this option if you wish to open the account automatically after you finish creating it | ||
| + | |||
| + | |||
| + | ''Advanced'' – To access the advanced configuration options (add new communicator type, advanced TL communication setting, etc ) select Advanced. [[Create a New Account (Advanced)]] | ||
| + | |||
| + | ''Create'' – To create the account select Create. Your account is now available in your account list and you can view/modify/delete it from the Account Search menu | ||
| + | |||
| + | ''Cancel'' – To cancel your work, select Cancel. | ||
Revision as of 21:23, 6 April 2009
There are several different ways you can create an account.
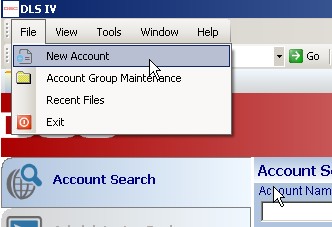
1. Go to File -> New Account
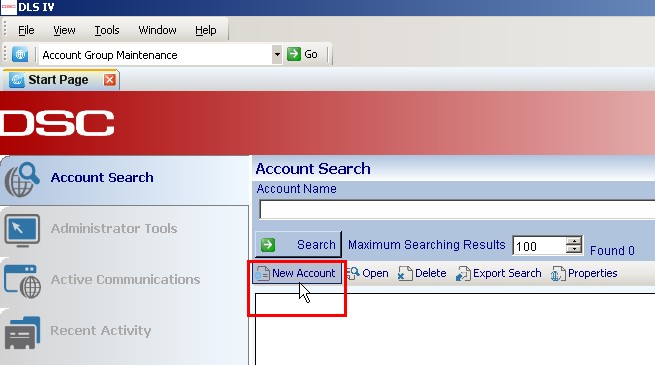
2. Select "New Account" from the main screen
3. Select "Create new account" from the quick launch side bar and then select "Go"
4. Right-Click on the main screen and select "New Account"
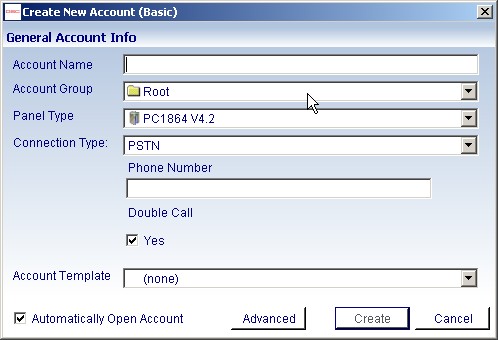
A window will then pop up and will prompt you to enter the panel’s account information.
Account name – Enter in an appropriate name for the account
Account Group – The group that this account will belong too. You can create new groups using the Account Group Maintenance feature.
Panel Type – Type and version of panel you will be connecting to. If you would wish to configure only the communicator without connection to the panel, select the communicator you are configuring
Connection Type – Select the communication type used to communicate:
- PSTN – Enter phone number (allowed characters – 0-9,*,#,W)
Phone Number – Phone number the panel is connected to
Double Call – Whether you will be connecting using the double call feature
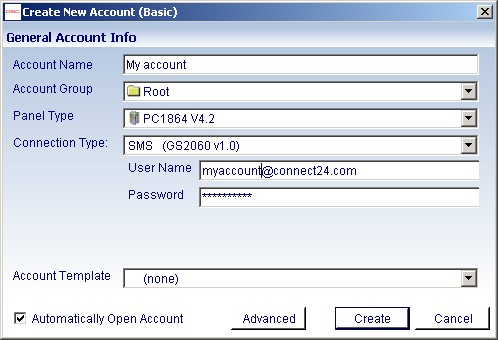
- SMS – Choose this option to enable DLS sessions over GSM/GPRS or to use SMS to initiate DLS sessions over Ethernet. Ensure that the module type used for the account is referenced in the brackets in the Connection Type field.
Enter your user name and password that will be used to connect to the panel via Connect24.
Account Template – Select this option if you will be programming the panel using a template
Automatically open account – Select this option if you wish to open the account automatically after you finish creating it
Advanced – To access the advanced configuration options (add new communicator type, advanced TL communication setting, etc ) select Advanced. Create a New Account (Advanced)
Create – To create the account select Create. Your account is now available in your account list and you can view/modify/delete it from the Account Search menu
Cancel – To cancel your work, select Cancel.


