Communication Tutorial-PSTN
PSTN stands for Public Switched Telephone Network otherwise known as a standard phone line. This is the most common form of connecting to a panel remotely. In order to connect to a panel over this connection you would require an MD-12 modem which connects to an available serial port or through a USB-to-Serial adapter on your computer, an analog phone line for the modem to plug into and the telephone number that the panel is connected to with it being able to accepting incoming calls.
Contents
[hide]Creating a New Account for a PSTN Connection
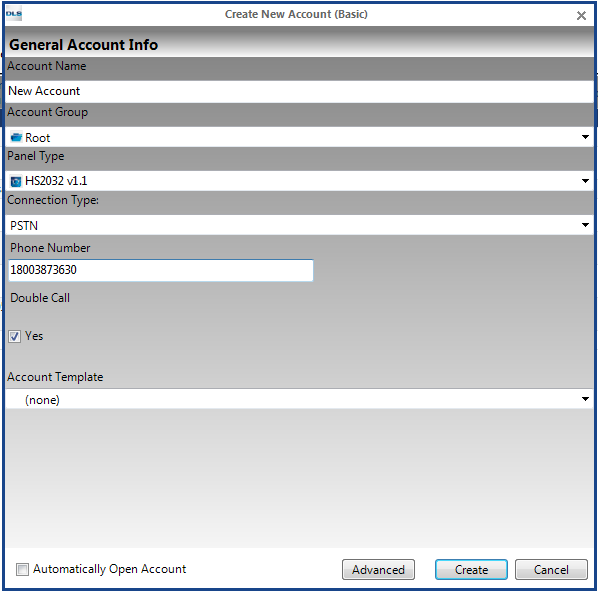
When initially creating an account within DLS you are prompted to select a connection type after choosing the panel type. In this location you would want to select PSTN and enter the phone number in the location below it as it appears. You will also have an option to have double call enable on this account depending on the panels programming.
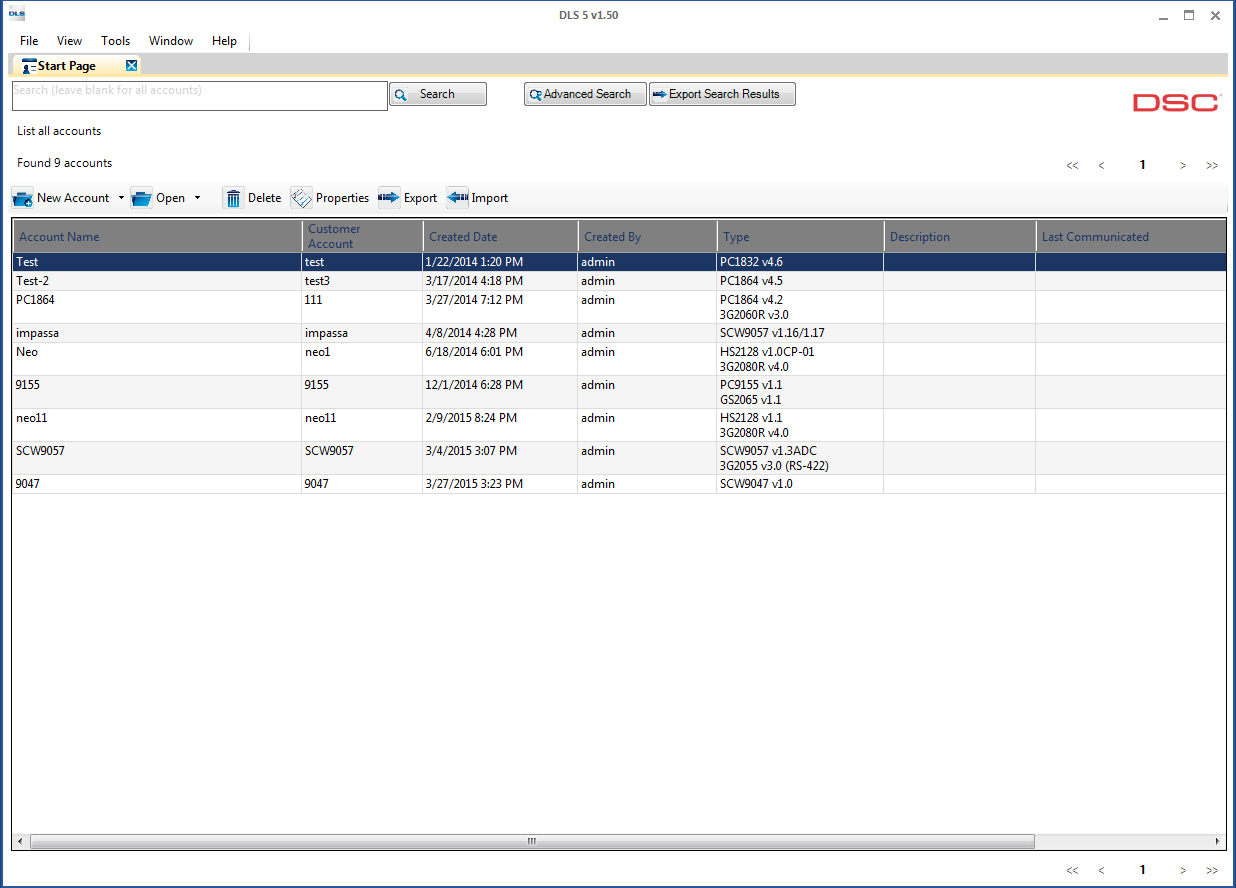
When using only a PSTN connection to connect to the panel you would want to start off by creating the account. To do so we would want the DLS software open and be viewing the main start page
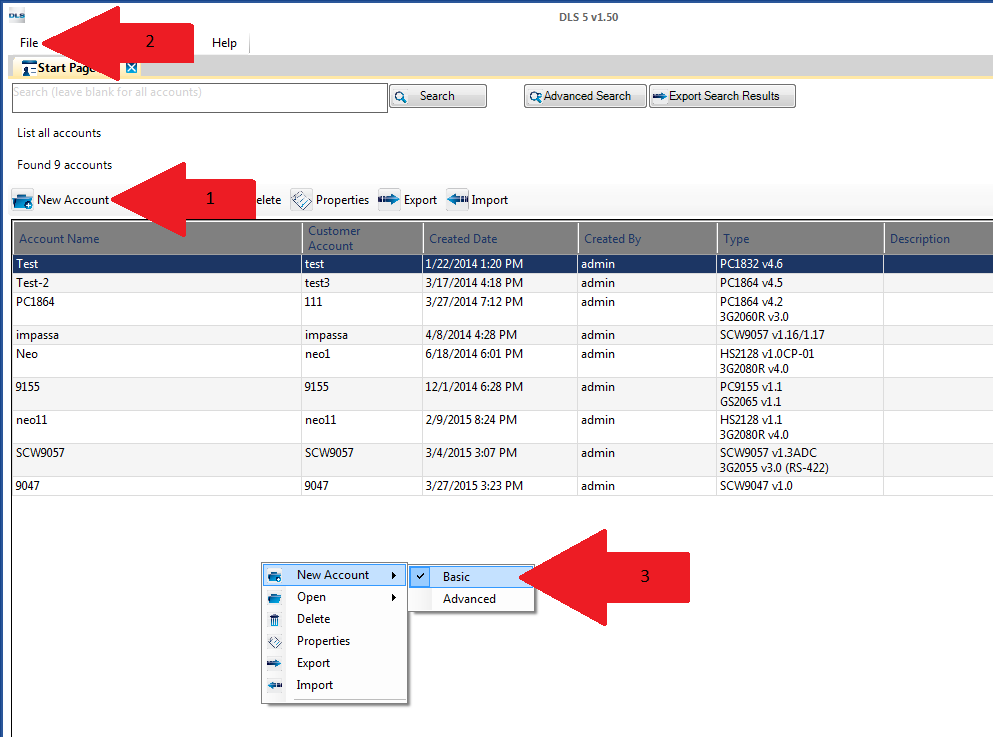
From here we can click on the New Account button (1), go from the File menu and select New Account (2), or right click within the Start Page and select New Account (3). If you do select the last option it is recommended to click basic following that.
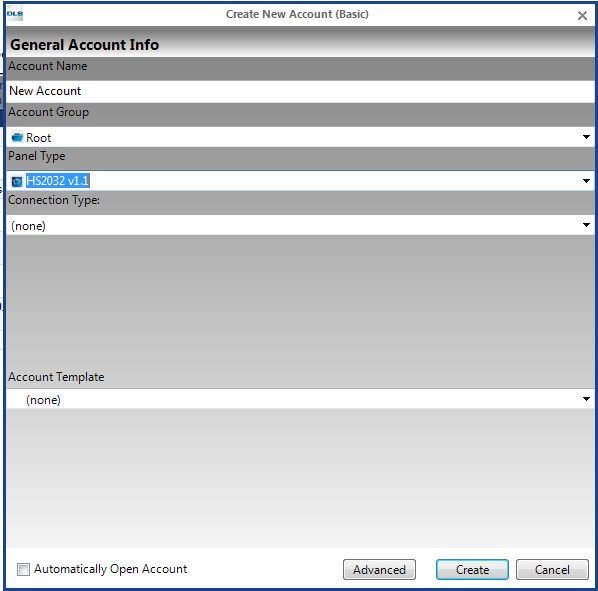
After selecting the desired method to create the account a new window will appear labelled “Create New Account (Basic)”.
In this new window we can then enter the Account Name, chose the Account Group, select the panel type and the connection type. Since this account we are creating is for a PSTN connection in the drop down menu we would chose PSTN. After selecting the connection type as PSTN two new fields will appear for the Phone Number as well as an option if you wish to do the Double Call feature on this account. You can then enter the phone number and enable/disable the double call feature. Once completed you can then click on Create and this account will populate within the main Start Page in DLS. If you do have enabled Automatically Open Account when creating the account it will open right away after clicking Create.
Adding PSTN to an Existing Account
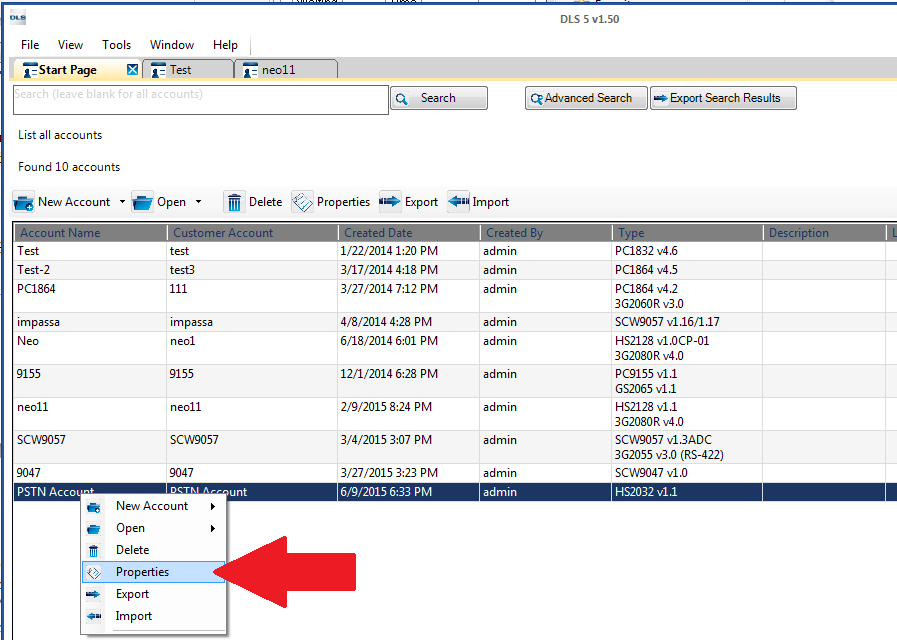
If you have already created an account and then wish to add the PSTN connection to it that is also possibility. In order to do so we would want to start at the main start page with the account already closed; we would then right click on the account and click on properties.
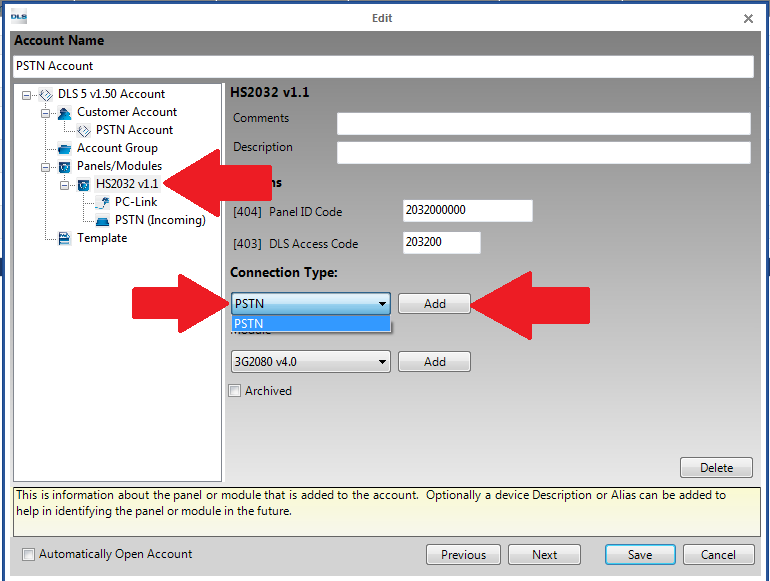
With the account properties open you would then click on the actual panel (Ex. HS2032 V1.1) which is nestled under Panel/Modules. With the panel selected you can then use the drop down menu under the header Connection Type and choose PSTN and click the add button.
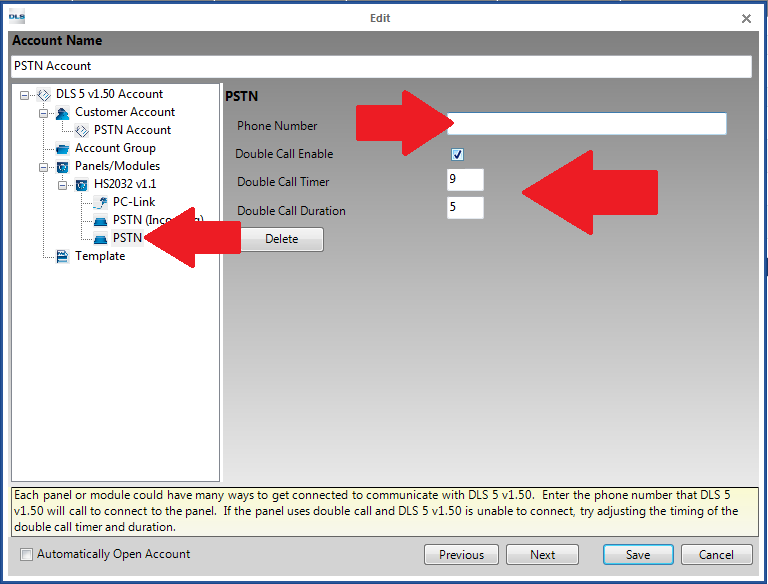
After adding PSTN as a connection type you will notice that PSTN is now nestled under the actual panel. If you click on that option you can then program the Phone Number, select if you want Double Call to be enabled on the account or modify the Double Call Timer/Double call duration. After you are completed with entering this information you can click on the Save button and this will either automatically open the account if you have selected that option or save it to the main Start Page.
Configuring the MD12 Modem
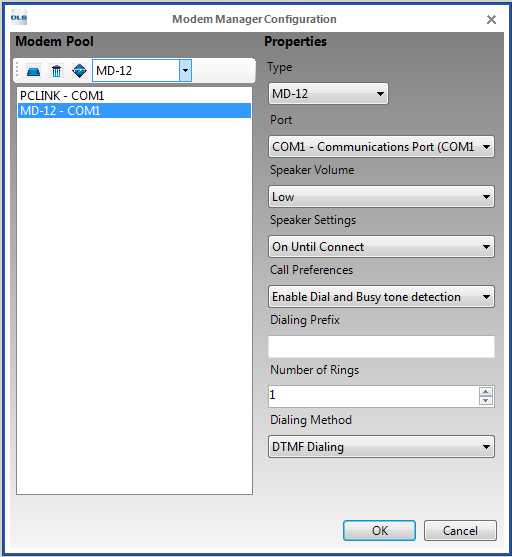
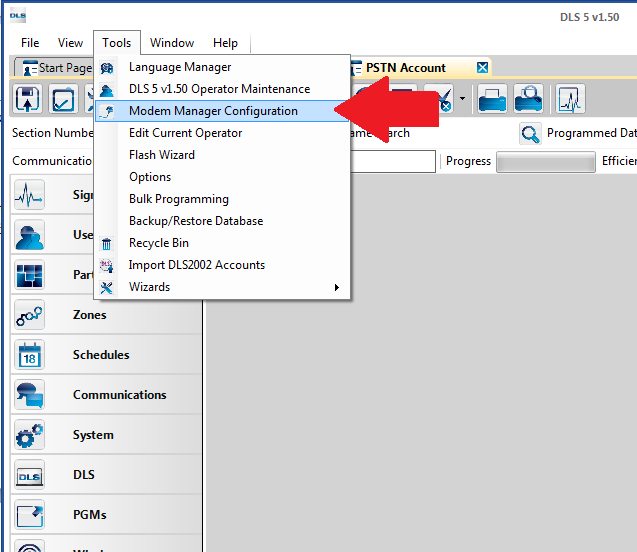
The next step in preparing the software to be able to communicate over a phone line is to make sure DLS is able to see the modem properly. This would be done through the Modem Manager Configuration within the Tools menu.
With the Modem Manager Configuration window open we would want to select the MD-12 modem bringing up the properties associated to it on the right hand side of the window.
Within the properties you are able select the following options:
Port - Lets you select which port the modem is assigned to.
Speaker Volume - Lets you adjust the volume of the modem.
Speaker settings - Lets you turn on/off the speaker
Call Preferences - Can turn on/off dial tone/busy tone detection
Dialing Prefix - You can add a prefix to the front of the phone number each time it dials. For example: a dialing string like *70 to disable call-waiting
Number of rings - For incoming calls: How many rings before the modem picks up
Dialing method - Choose whether you will dial using DTMF or Pulse
For more information please view Modem Manager Configuration
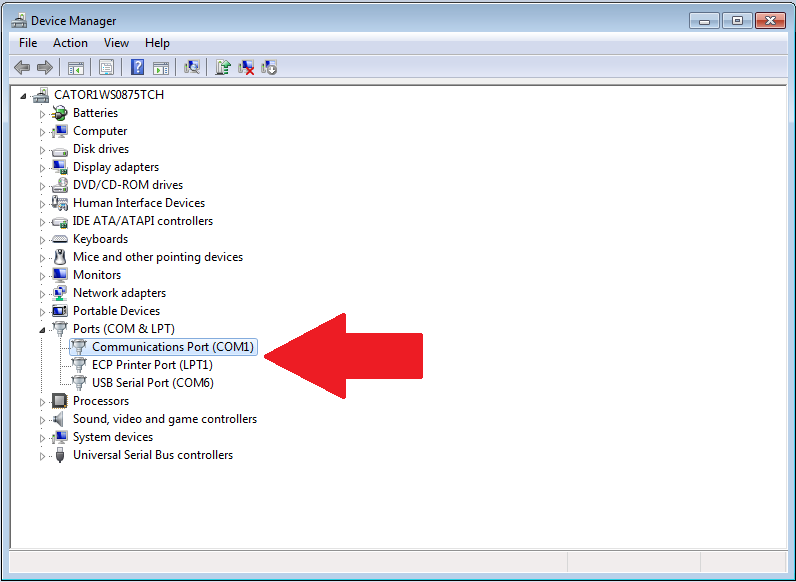
If you do not know what Com Port you are using and have multiple on the system you would wanted to use the “Device Manager” within Windows to view what Port are available and to figure out which one needs to be selected in DLS. Once you have this information you would wanted to go back into DLS and choose the appropriate port and close the Modem Manager Configuration window. For more information on how to get to the device manager please go to the wiki page on the Device Manager
Connecting to a Panel
PSTN Outgoing Connection
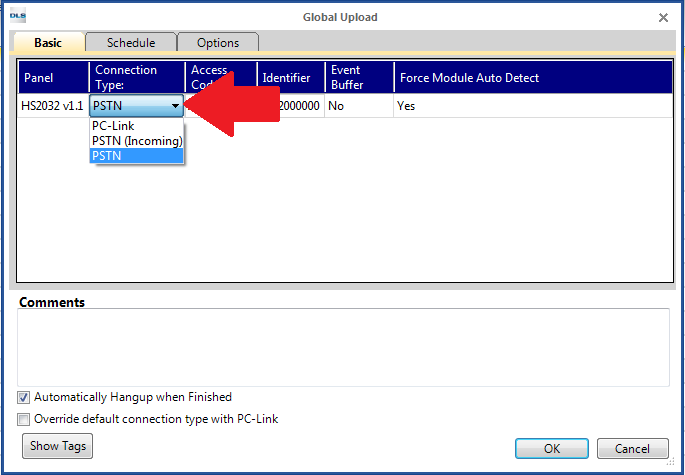
After creating the account or adding PSTN to the account you would then be able to connect to the panel. To do so you would want to open the account and do your regular connection options (Global Upload/Global Download/Communicate Tags/Connect Only) and when the new window opens instead of picking PC-Link for the connection type you would want to drop down the menu and pick PSTN.
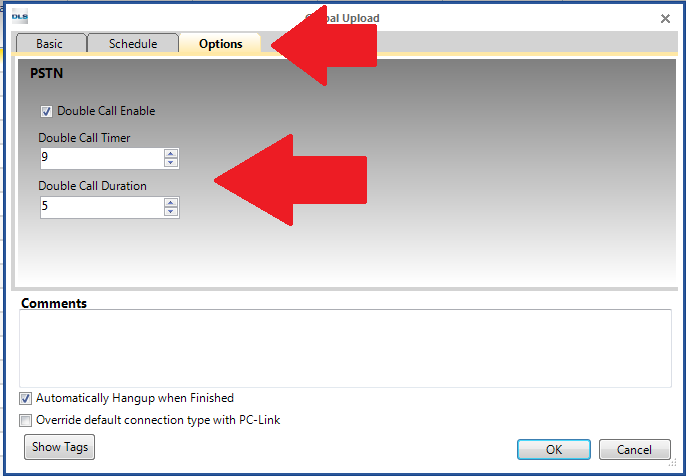
Depending on how the account was created the double call feature will either be enabled or disabled. To view this you can click on the Options tab of the connection window and check the status of this. You would want to make sure that you have it selected properly depending on the programming on your panel. For more information on this configuration it is recommended to review the programming manual for the panel you are trying to connect to.
Scheduled Outgoing PSTN Connection
If you would like to schedule the connection for a future time this feature is also available. If you would like to perform this you would initiate a connection like normal (Global Upload/Global Download/Communicate Tags), and select PSTN as the connection type like before
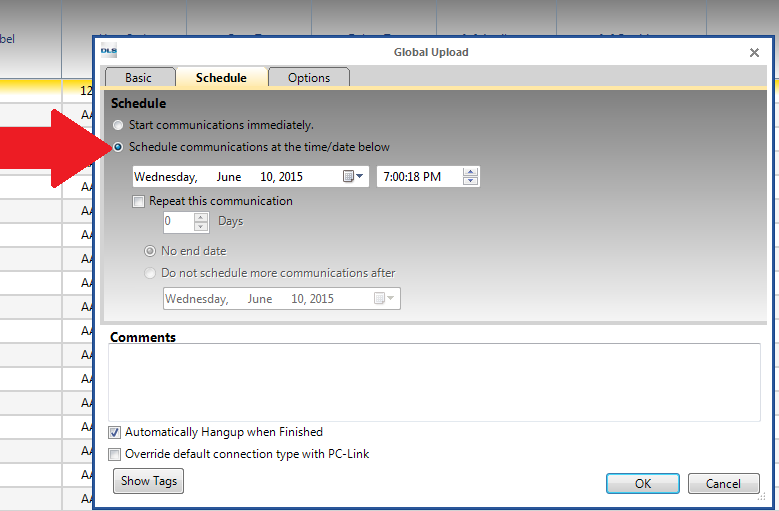
After selecting PSTN for the connection type you would then click on the Schedule tab of the new connection window and instead of selecting “Start communications immediately” you would select the option to “Schedule communications at the time/date below”.
You would then be able to pick what time and date it would try to communicate to the panel at, if you want it to be repeated (how many days from the date chosen) and if you want it to repeat the end date for that or if it will continue with no end time.
PSTN Incoming Connection
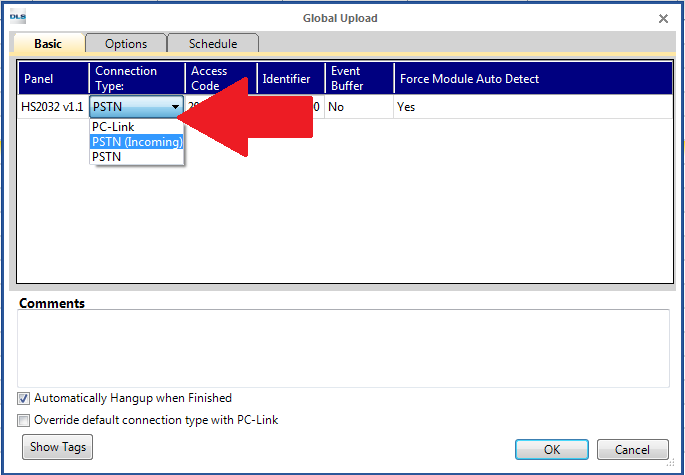
The DLS software can also be set to have the panel dial to the modem of the computer and have the software wait for that incoming connection. With this option you would do your same general connection (Global Upload/Global Download/Communicate Tags/Connect Only) and the connection window will appear. In this window we would use the drop down menu under the connection type and choose PSTN incoming
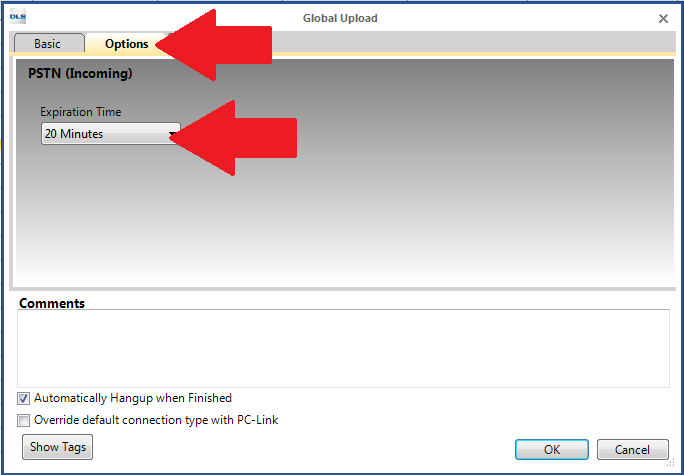
Once selecting PSTN Incoming the default value would be for the software to wait for the connection for 20 minutes before that time expires and to start that time immediately. If you would like to lengthen this time you can click on the options tab and using the drop down menu pick a different time.
Scheduled Incoming PSTN Connection
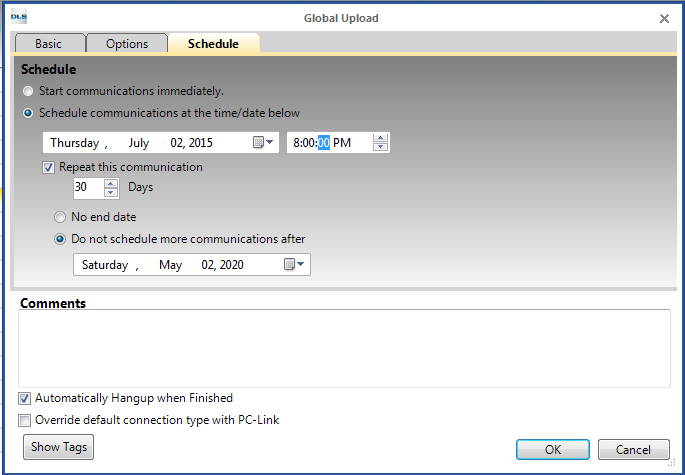
You can also schedule the account for DLS to wait for this connection on a certain date and time, if you want this task to be repeated (how many days from the date chosen) and if you want it to repeat the end date for that or if it will continue with no end time. After selecting PSTN for the connection type you would then click on the Schedule tab of the new connection window and instead of selecting “Start communications immediately” you would select the option to “Schedule communications at the time/date below”.
You would then be able to pick what time and date it would try to communicate to the panel at, if you want it to be repeated (how many days from the date chosen) and if you want it to repeat the end date for that or if it will continue with no end time.
Troubleshooting
Dialing [phone number] on modem 1 received busy signal: You will see this error if the modem successfully dialed the phone number but received a busy signal. Ensure that the phone line the panel is connected to is not in use. For more information on disabling dial and busy tone detection, see Modem Manager Configuration
No dial tone detected on modem 1: This error is caused by the modem not detecting a dial tone on the line it is connected to. Makes sure the phone line is connected, working and not in use. For more information on disabling dial and busy tone detection, see Modem Manager Configuration
The modem is not responding: You will see this error if you try to communicate using the modem and the serial cable, or serial to USB converter from the modem to the PC is disconnected. Ensure that the cable is connected tightly on both ends and there is no damage to the cable. Make sure that the correct Com port has been selected and there are no conflicts associated with it.
The panel did not answer phone number [phone number]: This error is caused when the modem has successfully dialed and waited for the connection but the panel did not answer the call. Ensure that DLS is enabled on the panel and it is correctly set up for the proper number of rings, or double call. Make sure you have the correct phone number and all phone line connections are correct on the panel. You can also look into other devices answering the line before the panel is able to (Fax machines, Answering machines, etc).
The modem manager 127.0.0.1:51004 is not responding: This error is caused by trying to communicate with a panel while the MCPH service is stopped. Restart the MCPH service, ensure that it is running and try again. If still having issues reboot your computer and confirm the MCPH service is running.
There are no modems available: If you see this error, it means that all modems have been removed from the Modem Manager Configuration. Ensure that the correct modems are added and configured.
Timeout while waiting for panel to call back: This error will appear if you are trying to connect to a panel with call-back enabled and it does not call back within the allotted time. Ensure that the callback number in the panel is programmed correctly. If you are not using the callback method, disable the callback toggle option in the panel programming through the keypad.
Your telephone number contains invalid characters. Valid characters are 0-9,#,*,W and comma.: Very simply this error means that your phone number contains characters which are not supported. Verify the correct phone number is entered omitting any characters other than 0-9,#,*,W and comma. For every comma entered in the phone number will provide a two second pause.
