Communication Tutorial - IP
An IP base connection is when you are connecting through a network base such as a local LAN or WAN (Wide Area Network, such as the internet) through a T-Link communicator (Ex. TL250, TL260, TL280). This connection type will require that you have access to certain network information that the panel is connected to and in some situations ports may need to be opened/forwarded.
Contents
[hide]Creating an New Account for a T-Link Connection
When initially creating an account within DLS you are prompted to select a connection type after choosing the panel type. In this location you would want to select the appropriate T-Link communicator and following that you will be able to enter the required information to connect.
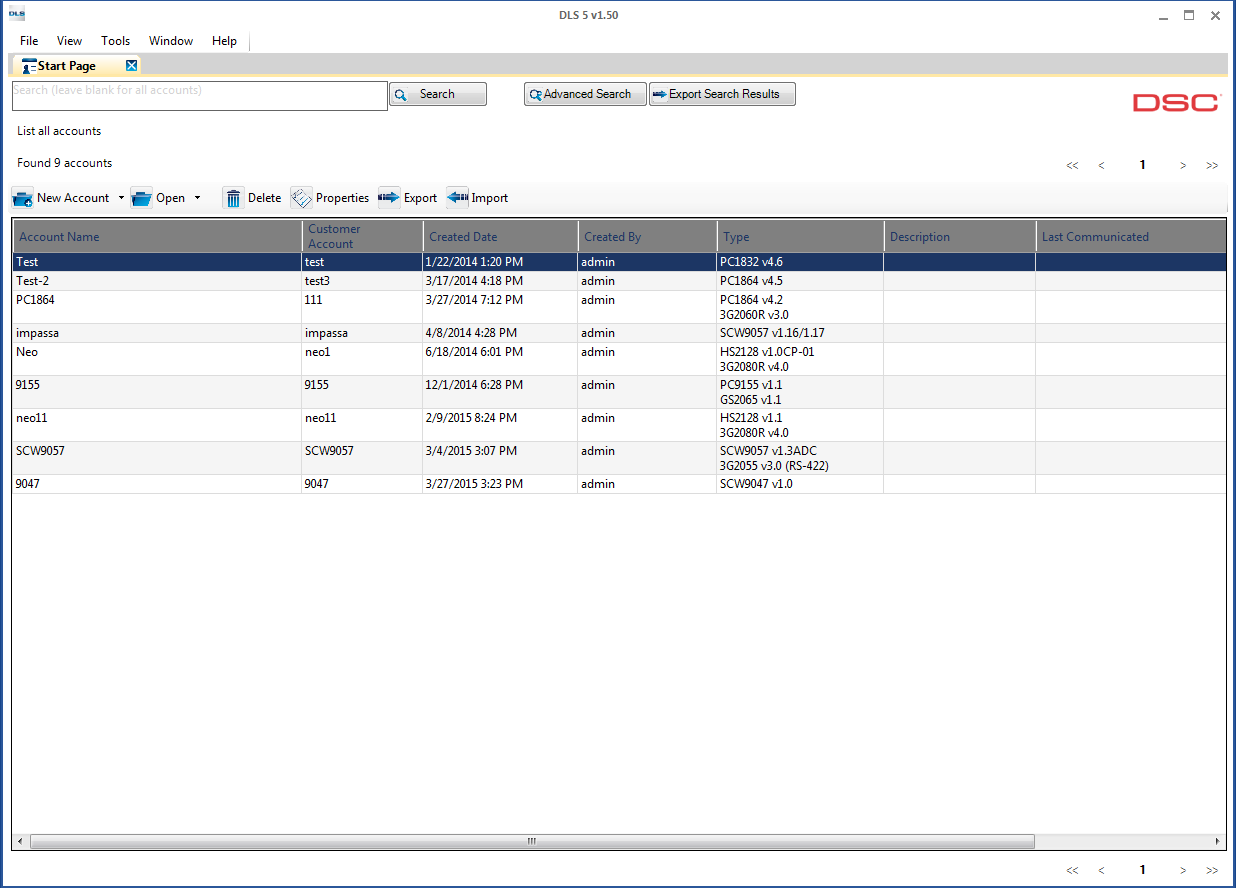
When only using an T-Link connection to connect to the panel you would want to start off by creating the account; to do so we would want the DLS software open and be viewing the main start page.
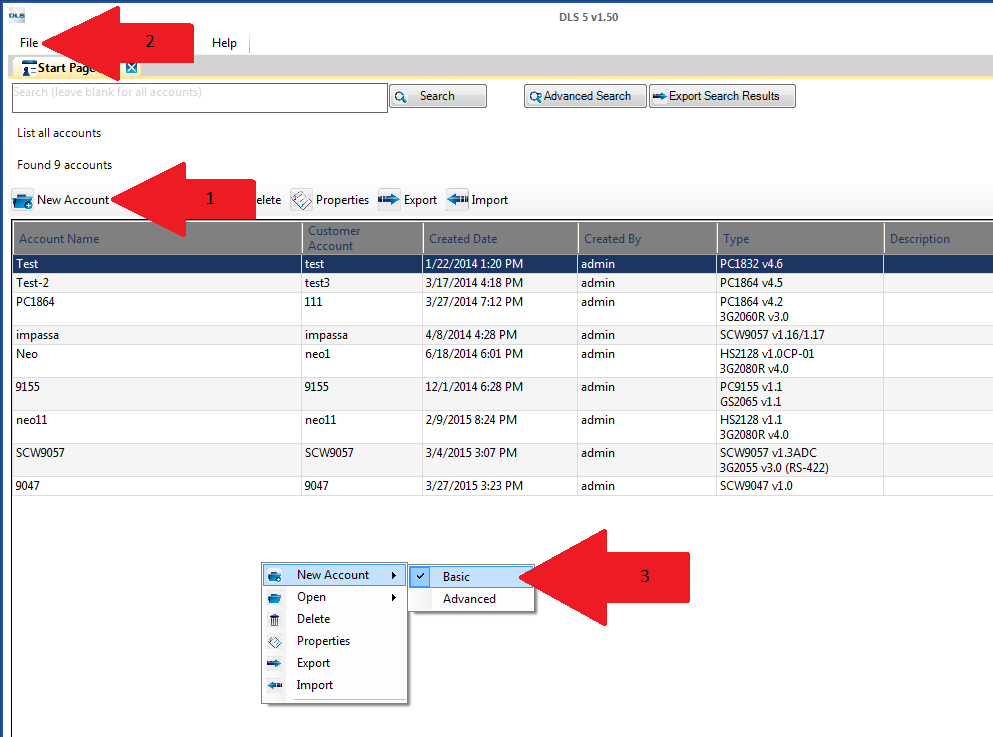
From here we can click on the New Account button (1), go from the File menu and select New Account (2), or right click within the Start Page and select New Account (3). If you do select the last option it is recommended to click basic following that.
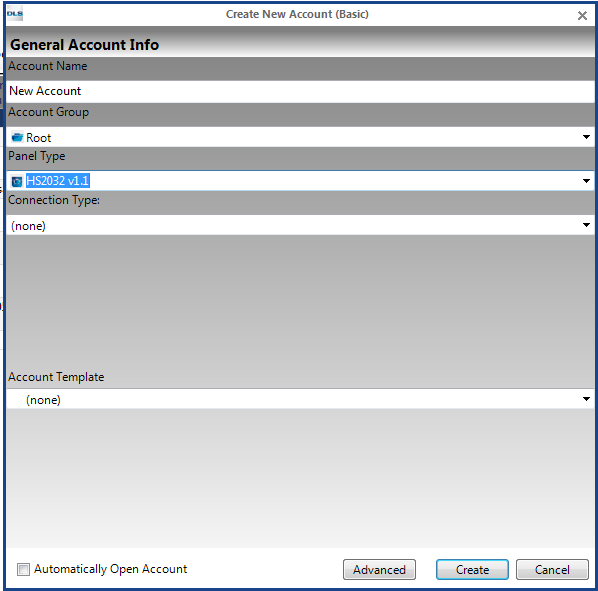
After selecting the desired method to create the account a new window will appear labelled “Create New Account (Basic)”.
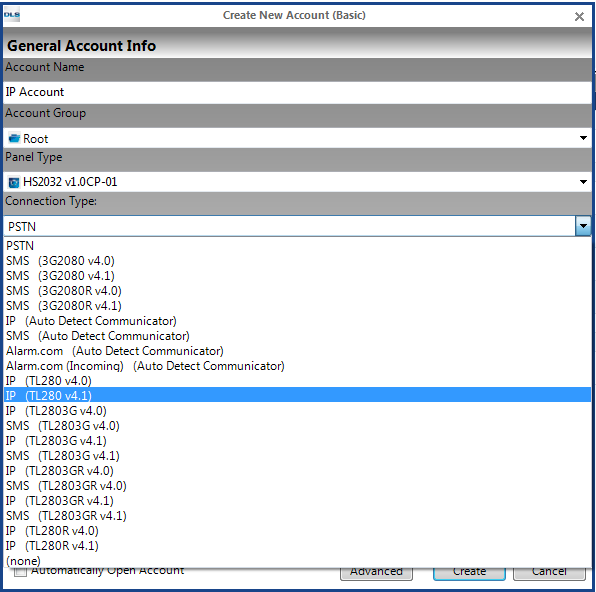
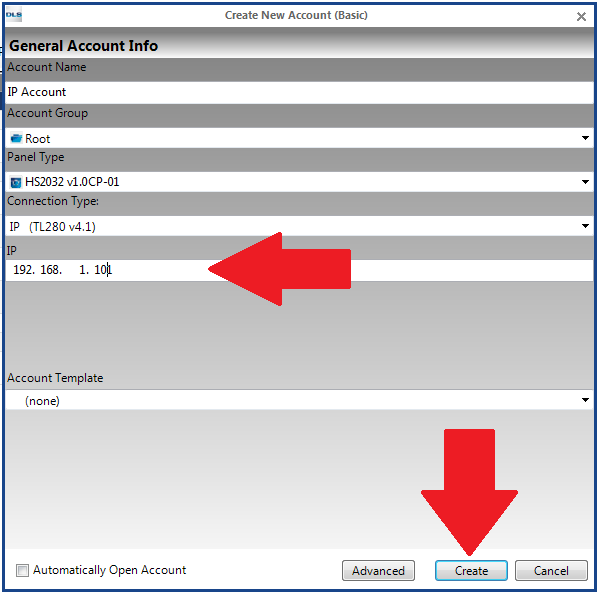
In this new window we can then enter the Account Name, Chose the Account Group, select the panel type and the connection type. Since this account we are creating for a T-Link connection we would want to select the appropriate T-Link communicator that you have connected to the panel.
After selecting the T-Link being used you are then prompted to enter your IP address of the panel you want to connect to (For more information on the IP address please go to T-Link Configuration). Once entered you would then want to click on Create and that will automatically open the account if you have that feature selected or it will automatically save to the main start page.
Note: If you are trying to add the TL250 to the account you would want to add “IP (TLink)” as the connection type as you will not see TL250 as an available option in the drop down menu.
Creating a New Account for a T-Link/GSM Connection
Another possible option is to create a new account using a combination T-Link/GSM communicator such as a TL2803GR, TL2603GR, Etc. When creating this account we would begin with the DLS software at the main start page.
From here we can click on the New Account button (1), go from the File menu and select New Account (2), or right click within the Start Page and select New Account (3). If you do select the last option it is recommended to click basic following that.
After selecting the desired method to create the account a new window will appear labelled “Create New Account (Basic)”.
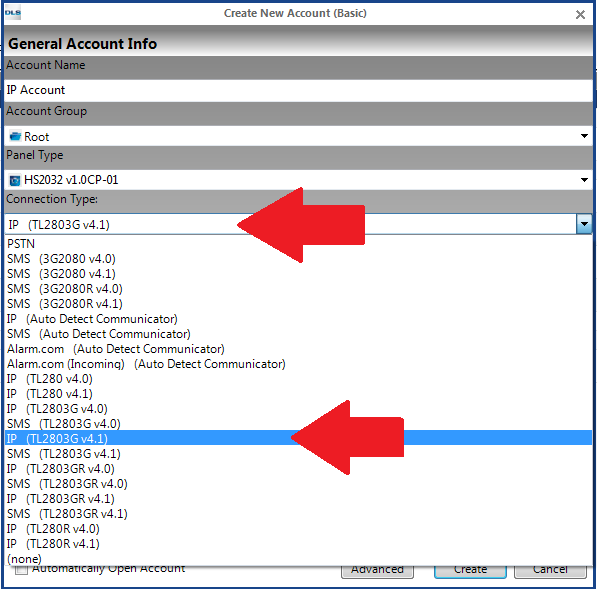
In this new window we can then enter the Account Name, Chose the Account Group, select the panel type and the connection type. Because we are creating an account for a combination you would then want to choose the appropriate communicator from connection type drop down menu with IP beside it.
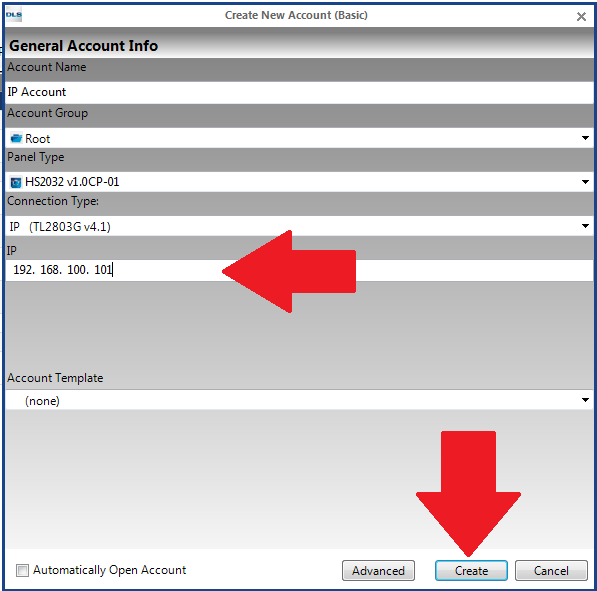
After selecting the T-Link being used you are then prompted to enter your IP address of the panel you want to connect to (For more information on the IP address please go to T-Link Configuration). Once entered you would then want to click on Create and that will automatically open the account if you that feature selected or save it to the main start page.
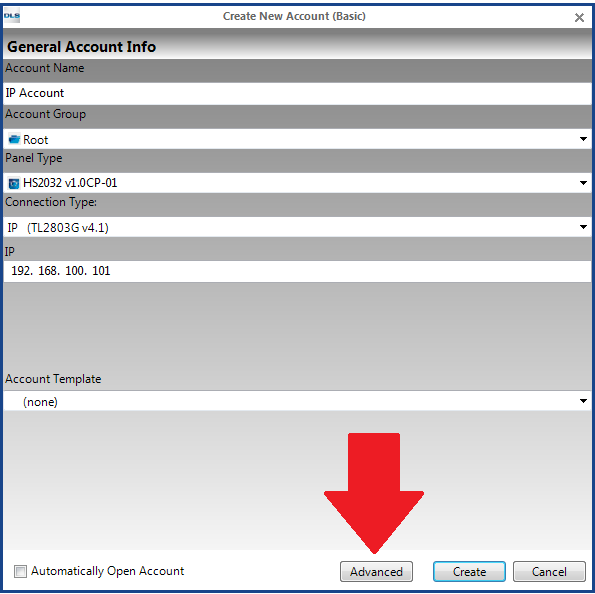
If you are planning on connecting through SMS to this account you would then want to click on advance for we can also add the SMS connection.
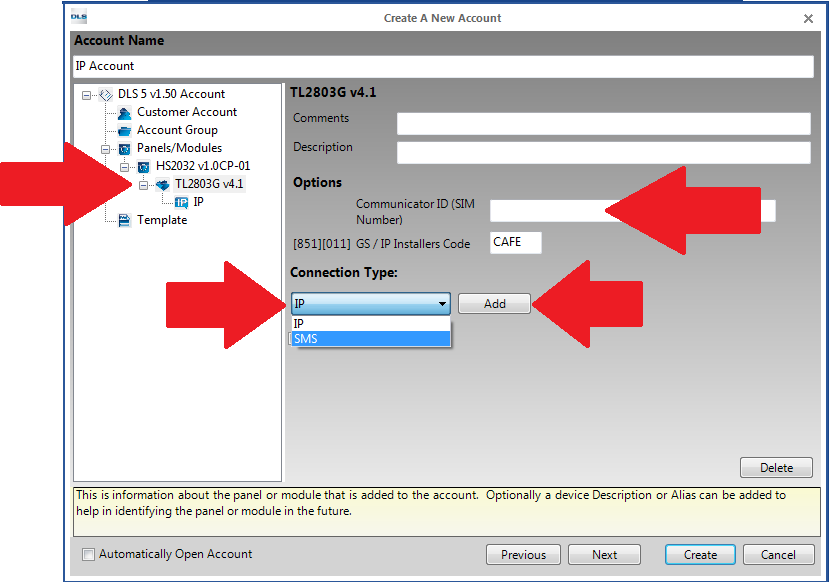
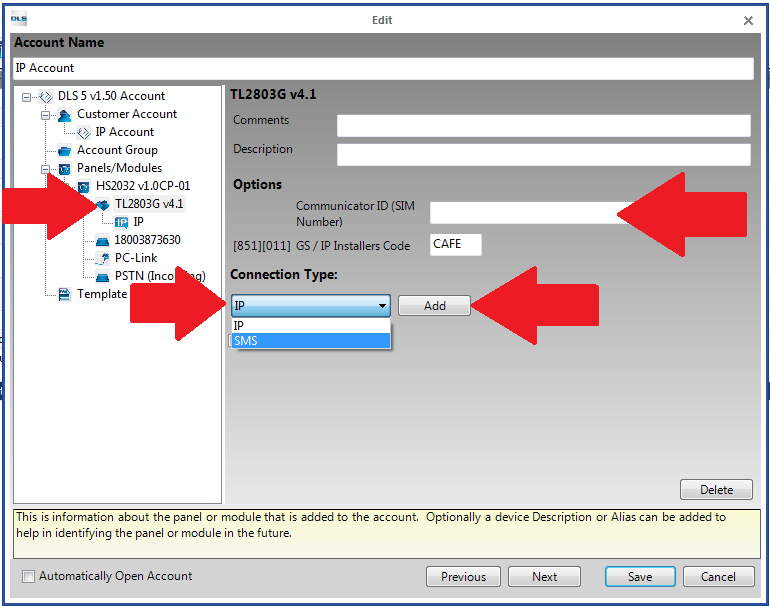
With the new window open we would want to select the communicator that you have nestled under the panel you are creating for. After selecting this communicator you would then enter the SIM card number associated with the radio and the using the drop down menu under Connection Type select SMS and click add.
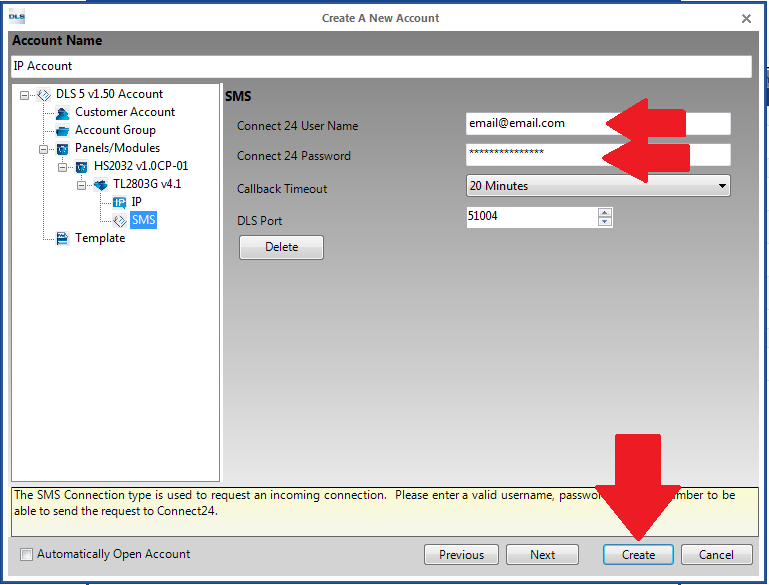
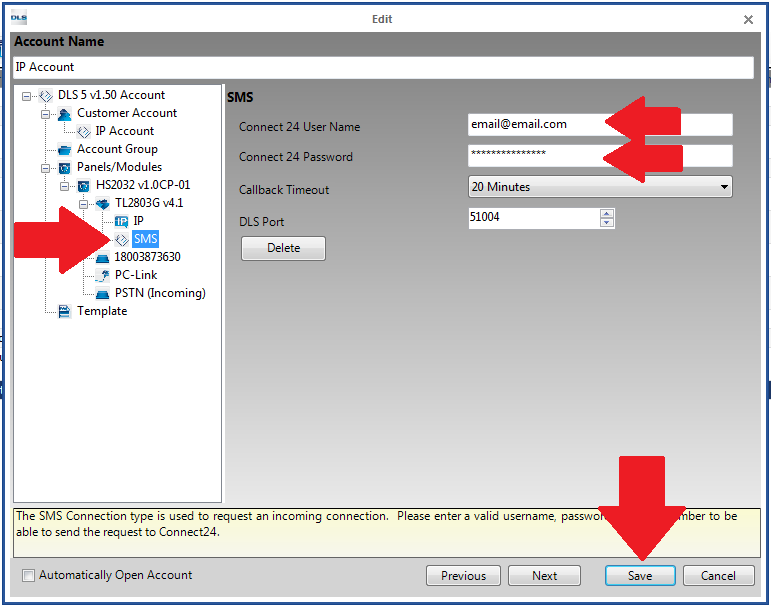
With SMS now added and nestled under the communicator you would then click on it and make sure that the correct Connect 24 Username and Password have been entered for the account. With all this information you can then create and the account with either auto populate on the start page or open automatically.
Adding a T-Link Communicator to an account
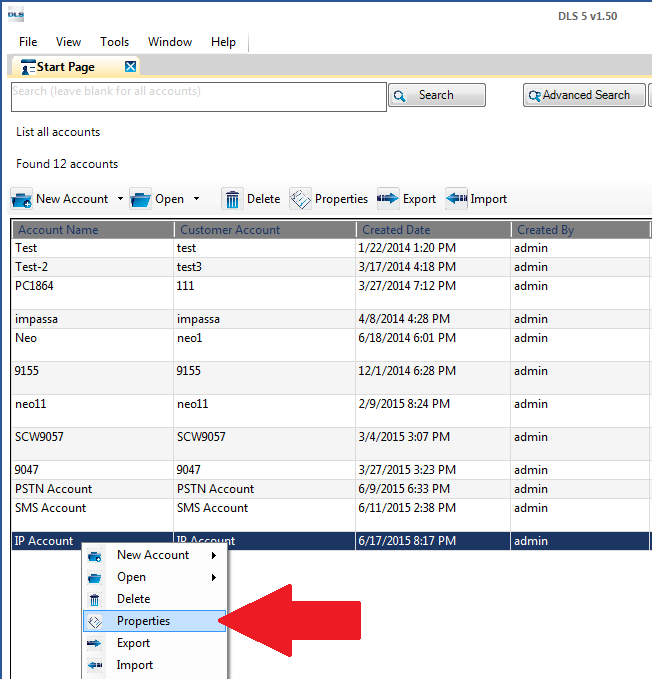
If you have already created an account and then choose later to add a T-Link communicator you can still add it to the account. With the account closed you would right click on the account and click on properties
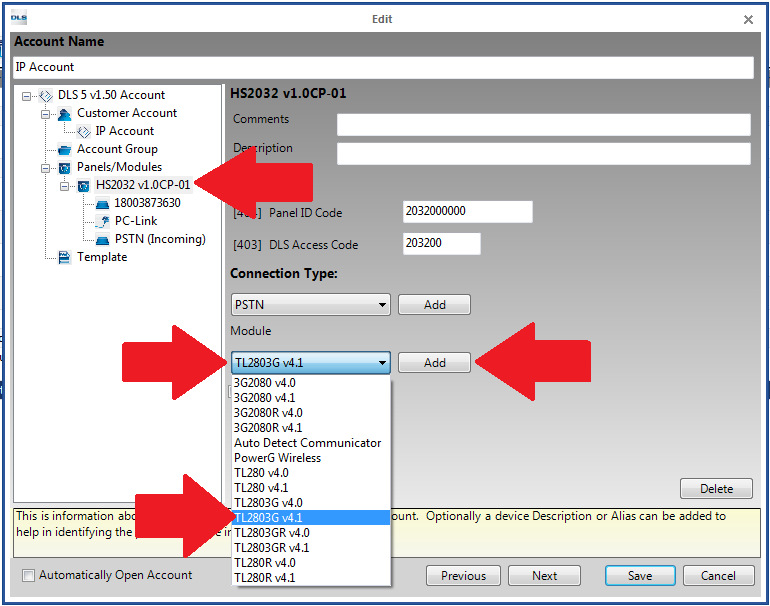
With the account properties open you would want to click on the actual panel that you are using and you will be provided a drop down menu on the right hand side labeled module. You would then drop this menu down and chose the T-Link that is connected to the panel and click the add button to add it to the account.
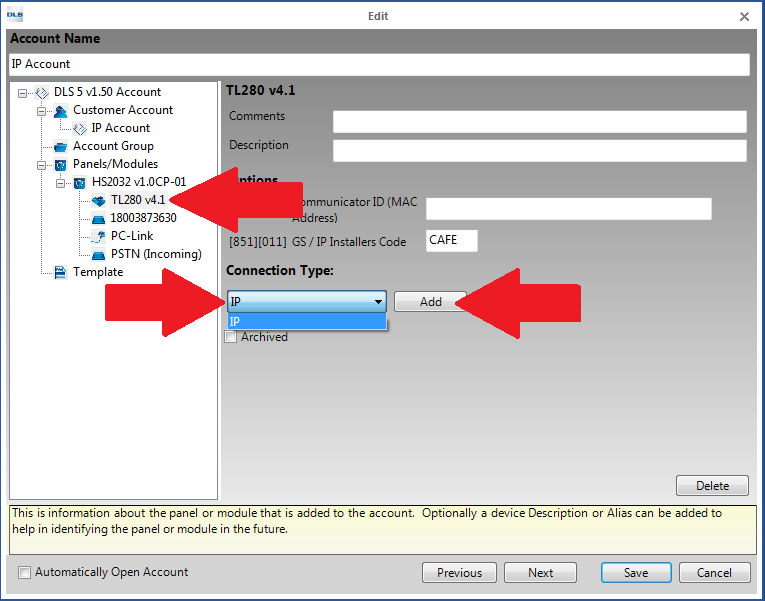
After adding the communicator to the account you would then click the T-Link that that will be nestled under the panel. On the right hand side of the screen there will be a drop down menu where you would select IP and then click add.
Note: If you are trying to add communications for a TL250 communicator you will not find it in the list. For this communicator you would drop down the connection type menu instead of the module menu and add “TLINK IP” and program accordingly.
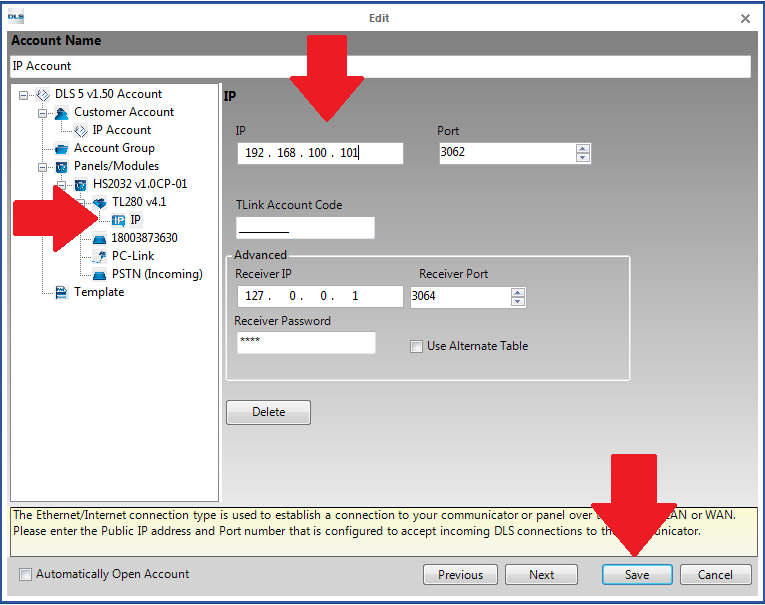
After adding IP as a connection type below the communicator you would then select that and you can program the appropriate IP address and port number being used (For more information on the IP address please go to T-Link Configuration). If you are not using a GSM/T-Link communicator you can then click save and that will either automatically open the account or save it to the main start page.
Optional: If the communicator that you added is both a GSM and a T-Link communicator and you wish to also add that information as GSM connection there is a few more steps required before saving the account. With the communicator already added we would click on it and enter the SIM Card number for the account. Following we would select the drop down menu again under connection type and add an SMS connection.
With the SMS nestled under the communicator we would then be able to click on it and confirm that we have the proper Connect 24 Username and Password added. With all that information included you then can click on save and that will either automatically open the account or save it to the main start page.
T-Link Connection Configuration
When creating the account and you are asked to enter an IP address, this address will either be a local IP address (when on the same network) or a remote IP address (when you are not on the same network). For more information see below
Local IP Connection
A local IP connection is when you are the same network as the IP communicator is on, such as being on the same LAN (local area network) or connected through a VPN service to be on the same network. This is usually the less restrictive of the connection options as there is not usually any firewall or security software that could be blocking the ports needed to connect to the panel (For more information on ports please see the port’s section). Often times when connecting to a local connection you will see a similar IP to 10.10.10.XXX or 192.168.100.XXX, which is a quick way to determine if the IP address is local.
Remote IP Connection
Remote IP connections are when you are connecting from one network to another network over a WAN (Wide area network), this is most often the internet. This can sometimes be difficult depending on restrictions that could be put into place with firewalls/routers/antivirus that are put into place for security reasons. Because of this many times ports will be blocked and need to be opened in order to communicate from the DLS software to the IP communicator/Panel. For more information regarding ports please see the port’s section.
Ports
If you encounter a trouble were DLS states it could not connect to the panel there could be a router/firewall or antivirus program that is blocking a port not allowing you to reach the communicator. This most often occurs when connecting to a panel remotely but can also happen when trying to connect to a panel locally. In situations like this we would want to confirm on the network that port 3062 is open for the IP address that you are trying to connect to. Also if you are trying to connect remotely it is recommended to have any firewalls/routers to forward that port to the internal IP address that the IP communicator is assigned. If you are unfamiliar with how to do so you can contact the manufacture or the router/firewall, contact an IT professional or go to www.portforward.com
Connecting to a Panel
After creating the account or adding T-Link to the account you would then be able to connect to the panel. To do so you would want to open the account and do your regular connection options (Global Upload/Global Download/Communicate Tags/Connect Only) and when the new window opens instead of picking PC-Link for the connection type you would want to drop down the menu and pick IP for both the IP communicator as well as for the panel. For more information on connection options please view the wiki page on Connection Options.
To view that status of your connection jobs or to see if the software had a trouble condition when trying to connect you can click on view and then communication jobs. This will display the status of the jobs on your system and if any are showing up in red you can view what trouble the software had under the activity log. For more information on the communication job window please visit the Communication Job page.
Troubleshooting
Could not connect to [IP address]: This error is caused by DLS not being able to contact the provided IP address. Ensure that the IP address is correct and that all connections are secure. Make sure there are no firewalls blocking the communications to/from DLS 5.
DLS lockout is active due to too many invalid attempts: This indicates that the installer code of the communicator used to connect to the panel is not correct and DLS is in lockout mode for one hour. Confirm the downloading access code that you are using is correct for the panel. If you wish to restart this lock out you can power cycle the panel, or kick starting the communicator through the Connect 24 website (Save and send changes). The lockout will be trigged after 5 attempts to connect with the wrong downloading access code. If you try less than 5 times then connect successfully the counter is reset.
DLS is not enabled or the DLS window has expired: This indicates that DLS is not enabled on the panel for the specific connection type you are using. For example on a Power Series alarm panel, ensure answering machine override/double call is enabled, and for an Alexor PC9155 or Impassa SCW9057, ensure the DLS over alternate communicator option is enabled.
Connection Broken before Completion: This error is caused by the panel or modem being disconnected from the phone line while DLS 5 is in the process of communicating via the PSTN communications, or by a noisy/weak phone line connection. This may also be caused by disconnecting the serial cable when communicating using PC-Link. Make sure all connections are secure.
The [panel type] you are attempting to connect to is not compatible with this version of DLS 5: This error will occur if you connect to a panel which does not match the current panel type of the account, and DLS 5 is unable to identify the panel to automatically update it.
The panel type [panel type] in the account did not match the panel type [panel type] in the field: This means that the panel DLS V is attempting to connect to does not match the panel type of panel you have created in the account.
Module auto detect found unsupported [module type]: This error will occur when DLS 5 has done a module auto-detect and has found a module which it does not recognize. While there may be some modules at various times which are not supported by DLS 5, keeping your software up to date is the best way to avoid receiving messages like this.
Panel could not be identified: This error occurs when the DLS 5 software is unable to determine the panel type and version which it is connected to. This can often be caused when connecting by PSTN by either a noisy telephone line or something else (such as a fax machine) answering the line instead of the alarm panel. Ensure the telephone line is free of noise and is not a DSL line. Unplug any fax machines or computers which may be answering before the panel.
The communicator is currently busy, please try again later: The communicator is currently completing another task.
Timed out waiting for response: The DLS software did not receive a response from the panel or communicator in the specified amount of time.
Bad access code: This means that the downloading access code which is programmed into the panel, does not match what you have entered in the DLS account. Please ensure DLS 5 and the control panel both have the same downloading access code programmed.
The modem manager is not responding: This error denotes that the DLS 5 cannot communicate with the MCPH service. Ensure that the MCPH service is running.
The panel did not answer: This error is caused by trying to connect to a panel through any of the connection types, and the panel not responding. This could be caused by DLS being disabled on the panel, a problem with the connection method, or in the case of a T-Link Module this could mean an incorrect encryption key.
DLS connection refused because the panel is busy or the downloading access code is locked out: This error indicates that the downloading access code is not correct and DLS is in lockout mode for 1 hour.
