Communication Tutorial - PC-Link
The PC-Link connection method is a way of directly connecting to the panel using a physical cable (available through your distributor) from the panel’s 4 pin PC-Link header directly on board to a serial port on your computer or by using a USB-to-Serial adapter (Recommended model: Keyspan USA19HS). This connection will allow you to communicate to the panel so that you are able to send programming to it, retrieve programming from it or be able to view or perform certain functions on the panel.
Contents
Creating an account for a PC-Link Connection
When creating an account in DLS you will be unable to select PC-Link as a connection type through the drop down menu in the new account creation window. This is because all accounts with have it as an available connection option to the panel and cannot be deleted as well. In the case that it will be the only form of connection to the panel you would want to choose none for the connection type. However with you also wish to communicate to the panel using a PSTN (Phone Line), GSM or a T-Link connection you would select the appropriate information for that type and make sure the needed information is added (Please see the appropriate communication tutorial for more information on adding that means of communication).
Only PC-Link:
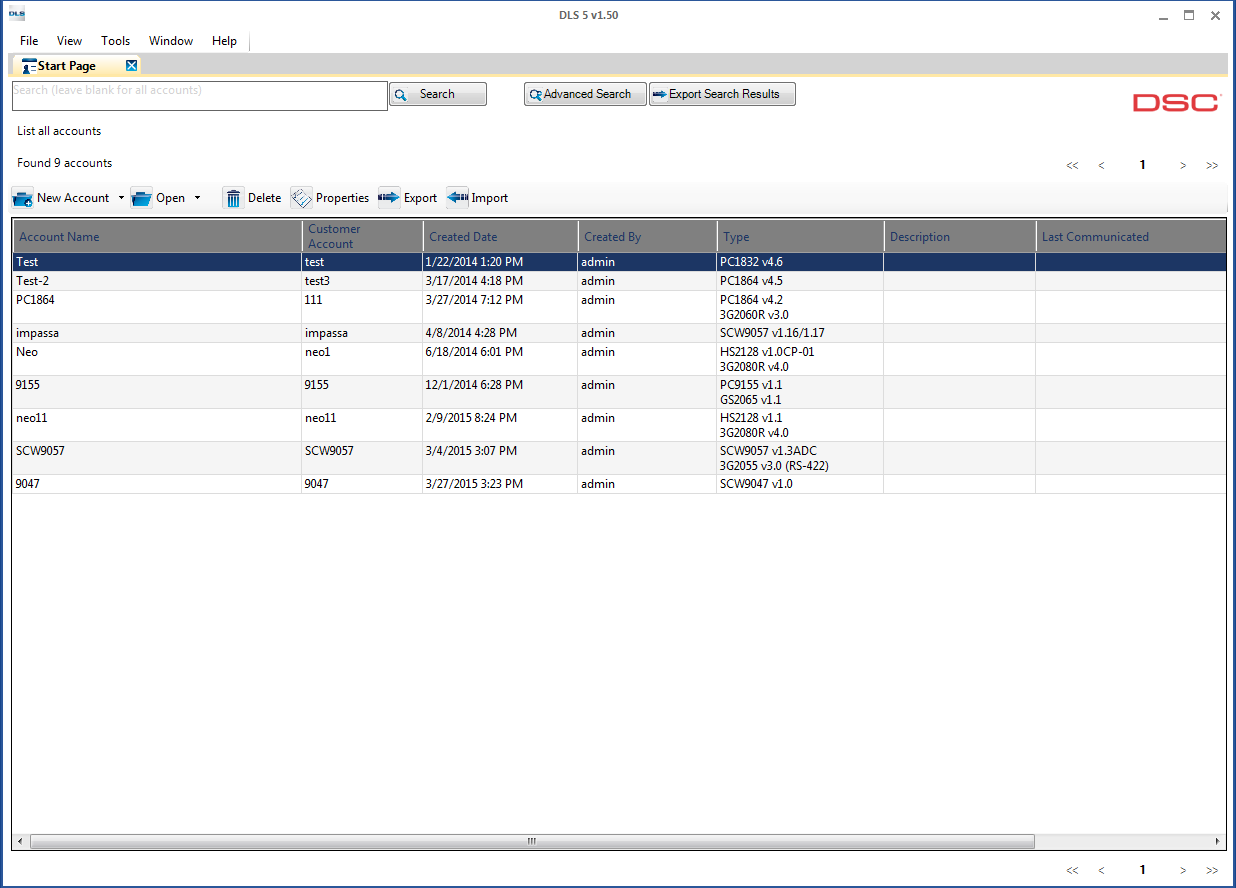
When using only a PC-Link connection to connect to the panel you would want to start off by creating the account. To do so we would want the DLS software open and be viewing the main start page
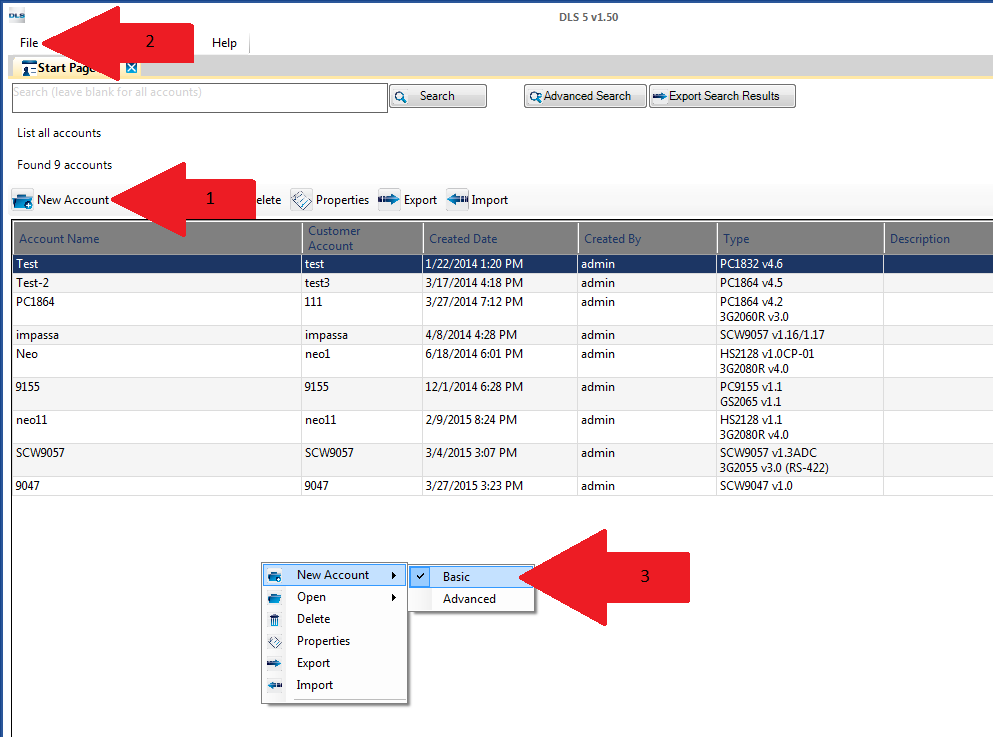
From here we can click on the New Account button (1), go from the File menu and select New Account (2), or right click within the Start Page and select New Account (3). If you do select the last option it is recommended to click basic following that.
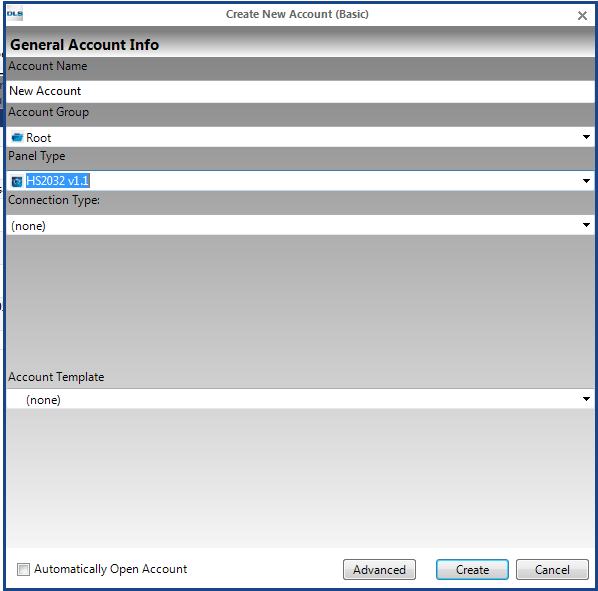
After selecting the desired method to create the account a new window will appear labelled “Create New Account (Basic)”.
In this new window we can then enter the Account Name, chose the Account Group, select the panel type and the connection type. Since this account we are creating is for PC-Link only you would wanted to select (none) and the default value of having a PC-Link connection is automatically added to the account. You can then click on Create and this account will populate within the main Start Page in DLS. If you do have enabled Automatically Open Account when creating the account it will open right away after clicking Create.
PC-Link with a PSTN connection:
When using only a PC-Link connection to connect to the panel you would want to start off by creating the account. To do so we would want the DLS software open and be viewing the main start page
From here we can click on the New Account button (1), go from the File menu and select New Account (2), or right click within the Start Page and select New Account (3). If you do select the last option it is recommended to click basic following that.
After selecting the desired method to create the account a new window will appear labelled “Create New Account (Basic)”.
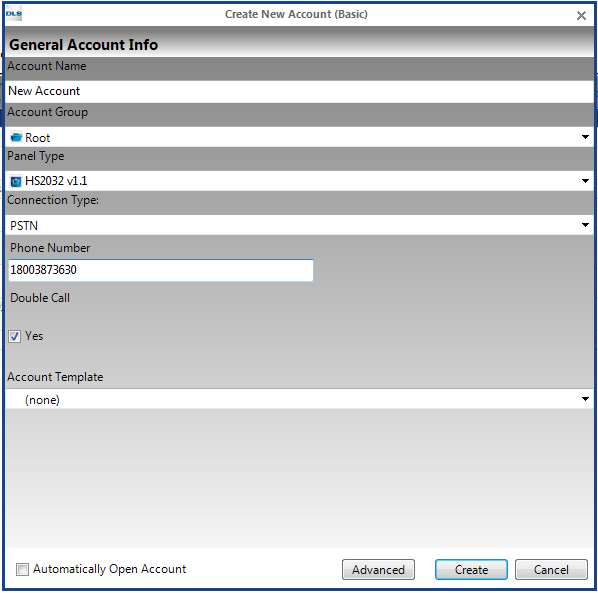
In this new window we can then enter the Account Name, chose the Account Group, select the panel type and the connection type. From here we can then use the drop down menu and select the desired other option form of communication. In this example we are showing PSTN, and as you can see after we have chosen PSTN as a connection type the software is also asking for us to program in the telephone number that we would want to call to connect to panel. For more information on programming other forms of communication please refer to the appropriate communication tutorial. After entering the required information we can then click the Create button and this account will populate within the main Start Page in DLS. If you do have enabled Automatically Open Account when creating the account it will open right away after clicking Create.
Configuring DLS for a PC-Link Connection:
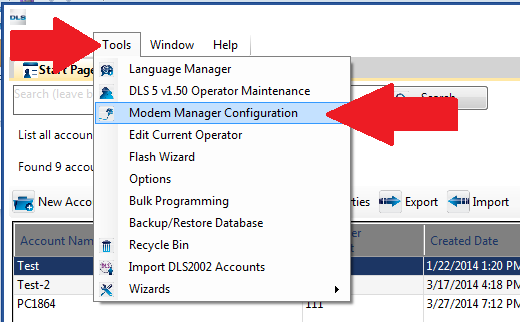
After the account is created one of the main requirements for connecting over PC-Link is making sure that Com Port is selected properly. To confirm this information you would want to click on the tools and go to Modem Manager Configuration
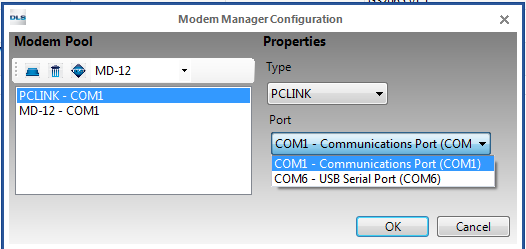
With the Modem Manager Configuration window open you would want to select the PC-Link option on the right hand side of within the white box. Once selected it will show the current Com Port assigned in the drop down menu below Port. If you have multiple Com Ports on your computer it is at this time you would want to use this drop down menu to select the correct Com Port if not already done so.
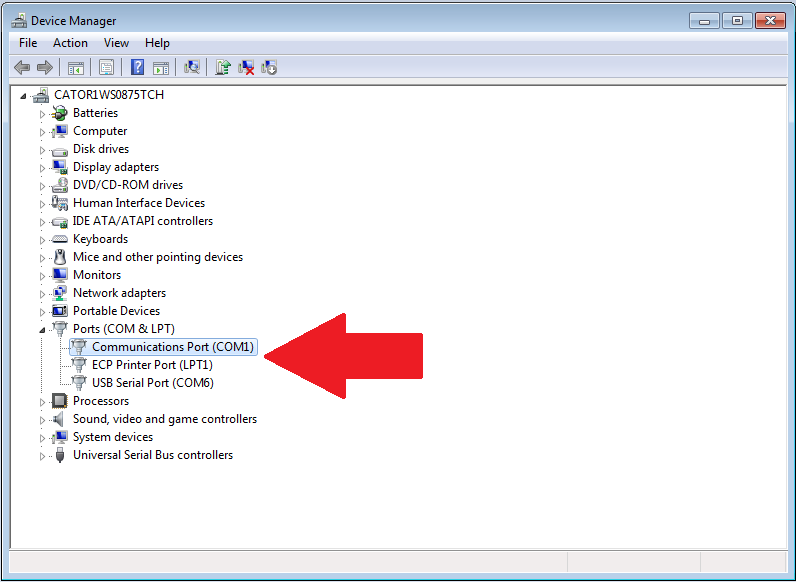
If you do not know what Com Port you are using and have multiple on the system you would want to use the “Device Manager” within Windows to view what Ports are available and to figure out which one needs to be selected in DLS. Once you have this information you would want to go back into DLS and choose the appropriate port and close the Modem Manager Configuration window. For more information on connection options please view the wiki page on Device Manager
Once you have everything setup correctly in DLS you can then try to connect to the panel after opening the account. You can try to connect in a few different ways being Connect Only/Global Upload/Global Download/Communicate Tags. For more information on connection options please view the wiki page on Connection Options.
Please note: Some panels require you to prepare for a PC-Link connection by going through programming (Ex. In programming you would enter section 499, enter the installer’s code, and then enter 499 again). For more information regarding this please refer back to the installation manual for your panel. Please note: When connecting the PC-Link cable you would want to ensure that the PCB board of the PC-Link connection is on the lower side towards the terminal strip of the panel and the cable jack is the furthest away. For more information on how to connect the PC-Link connection please refer to the panel’s installation manual.
Viewing the Connection Process
To view that status of your connection jobs or to see if the software had a trouble condition when trying to connect you can click on view and then communication jobs. This will display the status of the jobs on your system and if any are showing up in red you can view what trouble the software had under the activity log. For more information on the communication job window please visit the Communication Jobs page.
Troubleshooting
The [panel type] you are attempting to connect to is not compatible with this version of DLS 5: This error will occur if you connect to a panel which does not match the current panel type of the account, and DLS 5 is unable to identify the panel to automatically update it. When you see this error you would want to confirm the model number as well as the version of the panel. You can also make sure that DLS software is completely up to date to support the most recent panels.
The panel type [panel type] in the account did not match the panel type [panel type] in the field: This means that the panel DLS 5 is attempting to connect to does not match the panel type of panel you have created in the account for. Confirm the panel and version number that you are trying to connect to. The software will also prompt you to convert the account to the panel/version that it is identifying. If you wish to covert the account follow the prompts within the software.
Module auto detect found unsupported [module type]: This error will occur when DLS 5 has done a module auto-detect and has found a module which it does not recognize. While there may be some modules at various times which are not supported by DLS 5, keeping your software up to date is the best way to avoid receiving a message like this.
Bad access code: This means that the downloading access code which is programmed into the panel, does not match what you have entered in the DLS account. Confirm the downloading access code that is programmed in the panel as well as the DLS software.
The modem manager is not responding: This error denotes that the DLS 5 cannot communicate with the MCPH service. Ensure that the MCPH service is running and if it is not then restart it.
DLS connection refused because the panel is busy or the downloading access code is locked out: This error indicates that the downloading access code is not correct and DLS is in lockout mode for 1 hour. The lockout will be trigged after 5 attempts to connect with the wrong downloading access code. If you try less than 5 times then connect successfully the counter is reset.
The modem manager 127.0.0.1:51004 is not responding: This error is caused by trying to communicate with a panel while the MCPH service is stopped. Restart the MCPH service, ensure that it is running and try again.
Timed out waiting for response: The DLS software did not receive a response from the panel or a communicator in a specified amount of time. For this trouble you would need to check the following:
- Make sure the PC-Link cable is connected properly
- Make sure that you have prepped the panel for the PC-Link connection (If required)
- The DLS has the correct Com Port Selected
- Lower the baud rate on the Com Port to 300
- If using a USB to Serial adapter make sure it’s a compatible adapter (Model: Keyspan USA19HS or the one that comes in the PC-Link kit). If not using a compatible USB to Serial adapter change it to a compatible model and retest communication
- If the panel has an alternative communicator connected it may need to be disabled in programming depending on the model number of the panel. Check the installation manual of the panel for more information.
- Power cycle the panel and retest the connection
- Reboot the computer and retest the connection
- Make sure there are no conflicts on that Com Port
- Change the Com Port to a different Com Port number on the computer
